Dancing with the Elephants and Flying With The Bees – Apache Hive Performance Tuning

hive_thumb

Tuning Hive and other Apache components that run in the background to support processing of HiveQL is particularly important as the scale of your workload and database volume increases. When your applications query data sets that constitute a large-scale enterprise data warehouse (EDW), tuning the environment and optimizing Hive queries are often part of an ongoing effort of your team.

Increasingly, most enterprises require that Hive queries run against the data warehouse
with low-latency analytical processing, which is often referred to as LLAP by Hortonworks. LLAP of real-time data can be further enhanced by integrating the EDW with the Druid business intelligence engine.

Hive2 Architecture and Internals.

Before we begin, I am assuming you are running Hive on Tez execution engine. Hive LLAP with Apache Tez utilizes newer technology available in Hive 2.x to be
an increasingly needed alternative to other execution engines like MapReduce
and earlier implementations of Hive on Tez. Tez runs in conjunction with Hive
LLAP to form a newer execution engine architecture that can support faster
queries.

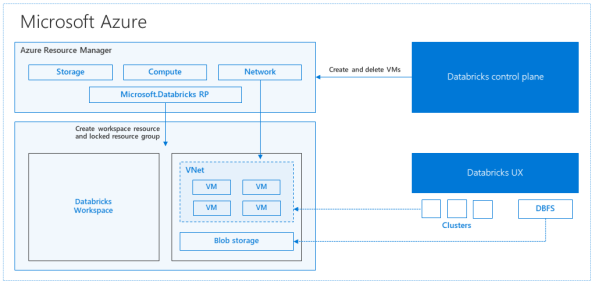
The architecture og Hive2 is shown below:

hive2

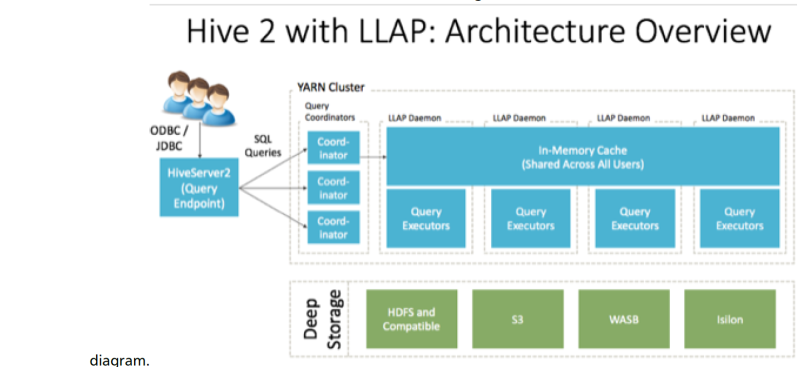
  • HiveServer2: provides JDBC and ODBC interface, and query compilation
  • Query coordinators: coordinate the execution of a single query LLAP daemon: persistent server, typically one per node. This is the main differentiating component of thearchitecture, which enables faster query runtimes than earlier execution engines.
  • Query executors: threads running inside the LLAP daemon
  • In-memory cache: cache inside the LLAP daemon that is shared across all users

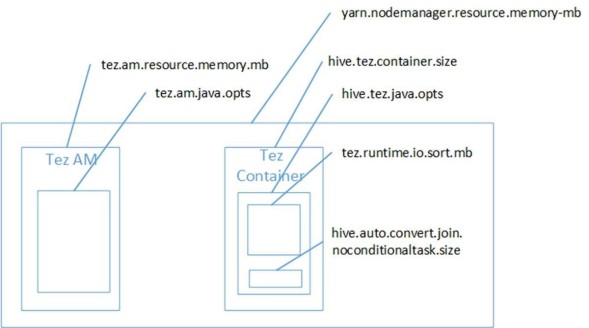
Tuning Hive cluster memory

After spending some time hearing from customers about slow running Hive queries or worst yet heap issues precluding successful query execution and doing some research I learned about some important tuning parameters that may be useful for folks supporting Hive workloads.  Some of these I will get into below.

To maximize performance of your Apache Hive query workloads, you need to optimize cluster configurations, queries, and underlying Hive table
design. This includes the following:

  • Configure CDH clusters for the maximum allowed heap memory size, load-balance concurrent connections across your CDH Hive
    components, and allocate adequate memory to support HiveServer2 and Hive metastore operations.
  • Review your Hive query workloads to make sure queries are not overly complex, that they do not access large numbers of Hive table partitions,
    or that they force the system to materialize all columns of accessed Hive tables when only a subset is necessary.
  • Review the underlying Hive table design, which is crucial to maximizing the throughput of Hive query workloads. Do not create thousands of
    table partitions that might cause queries containing JOINs to overtax HiveServer2 and the Hive metastore. Limit column width, and keep the
    number of columns under 1,000.

Memory Recommendations. 

HiveServer2 and the Hive metastore require sufficient memory to run correctly. The default heap size of 256 MB for each component is
inadequate for production workloads. Consider the following guidelines for sizing the heap for each component, based on your cluster size.

table

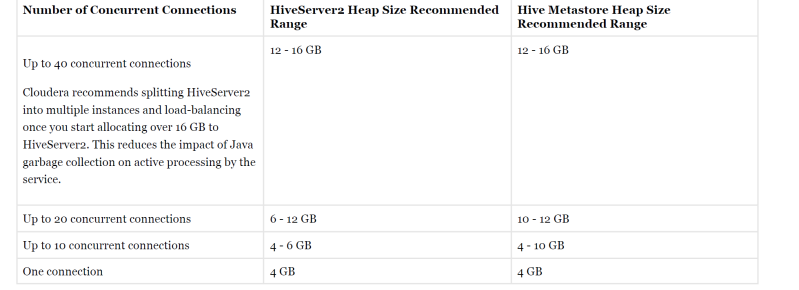
Important: These numbers are general guidance only, and can be affected by factors such as number of columns, partitions, complex joins, and
client activity. Based on your anticipated deployment, refine through testing to arrive at the best values for your environment.
In addition, the Beeline CLI should use a heap size of at least 2 GB.
Set the PermGen space for Java garbage collection to 512 MB for all.

Configuring Heap Size and GC

You can use Cloudera Manager to configure Heap Size and GC for HiveServer2

    • To set heap size, go to Home > Hive > Configuration > HiveServer2 > Resource Management. Set Java Heap Size of HiveServer2 in Bytes to the desired value, and click Save Changes.
    • To set garbage collection, go to Home > Hive > Configuration > HiveServer2 > Advanced. Set the PermGen space for Java garbage collection to 512M , the type of garbage collector used ( ConcMarkSweepGC or ParNewGC ), and enable
      or disable the garbage collection overhead limit in Java Configuration Options for HiveServer2. The following example sets the PermGen space to 512M , uses the new Parallel Collector, and disables the garbage collection overhead limit:
      -XX:MaxPermSize=512M -XX:+UseParNewGC -XX:-UseGCOverheadLimit
    • Once you made any changes to Heap and GC you will need to restart. From the Actions drop-down menu, select Restart to restart the HiveServer2 service

Similarly you can set up Heap Size and GC for Hive Metastore with the similar parameters using Cloudera Manager by going tp Home > Hive > Configuration > Hive Metastore > Resource Management.

If you are not using Cloudera Manager or on the HDInsight you can configure the heap size for HiveServer2 and Hive metastore in command line by setting the -Xmx parameter in the HADOOP_OPTS variable to the desired maximum heap size in /etc/hive/hive-env.sh .

The following example shows a configuration with HiveServer2 using 12 GB heap,  Hive Metastore using 12 GB heap,  Hive clients use 2 GB heap:


if [ "$SERVICE" = "cli" ]; then
if [ -z "$DEBUG" ]; then
export HADOOP_OPTS="$HADOOP_OPTS -XX:NewRatio=12 -Xmx12288m -Xms12288m
-XX:MaxHeapFreeRatio=40 -XX:MinHeapFreeRatio=15 -XX:+UseParNewGC -XX:-
UseGCOverheadLimit"
else
export HADOOP_OPTS="$HADOOP_OPTS -XX:NewRatio=12 -Xmx12288m -Xms12288m
-XX:MaxHeapFreeRatio=40 -XX:MinHeapFreeRatio=15 -XX:-UseGCOverheadLimit"
fi
fi
export HADOOP_HEAPSIZE=2048

You can use either the Concurrent Collector or the new Parallel Collector for garbage collection by passing -XX:+useConcMarkSweepGC or –XX:+useParNewGC in the HADOOP_OPTS lines above. To enable the garbage collection overhead limit, remove the -XX:-UseGCOverheadLimit setting or change it to -XX:+UseGCOverheadLimit .

For more on latest docs on tuning memory and troubleshootng heap\GC exceptions in Hive see Cloudera docs https://docs.cloudera.com/documentation/enterprise/latest/topics/admin_hive_tuning.html or for HDInsight see this great MS docs with configurations – https://docs.microsoft.com/en-us/azure/hdinsight/interactive-query/hive-llap-sizing-guide

The Dead Philosophers Club – Streaming Data from SQL Server to Azure via Debezium and Apache Kafka

debezium-1

Debezium is a set of open source distributed services to capture changes in your databases so that your applications can see those changes and respond to them. Debezium records all row-level changes within each database table in a change event stream, and applications simply read these streams to see the change events in the same order in which they occurred.

I first came across usefullness of Debezium and Kafka as change streaming platform\mechanism from SQL Server to Azure based on excellent blog posting from SQL Azure PM Davide Mauri I follow in Medium – https://medium.com/@mauridb/sql-server-change-stream-b204c0892641. At that time I was looking for a way to stream Change Data Capture Changes out of SQL Server to Azure Data Lake for number of customers and after reading Davide’s post decided to take a look deeper. Kafka integration (also can be done with Azure Event Hub Kafka message head – https://docs.microsoft.com/en-us/azure/event-hubs/event-hubs-create and https://docs.microsoft.com/en-us/azure/event-hubs/event-hubs-kafka-connect-tutorial)  allows you to also stream changes to Azure Databricks via Spark Kafka broker for further processing via Spark Streaming:

spark-streaming-datanami

So this opens a lot of opportunities for near real-time data processing of changes from SQL Server without using transactional replication or Service Broker features.

Most commonly, Debezium is deployed via Apache Kafka Connect. Kafka Connect is a framework and runtime for implementing and operating:

  1. source connectors such as Debezium, which ingest data into Kafka and
  2. sink connectors, which propagate data from Kafka topics into other systems.


debezium-architecture

Typical Debezium CDC architecture is shown above with data landing in various sinks like Elastic, Infiniscan or another DB.

Back to Debezium\Kafka setup with SQL Server. How would we set this up based on my last post where I have setup Confluent Cloud Kafka?

Debezium will work with SQL Server Change Data Capture. SQL Server needs to be configured for CDC at a database level. Assuming we have database named demo in our source SQL Server:

USE [demo]
GO
EXEC sys.sp_cdc_enable_db
GO 

Now lets do it on table level. Assuming we have a table in demo database called orders in that database:

USE [demo]

EXEC sys.sp_cdc_enable_table
@source_schema = N'dbo',
@source_name   = N'ORDERS',
@role_name     = NULL,
@supports_net_changes = 0
GO 

Verify that user has access to CDC table:

EXEC sys.sp_cdc_help_change_data_capture
GO

If results are empty, make sure that the user has privileges to access both the capture instance and CDC tables.

Once that’s done you can setup the connector. To do so you will need confluent-hub installed.  I went through following:

  1. Assuming you already setup Confluent Cloud in Azure as I already blogged about in my last post 
  2. Setup Kafka Connect as explained here – https://docs.confluent.io/current/cloud/connect/connect-cloud-config.html
  3. Download and install confluent-hub client from – https://docs.confluent.io/current/connect/managing/confluent-hub/client.html .Shocker for me personally was lack of Windows support, looks like client is only available for MacOS and Linux. Had to use my spare old Mac Book.
  4. Use client to install Debezium SQL Server connector in your Kafka Connect worker.
  5. Restart worker.
confluent-hub install --no-prompt debezium/debezium-connector-sqlserver:0.10.0

Now, check that plugin  has been loaded successfully:

$ curl -s localhost:8083/connector-plugins|jq '.[].class'|grep debezium
"io.debezium.connector.sqlserver.SqlServerConnector"

Debezium will write to a topic with all of the data from SQL Server. Debezium also needs its own topic for tracking the DDL—and we need to pre-create both these topics:

$ ccloud kafka topic create --partitions 1 dbz_dbhistory.mssql.asgard-01
$ ccloud kafka topic create mssql-01-mssql.dbo.ORDERS
$ ccloud kafka topic list

Now create the connector. It’s a bit more verbose because we’re using a secure Kafka cluster and Debezium needs the details passed directly to it:

curl -i -X PUT -H  "Content-Type:application/json" \
    http://localhost:8083/connectors/source-debezium-mssql-01/config \
    -d '{
    "connector.class": "io.debezium.connector.sqlserver.SqlServerConnector", 
    "database.hostname": "mssql",
    "database.port": "1433",
    "database.user": "sa",
    "database.password": "Admin123",
    "database.dbname": "demo",
    "database.server.name": "mssql",
    "table.whitelist":"dbo.orders",
    "database.history.kafka.bootstrap.servers": "${file:/data/credentials.properties:CCLOUD_BROKER_HOST}:9092",
    "database.history.kafka.topic": "dbz_dbhistory.mssql.asgard-01",
    "database.history.consumer.security.protocol": "SASL_SSL",
    "database.history.consumer.ssl.endpoint.identification.algorithm": "https",
    "database.history.consumer.sasl.mechanism": "PLAIN",
    "database.history.consumer.sasl.jaas.config": "org.apache.kafka.common.security.plain.PlainLoginModule required username=\"${file:/data/credentials.properties:CCLOUD_API_KEY}\" password=\"${file:/data/credentials.properties:CCLOUD_API_SECRET}\";",
    "database.history.producer.security.protocol": "SASL_SSL",
    "database.history.producer.ssl.endpoint.identification.algorithm": "https",
    "database.history.producer.sasl.mechanism": "PLAIN",
    "database.history.producer.sasl.jaas.config": "org.apache.kafka.common.security.plain.PlainLoginModule required username=\"${file:/data/credentials.properties:CCLOUD_API_KEY}\" password=\"${file:/data/credentials.properties:CCLOUD_API_SECRET}\";",
    "decimal.handling.mode":"double",
    "transforms": "unwrap,addTopicPrefix",
    "transforms.unwrap.type": "io.debezium.transforms.ExtractNewRecordState",
    "transforms.addTopicPrefix.type":"org.apache.kafka.connect.transforms.RegexRouter",
    "transforms.addTopicPrefix.regex":"(.*)",
    "transforms.addTopicPrefix.replacement":"mssql-01-$1"
    }'

Now that everything is running from SQL Server -> Debezium-> Confluent Kafka we can now consume it from Kafka as illustrated here – https://forums.databricks.com/questions/27062/how-connect-confluent-cloud-and-databricks.html

Rest is up to you, what do you want to do with data or where to land it.

More information is here:

https://debezium.io/documentation/reference/connectors/sqlserver.html

https://docs.confluent.io/current/connect/debezium-connect-sqlserver/index.html

https://docs.confluent.io/current/connect/managing/confluent-hub/client.html

https://docs.confluent.io/current/quickstart/cloud-quickstart/index.html#cloud-quickstart

Good tutorial on using Kafka endpoints in Event Hub with Debezium Docker from Davide Mauri – https://github.com/yorek/debezium-sql-change-stream 

And Apache Kafka with Spark – https://azure.microsoft.com/en-us/resources/videos/build-2018-real-time-data-streams-with-apache-kafka-and-spark/

Hope this was interesting to some of you at least.

The Dead Philosophers Club – Starting Out with Apache Kafka

apache-kafka

Apache Kafka is a distributed publish-subscribe messaging system and a robust queue that can handle a high volume of data and enables you to pass messages from one end-point to another. Kafka is suitable for both offline and online message consumption. Kafka messages are persisted on the disk and replicated within the cluster to prevent data loss. Kafka is built on top of the ZooKeeper cluster syncronization service. It integrates very well with Apache Storm and Spark for real-time streaming data analysis.

Kafka was developed at LinkedIn back in 2010, and it currently handles more than 1.4 trillion messages per day across over 1400 brokers.

kafka

As with typical pub sub messaging system you have to understand following terms to work with Kafka architecture:

  • Producer – Producers are the publisher of messages to one or more Kafka topics. Producers send data to Kafka brokers,  which get appended to a partiotion.
  • Consumer – Consumers read data from brokers. Consumers subscribes to one or more topics and consume published messages by pulling data from the brokers.
  • Topic – A stream of messages belonging to a particular category is called a topic. Data is stored in topics. Topics can be divided into partiotions. For each topic, Kafka keeps a mini-mum of one partition. Each such partition contains messages in an immutable ordered sequence. A partition is implemented as a set of segment files of equal sizes.
  •  Broker – Brokers are simple system responsible for maintaining the pub-lished data. Each broker may have zero or more partitions per topic. Assuming for example there are one partiotions in a topic and one topic , each broker will have one partition.
  •  Kafka Cluster. For High Availability (HA), Kafka’s can have more than one broker , therefore forming  Kafka cluster. A Kafka cluster can be expanded without downtime. These clusters are used to manage the persistence and replication of message data.
  • Leader. Leader is a the node responsible for all reads and writes for the given partition. Every partition has one server acting as a leader.
  • Follower is a node which follows leader instructions. If the leader fails, one of the follower will automatically become the new leader. A follower acts as normal consumer, pulls messages and up-dates its own data store.

Another great architecture that shows Kafka messaging in action from Data Flair tutorial – https://data-flair.training/blogs/kafka-architecture/

Kafka-topics-and-partitions-relationship

Because Kafka is designed for broker scalability and performance, producers (rather than brokers) are responsible for choosing which partition each message is sent to.  The default partition is determined by a hashing function on the message key, or round-robin in the absence of a key. However, this may not always provide the desired behaviour (e.g. message ordering, fair distribution of messages to consumers, etc). Producers can therefore send messages to specific partitions – through the use of a custom partitioner, or by using manual or hashing options available with the default partitioner.

A fundamental explanation of Kafka’s inner workings goes as follows: Every topic is associated with one or more partitions, which are spread over one or more brokers. Every partition gets replicated to those one or more brokers depending on the replication factor that is set. The replication factor is then responsible for determining the reliability, while the number of partitions is responsible for the parallelism for consumers. A partition is associated with only a single consumer instance per consumer group. Since the total consumer instances per group is less than – or the same as – the number of partitions, adding support for extra consumer instances requires that more partitions be added as well, but ensures read scalability.

Consumers label themselves with a consumer group name, and each record published to a topic is delivered to one consumer instance within each subscribing consumer group. Consumer instances can be in separate processes or on separate machines.

If all the consumer instances have the same consumer group, then the records will effectively be load balanced over the consumer instances. If all the consumer instances have different consumer groups, then each record will be broadcast to all the consumer processes.

consumer-groups

Kafka works well as a replacement for a traditional message broker. Message brokers are used for a variety of reasons (to decouple processing from data producers, to buffer unprocessed messages, etc).  This where it competes with well known brokers like Azure Service Bus, Google Pub Sub, Azure Event Hub, Rabbit MQ, etc.

Many users of Kafka process data in processing pipelines consisting of multiple stages, where raw input data is consumed from Kafka topics and then aggregated, enriched, or otherwise transformed into new topics for further consumption or follow-up processing. That can be a part of Kappa Big Data architecturehttp://milinda.pathirage.org/kappa-architecture.com/ . Starting in 0.10.0.0, a light-weight but powerful stream processing library called Kafka Streams is available in Apache Kafka to perform such data processing as described above. Apart from Kafka Streams, alternative open source stream processing tools include Apache Storm and Apache Samza, as well as very popular Apache Spark Streaming.  This is probably most interesting use to me personally and one In explore in next few blog articles I am planning showcasing Kafka as part of such architectures.  With this case scenario, I will explore enterprise data management features like Kafka Connect, Apache Kafka’s data integration tools and the Schema Registry, schema management service from Confluent. Generically it looks like following:

ETL_IMAGE-1024x541

Now I will show you how to quickly create test Kafka cluster and topic using Confluent cloud platform.  Confluent is a company founded by former LinkedIn team that created Kafka and even through you can use Apache Kafka as open source it adds number of additional features and significant enhancements to the OSS product.  I will create Confluent on MS Azure signing up for trial here – https://www.confluent.io/confluent-cloud/compare/ .

Confluent adds a lot more features on top of Apache Kafka core, and even through I dont need these features for this post, it also allows me to create Kafka cluster without allocating hardware, installing Linux, unpacking and installing libraries, etc. As a matter of fact most of the enterprise customers that I worked with recently that picked Kafka have picked either Confluent or Azure HDInsight PaaS platforms to run it to cut out operational complexity of running it bare metal or on VM.

Once I am signed up for the cloud platform I can see this screen

confluent1

Now I can just click Create Cluster.

I will pick cluster name and region in Azure. Note I picked Single Zone as I have no HADR requirement for my test and attempting to lower my costs. Obviously that will lead to lower SLA guarantees.

confluent2

After entering billing information in couple of seconds I have a real Kafka cluster ready to go.

confluent3

After you have a working Kafka cluster in Confluent Cloud, you can use the Confluent Cloud CLI to interact with your cluster from your local computer. For example you can produce and consume to your topic using the Confluent Cloud CLI. You can get installers for CLI for various OS platforms here – https://docs.confluent.io/current/quickstart/cloud-quickstart/index.html#tarball-installation

First, you need to login from CLI client after install.

ccloud login

After you should see following prompt:

cili1

Next, I can view my cluster:

ccloud kafka cluster list

You will see following response:

cli2

If we have multiple clusters, before we do anything we should set active one:

ccloud kafka cluster use lkc-r50gp

After this I can create topic named test

ccloud kafka topic create test

And now I can query for it:

ccloud kafka topic list

Result is following

cii3

So within few minutes I have explained to you concepts of Apache Kafka, created Kafka cluster and even ready to consume topic on Confluent in Azure. Next, we will do something more interesting with it like streaming data from SQL Server and will also look at setting up Kafka on Azure HDInsight PaaS as well.


More on Apache Kafka – https://blog.newrelic.com/engineering/kafka-best-practices/, https://kafka.apache.org/intro, https://www.infoq.com/articles/apache-kafka/, https://www.cloudkarafka.com/blog/2016-11-30-part1-kafka-for-beginners-what-is-apache-kafka.html

Hope this helps.


Alienus Terrae- Running Simple Kubernetes Cluster on Google Cloud

google-cloud-platform_w_500

Did you know that you can create a basic managed Kubernetes Cluster (GKE) on GCP in code in less than 20 minutes?

You will of course new few prerequisites:

  • GCP account
  • Google Cloud SDK installed. The Cloud SDK is a set of command-line tools for developing with Google Cloud. You can use these tools to access Compute Engine, Cloud Storage, BigQuery, and other Google Cloud services directly from the command line. The download and install directions can be fount at https://cloud.google.com/sdk/install
  • Decide what kind of cluster you want to create. I will create a very simple single zone cluster in my example, but you may want to go more sophisticated with multi-zonal or regional cluster. For more details see – https://cloud.google.com/kubernetes-engine/docs/concepts/types-of-clusters
  • Enable GCP Kubernetes Engine API.

Once you are done with prerequisites, next start up you GCP Cloud SDK command line.  Then you need to initialize your SDK with this command:

 gcloud init

This does some checks and prompts you if you wish to login to GCP. If you proceed , it will open browser window to authenticate you, following that your browser is redirected to screen like this:

gcp2

Next, quickly setup your default project using Project Id, I am using my id, yours will be different:

gcloud config set project gennadyk1-221817

Now you should get response like this acknowledging you set default project:

gcp3

Now update GCP SDK components to latest version:

gcloud components update

You will see some scrolling command line magic , agree to continue after a bit will get confirmation that you are updated.

Next I will create cluster using gcloud beta command like:

gcloud beta container clusters create gennadyk

Now navigating to GCP Console Kubernetes Engine one can see cluster created:

gcp_cluster

You can see confirmation in SDK command line as well:

gcp4

So as you can see I created a GCP GKE Kubernetes cluster using one line command in 5 minutes. Pretty cool isnt it?

For more on GCP SDK see – https://medium.com/mindorks/getting-started-with-google-cloud-sdk-40e806c07460, https://cloud.google.com/sdk/docs/

Hope this helps.


Dancing with the Elephants and Flying with the Bees – Troubleshooting Vertex Errors in Hive Interactive\LLAP on Azure HDInsight

hive_thumb

One of my customers running Interactive Hive with HDinsight on Tez ran into a fatal error like:

Code: 2, SQL State: 08S01]  Error while processing statement: FAILED: Execution Error, return code 2 from org.apache.hadoop.hive.ql.exec.tez.TezTask. Vertex failed, vertexName=Map 12, vertexId=vertex_1573064032618_0017_26_18, diagnostics=[Task failed, taskId=task_1573064032618_0017_26_18_000000, diagnostics=[TaskAttempt 0 killed, TaskAttempt 1 killed, TaskAttempt 2 failed, info=[Error: Error while running task ( failure ) : java.lang.RuntimeException: Map operator initialization failed

As customer noted that scaling this cluster doesnt stop the error.Looking deeper at the large error  stack one can see that we actually ran into Java OOM error here:

Caused by: org.apache.hadoop.hive.ql.exec.mapjoin.MapJoinMemoryExhaustionError: Hash table loading exceeded memory limits for input: Map 11 numEntries: 19000000 estimatedMemoryUsage: 2342546972 effectiveThreshold: 2331551914 memoryMonitorInfo: { isLlap: true executorsPerNode: 21 maxExecutorsOverSubscribeMemory: 3 memoryOverSubscriptionFactor: 0.20000000298023224 memoryCheckInterval: 100000 noConditionalTaskSize: 20000000 adjustedNoConditionalTaskSize: 32000000 hashTableInflationFactor: 1.5 threshold: 48000000 }

Cause is as usual Map Join, as its very memory intensive. Map side join is a process where joins between two tables are performed in the Map phase without the involvement of Reduce phase.Map-side Joins allows a table to get loaded into memory ensuring a very fast join operation, performed entirely within a mapper and that too without having to use both map and reduce phases.

mapjoin

Customer scenario appears to ne pretty close to issues with Map Joins and OOM on tez shown here – https://azure.microsoft.com/en-us/blog/hive-memory-settings-resolve-out-of-memory-errors-using-azure-hdinsight/

What is Tez and why Hive on Tez vs. Map Reduce? Tez is a new application framework built on Hadoop Yarn that can execute complex directed acyclic graphs of general data processing tasks. In many ways it can be thought of as a more flexible and powerful successor of the map-reduce framework.
It generalizes map and reduce tasks by exposing interfaces for generic data processing tasks, which consist of a triplet of interfaces: input, output and processor. These tasks are the vertices in the execution graph. Edges (i.e.: data connections between tasks) are first class citizens in Tez and together with the input/output interfaces greatly increase the flexibility of how data is transferred between tasks.

As the de facto standard for SQL-In-Hadoop, Apache Hive is optimal for both batch and interactive queries at petabyte scale. Hive embeds Tez so that it can translate complex SQL statements into highly optimized, purpose-built data processing graphs that strike the right balance between performance, throughput, and scalability. Apache Tez innovations drove many of the Hive performance improvements delivered by the Stinger Initiative.  Tez helps make Hive interactive.

As explained in this blog post, when Tez execution engine is used, the heap space used actually belongs to the Tez container. See the image below describing the Tez container memory.

tez

As the blog post suggests, the following two memory settings define the container memory for the heap: hive.tez.container.size and hive.tez.java.opts. From my experience, the OOM exception does not mean the container size is too small. It means the Java heap size (hive.tez.java.opts) is too small. So whenever you see OOM, you can try to increase “hive.tez.java.opts.” If needed you might have to increase “hive.tez.container.size.” The “java.opts” should be around 80% of “container.size.”

Note, the setting hive.tez.java.opts must always be smaller than hive.tez.container.size. So quick way to fixing the the issue wouldn’t be just scaling up , it would be scaling up RAM , upping container size and keeping 80% to java. Opts. Parameter, otherwise that memory wouldn’t be utilized by tez.

Are there any other ways to work an issue around complex query with lots of memory intensive map joins in Hive on Tez?

Another paramerer that control mapjoin memory utilization is hive.auto.convert.join.noconditionaltask.size. What is it? When hive.auto.convert.join.noconditionaltask=true, if estimated size of small table(s) is smaller than hive.auto.convert.join.noconditionaltask.size(default 10MB),  then common join can convert to map join automatically.  Looks like at least in these docs – https://community.cloudera.com/t5/Community-Articles/Demystify-Apache-Tez-Memory-Tuning-Step-by-Step/ta-p/245279 Cloudera\Hortonworks recommends setting hive.auto.convert.join.noconditionaltask.size  to 1/3 of hive.tez.container.size and setting tez.runtime.unordered.output.buffer.size-mb to 10% of hive.tez.container.size.

Another reason that map joins maybe picked and not work very efficiently with memory is lack of cost based optimization and bad statistics. If you see following running EXPLAIN on the problem query:

“Plan not optimized by CBO due to missing feature [Hint].

Vertex dependency in root stage”

if you see this update statistics:

analyze table t compute statistics;

analyze table t compute statistics for columns;


Hope this will help someone troubleshooting this kind of error with HDInsight Interactive Hive cluster.

For more see – https://community.cloudera.com/t5/Community-Articles/How-to-Analyze-or-Debug-Hive-Queries/ta-p/249281, https://community.cloudera.com/t5/Community-Articles/Map-Join-Memory-Sizing-For-LLAP/ta-p/247462 , https://blogs.msdn.microsoft.com/shanyu/2014/07/31/hadoop-yarn-memory-settings-in-hdinsight/, https://community.cloudera.com/t5/Community-Articles/LLAP-sizing-and-setup/ta-p/247425, https://community.cloudera.com/t5/Community-Articles/Demystify-Apache-Tez-Memory-Tuning-Step-by-Step/ta-p/245279 and https://docs.microsoft.com/en-us/azure/hdinsight/hdinsight-hadoop-optimize-hive-query

Cloud VM Tracing with STrace in Azure Linux VM

maxresdefault

strace is a powerful command line tool for debugging and trouble shooting programs in Unix-like operating systems such as Linux. It captures and records all system calls made by a process and the signals received by the process. As a person that is a huge fan of procmon tool on Windows – https://docs.microsoft.com/en-us/sysinternals/downloads/procmon  , I am pretty excited about strace on Linux

As such this utility can be very useful troubleshooting apps running on Azure Linux VMs as well.  Below I will show you an example of using strace for troubleshooting on Azure Linux VM.

The first thing we will do is to roll out Ubuntu Linux VM in Azure.  You can follow official Microsoft doc here – https://docs.microsoft.com/en-us/azure/virtual-machines/linux/quick-create-portal  or follow parts of my previous nmon on Azure VM tutorial here – https://gennadny.wordpress.com/2015/03/22/using-nmnon-to-monitor-linux-system-performance-on-azure/ .  Afer you done you should have an Azure Unbuntu Linux VM you can SSH into, like mine below:

ubuntustrace1

If you have Windows client , use Putty to SSH into this VM.  Once you connect via SSH lets install utility:

 sudo apt-get install strace

In my case strace is installed already, so I get following output:

straceinstall

Next lets list all of the pids on the machine running:

sudo ps aux

Result is this:

ps

If I wanted to take a look and find PID of particular process, axample mysql, I would run something like:

 ps aux | grep mysqld

pidof command finds the process ids (PIDs) of the named programs. It prints those PIDs on screen. Continuing on example with mysql process:

 sudo pidof mysqld

As stated this prints PID of that process:

pidof

Now we can start strace with the process ID:

sudo strace -Ff -tt -p 22695 2>&1 | tee strace-mysql.log

Now that strace is attached we can see lots of output scrolling by:

straceoutput

Now you can perform whatever action you need to reproduce your issue. After that, you can shut down strace with Ctrl-C.  Now you can look at what were the calls via nano editor:

sudo nano strace-mysql.log

So, as you can see we can install strace on Azure VM, attach it to offending process, repro the issue and collect log for analysis. Happy troubleshooting.

For more on strace see – https://strace.io/, https://www.tecmint.com/strace-commands-for-troubleshooting-and-debugging-linux/, https://www.thegeekstuff.com/2011/11/strace-examples  and https://linoxide.com/linux-command/linux-strace-command-examples/


Cosmonaut in Training – Starting out with Azure Cosmos DB

soviet-space-program-propaganda-poster-5

I cannot state that I am stranger to Azure Cosmos DB and its less famous parent Document DB. Moreover, I already blogged on using .NET with AWS competitor to Document DB called Dynamo DB here.  However, long time passed since then and Cosmos DB has really had a lot of good investment and has really progressed since those days.  Therefore I decided to visit this topic in my blog again.  So, l am on my way to becoming a Cosmonaut, something I never dreamt of when living in my native country.

Azure Cosmos DB, the industry’s first globally-distributed service that enables you to elastically scale throughput and storage across any number of geographical regions while guaranteeing low latency, high availability and consistency – all backed by industry leading, comprehensive SLAs.

Azure Cosmos DB allows you to use key-value, graph, and document data in one service, at global scale and without worrying about schema or index management.

cosmos1

As shown above, Azure Cosmos DB natively supports multiple data models. The core type system of Azure Cosmos DB’s database engine is atom-record-sequence (ARS) based. Atoms consist of a small set of primitive types e.g. string, bool, number etc., records are structs and sequences are arrays consisting of atoms, records or sequences. The database engine of Azure Cosmos DB is capable of efficiently translating and projecting the data models onto the ARS based data model. The core data model of Azure Cosmos DB is natively accessible from dynamically typed programming languages and can be exposed as-is using JSON or other similar representations. The design also enables natively supporting popular database APIs for data access and query. Azure Cosmos DB’s database engine currently supports DocumentDB SQL, MongoDB, Azure Table Storage, and Gremlin graph query API. We intend to extend it to support other popular database APIs as well. The key benefit is that developers can continue to build their applications using popular OSS APIs but get all the benefits of a battle-tested and fully managed, globally distributed database system.

Developers can start using Azure Cosmos DB by provisioning a database account using their Azure subscription. A database account manages one or more databases. An Azure Cosmos DB database in-turn manages users, permissions and containers. An Azure Cosmos DB container is a schema-agnostic container of arbitrary user-generated entities and stored procedures, triggers and user-defined-functions (UDFs). Entities under the customer’s database account – databases, users, permissions, containers etc., are referred to as resources as illustrated below:

cosmos2.png

Each resource is uniquely identified by a stable and logical URI and represented as a JSON document. The overall resource model of an application using Azure Cosmos DB is a hierarchical overlay of the resources rooted under the database account, and can be navigated using hyperlinks. With the exception of the item resource – which is used to represent arbitrary user defined content, all other resources have a system-defined schema. The content model of the item resource is based on atom-record-sequence (ARS) described earlier. Both, container and item resources are further projected as reified resource types for a specific type of API interface as depicted in Table 1. For example, while using document-oriented APIs, container and item resources are projected as collection (container) and document (item) resources, respectively; likewise, for graph-oriented API access, the underlying container and item resources are projected as graph (container), node (item) and edge (item) resources respectively; while accessing using a key-value API, table (container) and item/row (item) are projected.

PI Container is projected as … Item is projected as …
DocumentDB SQL Collection Document
MongoDB Collection Document
Azure Table Storage Table Item
Gremlin Graph Node and Edge

All the data within an Azure Cosmos DB container (e.g. collection, table, graph etc.) is horizontally partitioned and transparently managed by resource partitions as illustrated below. A resource partition is a consistent and highly available container of data partitioned by a customer specified partition-key; it provides a single system image for a set of resources it manages and is a fundamental unit of scalability and distribution. Azure Cosmos DB is designed for customer to elastically scale throughput based on the application traffic patterns across different geographical regions to support fluctuating workloads varying both by geography and time. The system manages the partitions transparently without compromising the availability, consistency, latency or throughput of an Azure Cosmos DB container.

cosmos3

Customers can elastically scale throughput of a container by programmatically provisioning throughput at a second or minute granularity on an Azure Cosmos DB container. Internally, the system transparently manages resource partitions to deliver the throughput on a given container. Elastically scaling throughput using horizontal partitioning of resources requires that each resource partition is capable of delivering the portion of the overall throughput for a given budget of system resources. Since an Azure Cosmos DB container is globally distributed, Azure Cosmos DB ensures that the throughput of a container is available for use across all the regions where the container is distributed within a few seconds of the change in its value. Customers can provision throughput (measured in using a currency unit called, Request Unit or RU) on an Azure Cosmos DB container at both.

Here I should also mention consistency models. Database Consistency states that only valid data will be written to the database. If a transaction is executed that violates the database’s consistency rules, the entire transaction will be rolled back and the database will be restored to its original state. On the other hand, if a transaction successfully executes, it will take the database from one state that is consistent with the rules to another state that is also consistent with the rules.

Currently available commercial distributed databases fall into two categories: (1) Databases which do not offer well-defined, provable consistency choices or (2) Databases which offer two extreme consistency choices – strong vs. eventual consistency. The former systems burden the application developers with minutia of their replication protocols and expects them to make difficult tradeoffs between consistency, availability, latency, and throughput. The latter systems put pressure on application developers to choose between the two extremes. Despite the abundance of research and proposals for numerous consistency models, the commercial distributed database services have not been able to operationalize consistency levels beyond strong and eventual consistency. Azure Cosmos DB allows developers to choose between five well-defined consistency models along the consistency spectrum.

cosmos4

Finally, global distribution. Your database resources are distributed along two dimensions: within a given region, all resources are horizontally partitioned using resource partitions (local distribution). Each resource partition is also replicated across geographical regions (global distribution).

cosmos5

Well, enough theory, lets do something.  Lets store and retrieve data in Cosmos using Azure Table API.

First of all, we navigate to Azure Portal (portal.azure.com) and in  the left navigation pane, select Create a resource icon. Select Databases and then select Azure Cosmos DB.

create-nosql-db-databases-json-tutorial-1

On the Create Azure Cosmos DB Account page,  we will enter the settings for the new Azure Cosmos DB account, including Subscription, Resource Group, unique name for Cosmos DB account, pick API as Azure Table, and finally location to closest Azure region.  Please leave the Geo-Redundancy and Multi-region Writes options at their default values (Disable) to avoid extra cost and as we dont need these features for this tutorial.  Click Review+Create tp create this account.

Once its created you can see after going to the resource code snippets on how to connect to your new Cosmos DB account

azure-cosmos-db-account-created

As you can see now we can use variety of frameworks to connect to our Cosmos DB account, I will use C# and .NET as most familiar to me.

I will open Visual Studio and create a .NET Console Project

VSConsole

Once the project is created we will need to install necessary Nuget packages.

  1. Right-click your project in Solution Explorer and choose Manage NuGet Packages.
  2. Search online for Microsoft.Azure.Cosmos.Table and select Install to install the Microsoft Azure Cosmos DB Table Library.

In the Azure Portal we need to copy over Connection String to connect from our application.Lets navigate to portal Connection String Pane. Use the copy button on the right side of the window to copy Primary Connection String.

Add necessary Using references to the top of your program

using System;
using System.Linq;
using System.Threading.Tasks;
using System.Net;
using Newtonsoft.Json;
using Microsoft.Azure.Cosmos.Table;

Next add constants necessary and reference to  Client in your class:

   private const string ConnectionString = your connection string here
     
        private DocumentClient client;

Add this function, which will be a “brain of our operation” and will be called from the Main() function. Here we will create client using our connection string and connect.

 private async Task GetStartedDemo()
        {
            //grab account
           CloudStorageAccount storageAccount = CloudStorageAccount.Parse(connectionString);
            //create table client
CloudTableClient tableClient = storageAccount.CreateCloudTableClient();
           
    // Create a table client for interacting with the table service 
    CloudTable table = tableClient.GetTableReference(tableName);       
        }

Now that we can access Cosmos Table lets add Entity to it. Entities map to C# objects by using a custom class derived from TableEntity. To add an entity to a table, create a class that defines the properties of my entity. I will create entity named Car.

namespace CosmosTableSamples.Model
{
    using Microsoft.Azure.Cosmos.Table;
    public class CarEntity : TableEntity
    {
        public CarEntity()
        {
        }

        public CarEntity(string Brand,string Model)
        {
            PartitionKey = Brand;
            RowKey = Model;
        }

        public string Color{ get; set; }
        public string Type{ get; set; }
    }
}

Now that you have database, table and entity its easy to do a CRUD operation like Insert with snippet like this:

// Create an instance of a carentity. See the Model\CarEntity.cs for a description of the entity.
            CarEntity myCar = new CustomerEntity("Ford", "Taurus")
            {
                Color= "Silver",
                Type= "Sedan"
            };

            // Demonstrate how to insert the entity
            Console.WriteLine("Insert an Entity.");
            myCar = await SamplesUtils.InsertOrMergeEntityAsync(table, myCar);

Then you can select using this quick snippet:

 Console.WriteLine("Reading the Car Entity.");
 customer = await SamplesUtils.RetrieveEntityUsingPointQueryAsync(table, "Ford", "Taurus");
            Console.WriteLine();

Hope above gets you interested in looking at Cosmos DB for your workloads, as it is really versatile and unique cloud scale NoSQL data store.


More details can be found here – https://azure.microsoft.com/en-us/blog/a-technical-overview-of-azure-cosmos-db/, https://www.sqlshack.com/8-things-know-azure-cosmos-db-formerly-documentdb/, https://docs.microsoft.com/en-us/azure/cosmos-db/.


Happy Cosmos Travels!


Forecast Cloudy – Migrating SQL Server Database from AWS RDS to SQL Azure Database Managed Instance

sql-database-windows-azure

With SQL Azure Managed Instance entering General Availability some months ago – https://azure.microsoft.com/en-us/blog/azure-sql-database-managed-instance-general-purpose-tier-general-availability/  we are seeing a lot of interest in this offering.  I already blogged about this offering in post Forecast Cloudy – Set Up SQL Server Managed Instance via Azure PowerShell, so you can see basic details on that offering in that post.  But if I am running SQL Server in AWS Relational Database Service (RDS) how can I migrate database to SQL Azure MI?  This is what I would like to show you today.

For my test I have created SQL Server express instance in AWS RDS as you can see below:

aws1

Once its created you will need to enable Backup\Restore functionality to this instance from AWS S3 storage.  I will create custom option group , assign that group to my database and add special SQLSERVER_BACKUP_RESTORE option to be able to do so.

awsrdsoptiongroup

After I am done, one can see SQLSERVER_BACKUP_RESTORE in Options tab In AWS RDS

awsrdsoptiongroup2

Now, I will create S3 bucket to be able to backup my source Adventure Works database to S3. You can use directions here to create AWS S3 Storage Bucket – https://docs.aws.amazon.com/AmazonS3/latest/gsg/CreatingABucket.html 

After creation it should look something like this , note I also added folder under the backet named Backup

aws_s3

Now I can backup my  Adventure Works database to S3 bucket.  I will use built in rds_backup_database stored procedure in msdb database to backup Adventure Works

exec msdb.dbo.rds_backup_database 
@source_db_name='database_name', @s3_arn_to_backup_to='arn:aws:s3:::bucket_name/file_name_and_extension', 
@overwrite_S3_backup_file=1;

Here running backup with my example below

aws_backup

Once you start a backup or restore process, you can track their progress or cancel it:

  • rds_task_status: to track the progress of the backup or restore task
  • rds_cancel_task: to cancel a running backup or restore task

I will grab task id and use rds_task_status to query and see status of backup

exec msdb..rds_task_status @task_id= 5;

We can keep running this command to check the status of the restore task. The “lifecycle” column of the output will change to reflect the status which can be any of these:
CREATED
IN_PROGRESS
SUCCESS
CANCEL_REQUESTED
CANCELLED
ERROR

The “% complete” column will show how far the operation has completed. When finished successfully, the output will show a “% complete” value of 100 and a “lifecycle” value of “success”

Now we can see that Adventure Works is fully backed up to S3

s3backupfile

Next I will  have to move that backup into Azure Blob Storage. To do so I will use awesome utility written by Ken Faulkner called AzureCopy. Cannot believe that no one else thought of anything like it, for example AzCopy standard tool from Microsoft cannot move files from AWS S3 bucket to Azure Blob. You can get this utility here – https://kpfaulkner.wordpress.com/azurecopyrelease/ .  Once downloaded and installed I will use command line and navigate to the folder where its installed. Then I will set up all of my necessary secret keys to connect to both S3 bucket and Azure blob:

set AzureAccountKey=MyAzureStorageAccountKey 
set AWSAccessKeyID=MyS3AccessId 
set AWSSecretAccessKeyID=MyS3SecretKey 
set AWSRegion value=us-west-2

Obviously I am not listing my secret keys here, however hopefully you get an idea. Now that my huge secret keys are successfully packaged in variables I can go ahead and try listing my files in S3 bucket like:

azurecopy -list https://s3-us-west-2.amazonaws.com/gennadykbackup/Backup/ -azurekey %AzureAccountKey% -s3k %AWSAccessKeyID% -s3sk %AWSSecretAccessKeyID%

Get response like this:

azcopy-1

Next I list files in Azure Blob, that of course will be empty as I have no files there yet.

azurecopy -list https://gennadyktarget.blob.core.windows.net/backups  -azurekey %AzureAccountKey% -s3k %AWSAccessKeyID% -s3sk %AWSSecretAccessKeyID%

Response looks like this:

azcpy12

Now lets actually move the backup file:

azurecopy -i https://s3-us-west-2.amazonaws.com/gennadykbackup/Backup/ -o https://gennadyktarget.blob.core.windows.net/backups -azurekey %AzureAccountKey% -s3k %AWSAccessKeyID% -s3sk %AWSSecretAccessKeyID% -blobcopy -destblobtype block

And the result after a bit is here:

qazcpyres

Now I see backup in my Azure Blob Storage:

backupinblob

Now I need to restore it in SQL Azure Managed Instance.  I already created one, to do so one can follow tutorials here – https://docs.microsoft.com/en-us/azure/sql-database/sql-database-managed-instance-get-started , https://www.brentozar.com/archive/2018/03/how-to-deploy-your-first-azure-sql-db-managed-instance-preview/  and https://blogs.msdn.microsoft.com/sqlserverstorageengine/2018/11/14/create-azure-sql-managed-instance-using-azure-cli/.

I will log into my SQL Azure MI via SSMS and my Azure Blob storage account and SAS key to create a credential in my Managed Instance.

CREATE CREDENTIAL [https://gennadyktarget.blob.core.windows.net/backups]
WITH IDENTITY = 'SHARED ACCESS SIGNATURE'
, SECRET = 'My Secret SSAS Key'

After that to check my credential, I will run the following script, which uses a container URL to get a backup file list.

RESTORE FILELISTONLY FROM URL = 
   'https://gennadyktarget.blob.core.windows.net/backups/AdventureWorks2014.bak'

Now since I can see file list I can proceed with restore:

   RESTORE DATABASE [AdventureWorks2014] FROM URL =
  'https://gennadyktarget.blob.core.windows.net/backups/AdventureWorks2014.bak'

And finally after a bit – result is in SSMS:

finaltarget

So finally we are done.  My Adventure Works database is fully migrated from AWS RDS to Azure DB Managed Instance. Hope this helps you or you find it interesting.


Spark in the Clouds – Running Azure Databricks

azuredblogo2

Apache Spark is an open-source, distributed processing system used for big data workloads. It utilizes in-memory caching, and optimized query execution for fast analytic queries against data of any size. It provides development APIs in Java, Scala, Python and R, and supports code reuse across multiple workloads—batch processing, interactive queries, real-time analytics, machine learning, and graph processing.

Spark was created to address the limitations to MapReduce, by doing processing in-memory, reducing the number of steps in a job, and by reusing data across multiple parallel operations. With Spark, only one-step is needed where data is read into memory, operations performed, and the results written back—resulting in a much faster execution. Spark also reuses data by using an in-memory cache to greatly speed up machine learning algorithms that repeatedly call a function on the same dataset. Data re-use is accomplished through the creation of DataFrames, an abstraction over Resilient Distributed Dataset (RDD), which is a collection of objects that is cached in memory, and reused in multiple Spark operations. This dramatically lowers the latency making Spark multiple times faster than MapReduce, especially when doing machine learning, and interactive analytics.

The Apache Spark project is main execution engine for Spark SQL ( SQL and HiveQL) , Spark streaming, machine learning and graph processing engines built on top of Spark Core. You can run them using provided API.

Apache-Spark-Architecture

There are three key Spark interfaces that you should know about:

  • RDD – Resilient Distributed Dataset. Apache Spark’s first abstraction was the RDD. It is an interface to a sequence of data objects that consist of one or more types that are located across a collection of machines (a cluster). RDDs can be created in a variety of ways and are the “lowest level” API available. While this is the original data structure for Apache Spark, you should focus on the DataFrame API, which is a superset of the RDD functionality. The RDD API is available in the Java, Python, and Scala languages.
  • DataFrame. These are similar in concept to the DataFrame you may be familiar with in the pandas Python library and the R language. The DataFrame API is available in the Java, Python, R, and Scala languages.
  • DataSet. A combination of DataFrame and RDD. It provides the typed interface that is available in RDDs while providing the convenience of the DataFrame. The Dataset API is available in the Java and Scala languages

Databricks is a company founded by the creators of Apache Spark, that aims to help clients with cloud-based big data processing using Spark. Azure Databricks is an Apache Spark-based analytics platform optimized for the Microsoft Azure cloud services platform. Designed with the founders of Apache Spark, Databricks is integrated with Azure to provide one-click setup, streamlined workflows, and an interactive workspace that enables collaboration between data scientists, data engineers, and business analysts.

azure-databricks-overview

Setting up Azure Databricks Workspace via Azure Portal is really easy.

If you don’t have an Azure subscription, create a free account before you begin. You can then navigate to Azure Portal and click + Create Resource to open New Resource blade

new_blade

Pick Analytics category and Azure Databricks service:

new_blade2

Under Azure Databricks Service, provide the values to create a Databricks workspace.

create-databricks-workspace

In the workspace name provide unique name for your workspace, pick your subscription , location of Azure datacenter where workspace will be created, resource group service  as well as pricing tier for the service.  You can pick between standard and premum pricing tiers , for details on each see – https://azure.microsoft.com/en-us/pricing/details/databricks/.  For the sake of this tutorial I will pick standard.

Click Create and in few minutes your workspace will be created. Once that happens, in the Azure portal, go to the Databricks workspace that you created, and then click Launch Workspace.

lworkspace

Once you login to Azure Databricks workspace you should see a screen like this:

azuredatabricksworkspace

Here you can pick Clusters icon on the side and create a Databricks Cluster.  How would this work, creating a Databricks Spark Cluster in Azure? Well, when a customer launches a cluster via Databricks, a “Databricks appliance” is deployed as an Azure resource in the customer’s subscription. The customer specifies the types of VMs to use and how many, but Databricks manages all other aspects. In addition to this appliance, a managed resource group is deployed into the customer’s subscription that we populate with a VNet, a security group, and a storage account. These are concepts Azure users are familiar with. Once these services are ready, users can manage the Databricks cluster through the Azure Databricks UI or through features such as autoscaling. All metadata, such as scheduled jobs, is stored in an Azure Database with geo-replication for fault tolerance.

azdatabricks

Databricks clusters provide a unified platform for various use cases such as running production ETL pipelines, streaming analytics, ad-hoc analytics, and machine learning.

Once you click Clusters button image on side toolbar it will open Clusters page.

clusters1


Hit Create Cluster button and in resulting screen you can name your cluster, as well as pick cluster type.  In Databricks you can create two different types of clusters: standard and high concurrency. Standard clusters are the default and can be used with Python, R, Scala, and SQL. High-concurrency clusters are tuned to provide the efficient resource utilization, isolation, security, and the best performance for sharing by multiple concurrently active users. High concurrency clusters support only SQL, Python, and R languages. For my tutorial I will create a Standard cluster.

clusters2

I will now download data scource file from GitHub  . I will put this file in Azure Blob Storage. In order to do that I will create an Azure Storage Account:

  • In the Azure portal, select Create a resource. Select the Storage category, and select Storage Accounts
  • Provide a unique name for the storage account.
  • Select Account Kind: Blob Storage
  • Select a Resource Group name. Use the same resource group you created the Databricks workspace.

Next we add Storage Container to the Storage Account and upload source data file:

  • Open the storage account in the Azure portal.
  • Select Blobs.
  • Select + Container to create a new empty container.
  • Provide a Name for the container.
  • Select Private (non anonymous access) access level.
  • Once the container is created, select the container name.
  • Select the Upload button.
  • On the Files page, select the Folder icon to browse and select the sample file for upload.
  • Select Upload to upload the file.

Once your cluster is created nd source data is uploaded to Azure storage you can go to Workspace and create a notebook.

databricks-create-notebook

These notebooks can be written in Scala,  Python, etc. I can pick Scala:

databricks-notebook-details

Once you created notebook we can now mount storage account where our source data file is to /mnt/mypath. In the following snippet, replace {YOUR CONTAINER NAME}, {YOUR STORAGE ACCOUNT NAME}, and {YOUR STORAGE ACCOUNT ACCESS KEY} with the appropriate values for your Azure Storage account. Paste the snippet in an empty cell in the notebook and then press SHIFT + ENTER to run the code cell.

dbutils.fs.mount(
source = “wasbs://{YOUR CONTAINER NAME}@{YOUR STORAGE ACCOUNT NAME}.blob.core.windows.net/”,
mountPoint = “/mnt/mypath”,
extraConfigs = Map(“fs.azure.account.key.{YOUR STORAGE ACCOUNT NAME}.blob.core.windows.net” -> “{YOUR STORAGE ACCOUNT ACCESS KEY}”))

Once file is mounted we can use its data to create a temporary table and move data there:

%sql

DROP TABLE IF EXISTS radio_sample_data;

CREATE TABLE radio_sample_data USING json

OPTIONS ( path “/mnt/mypath/small_radio_json.json” )

Now you can select data from that table:

%sql
SELECT * from radio_sample_data

Result should be there in a second or so:

result

Note that even without knowledge of Scala, only working in SQL or Python its pretty easy to get started here.

To learn more about Azure Databricks see – https://www.wintellect.com/overview-azure-databricks/https://docs.microsoft.com/en-us/azure/azure-databricks/https://databricks.com/product/azurehttps://medium.com/@jcbaey/azure-databricks-hands-on-6ed8bed125c7 


Forecast Cloudy – Set Up SQL Server Managed Instance via Azure PowerShell

logoAzureSql

Managed Instance is a new managed database service that represents fully-managed SQL Server Instance in Azure cloud. It shares the same code with the latest version of SQL Server Database Engine and has the latest features, performance improvements, and security patches.

Let’s step back and look at why Azure SQL Managed Instances are being released? Currently there is a gap of functionality between the retail SQL Server and Azure SQL Database. For example: a client that has an application that uses multiple databases and lots of code using three part names. Azure SQL Database doesn’t support three part names, so if you wanted to migrate this instance to Azure, your only choice would be to deploy and manage it as a SQL Server VM on IaaS. And yes, you can enable backup and patching agents, but at the end of the day, the configuration of the VM, maintenance of the OS and all the responsibility for SQL Server is still in your hands.

This is where the Azure SQL Managed Instance comes in. It provides a fully managed, higher feature-compatible instance that is a lot more similar to the SQL Server instance concept that we all know from the retail product. You don’t have to be responsible of every bit like with IaaS, while at the same time, you can continue running as an instance, with the features that are not compatible with the Azure SQL Database single database model. This means migration is straightforward without having to worry about compatibility or features not supported. It’s also easier because you don’t have to build every single piece of IaaS.

If you have experience with Azure SQL Database you might be thinking, how does this compare to the elastic database pools? The difference is that the pools are still created from databases that are single entities and the only thing they share are the elastic resources. On the other hand, Azure SQL Managed Instance will hold the database inside the instance container so they will be able to use three part names, linked servers, and other features that we are accustomed to using on the on-premises SQL Server.

Best of all, because Azure SQL Managed Instance is built on top of the PaaS framework that powers Azure SQL Database, once it’s migrated, it is fully managed in terms of OS, built-in HA, backups, etc.

As we can see in the diagram below, Azure SQL Managed Instance sits between having a full VM running SQL Server and the fully contained individual database paradigm of Azure SQL Database. And just like Azure SQL Db, with a Managed Instance the client can enjoy the continuous improvement and release of features that come with Microsoft’s cloud-first development model.

diagram

Managed Instance is a resource in your network hosted by Azure cloud. You need to create Azure VNET and a dedicated subnet where the instance should be deployed. There are some networking constraints for the VNET/subnet that you need to review before you create a managed instance. There is no public IP address dedicated to the Managed Instance. Only applications in customer network can access Managed Instance. In addition, your network administrators have the full control and can configure access to Managed Instance using standard methods such as Network security Groups and firewalls.

Managed Instance enables you to choose how many CPU cores you want to use and how much storage you need. You can create a Managed Instance with 16 cores and 500GB storage, and then increase or decrease these numbers depending on your needs. Changing CPU or storage in instance can be done via Azure portal using simple slider:

azure-sql-db-mi-sku-slider

Architecture of Managed Instance.

Managed Instance has split compute and storage components. You have compute nodes with 8, 16, or 24 cores, that work with database files stored on Azure Premium disk storage. Every database file is placed on separate Azure premium disk, that guarantees that database files cannot be lost. Although Managed Instance relies on Azure Premium disks, it also has separate backup mechanism that ensures that even if something would happen with the files, platform would still be able to restore files from backups.

mn-arch

There are also redundant passive nodes that are used to fail-over compute instance if needed.

Managed Instance is fully Platform as a Service database offer. High availability, automated backups, point-in-time restore, automatic plan correction, threat detection, vulnerability assessment, and other intelligent features are built-in into service     without any additional charge.

OS patching and database upgrades are handled automatically and do not require any action.

In addition to built-in monitoring and maintenance features, you can use any 3rd-party tool to monitor and manage your instance, because most of the system views are exposed.

Connecting to Managed Instance

Azure SQL Managed Instance is not a service on public endpoint. Azure SQL Managed Instance is placed on private IP address in your VNET. It is just hosted and managed by Azure cloud.

mn-connect

There are several ways to connect to your Managed Instance.

  1. You can create VPN connection between your on-premises network and Azure VNET where Managed Instance is placed. Managed Instance will be seen as any other SQL Server in your network.
  2. You can connect via some Azure VM in your Azure VNET (using standard RDP or via some app that is in your Azure VM). If your VM is placed in some other AzureVNET you need to establish peering between these two networks.
  3. You can Connect your web application to Managed Instance using Azure Apps VNET Integration or by placing your Web App into App Service environment that is placed in VNET. If your Web App or App service Environment is placed in another VNET, you need to establish peering between these two networks.

For more on Connecting see https://docs.microsoft.com/en-us/azure/sql-database/sql-database-managed-instance-connect-app

I want to create Managed Instance and test it out, how do I do it?

Assuming you  have created  Site-To-Site VPN of sorts at least we will need to place Managed Instance in special subnet inside a VNET connected to that VPN so Managed Instance can be seen from on premises.  Here are official docs for network configuration – https://docs.microsoft.com/en-us/azure/sql-database/sql-database-managed-instance-vnet-configuration and https://blogs.msdn.microsoft.com/sqlserverstorageengine/2018/03/14/how-to-configure-network-for-azure-sql-managed-instance/ . Custom DNS may need to be set in Azure like this – https://docs.microsoft.com/en-us/azure/sql-database/sql-database-managed-instance-custom-dns .

I used  Azure PowerShell  below to login to Azure Subscription connected to my on-premises network via Express Route and set up VNET, Subnets and Managed Instance itself, here is example script I run to create Demo instance.  Obviously disregard my subscription, VNET, subnet names, address ranges, etc, instead substitute proper values for you:

$SubscriptionName = ‘Visual Studio Enterprise’
$resourceGroup = ‘SQLMIDemo’
$location = ‘East US’
$vNetName = ‘SQLMIDemoVNET’

#login to azure
Login-AzureRmAccount
Select-AzureRmSubscription $SubscriptionName

#create resource group
New-AzureRmResourceGroup -ResourceGroupName $resourceGroup -Location $location

#create new virtual network
$virtualNetwork = New-AzureRmVirtualNetwork -ResourceGroupName $resourceGroup -Location $location -Name $vNetName -AddressPrefix 10.0.0.0/16

#create default subnet
$subnetConfig = Add-AzureRmVirtualNetworkSubnetConfig -Name default -AddressPrefix 10.0.0.0/24 -VirtualNetwork $virtualNetwork

#set up mi subnet

$subnetConfigMi = Add-AzureRmVirtualNetworkSubnetConfig -Name mi -AddressPrefix 10.0.1.0/24 -VirtualNetwork $virtualNetwork

$virtualNetwork | Set-AzureRmVirtualNetwork

#enable access to azure management service
$routeTableMiManagementService = New-AzureRmRouteTable -Name ‘mySQLMIRouteTableMiManagementService’ -ResourceGroupName $resourceGroup -location $location

Set-AzureRmVirtualNetworkSubnetConfig -VirtualNetwork $virtualNetwork -Name ‘mi’ -AddressPrefix 10.0.1.0/24 -RouteTable $routeTableMiManagementService |
Set-AzureRmVirtualNetwork

Get-AzureRmRouteTable -ResourceGroupName $resourceGroup -Name ‘mySQLMIRouteTableMiManagementService’ |
Add-AzureRmRouteConfig -Name ‘ToManagedInstanceManagementService’ -AddressPrefix 0.0.0.0/0 -NextHopType ‘Internet’ |
Set-AzureRmRouteTable

#install managed instance

New-AzureRmSqlManagedInstance -Name “demosqlmi”
-ResourceGroupName $resourceGroup -Location $location -SubnetId $subnetConfigMi.id`
-AdministratorCredential (Get-Credential) `
-StorageSizeInGB 1024 -VCore 8 -Edition “GeneralPurpose” `
-ComputeGeneration Gen4 -LicenseType LicenseIncluded

You can install Azure PowerShell from https://docs.microsoft.com/en-us/powershell/azure/install-azurerm-ps?view=azurermps-6.8.1 or use Portal to set up everything as per – https://docs.microsoft.com/en-us/azure/sql-database/sql-database-managed-instance-vnet-configuration and https://docs.microsoft.com/en-us/azure/sql-database/sql-database-managed-instance-get-started

Once you created networking prerequisites and SQL Azure MI you can restore SQL database into MI as explained here – https://docs.microsoft.com/en-us/azure/sql-database/sql-database-managed-instance-get-started-restore

How can I be sure that my application database features are supported in SQL Azure MI? 

Majority of mainstream SQL Server features are supported in SQL Azure Managed Instance, including such as jobs,  CLR, linked servers, etc.  For feature matrix can be found here –https://docs.microsoft.com/en-us/azure/sql-database/sql-database-features

For more see – https://azure.microsoft.com/en-us/blog/new-options-to-modernize-your-application-with-azure-sql-database/https://docs.microsoft.com/en-us/azure/sql-database/sql-database-managed-instance