The Dead Philosophers Club – Streaming Data from SQL Server to Azure via Debezium and Apache Kafka

debezium-1

Debezium is a set of open source distributed services to capture changes in your databases so that your applications can see those changes and respond to them. Debezium records all row-level changes within each database table in a change event stream, and applications simply read these streams to see the change events in the same order in which they occurred.

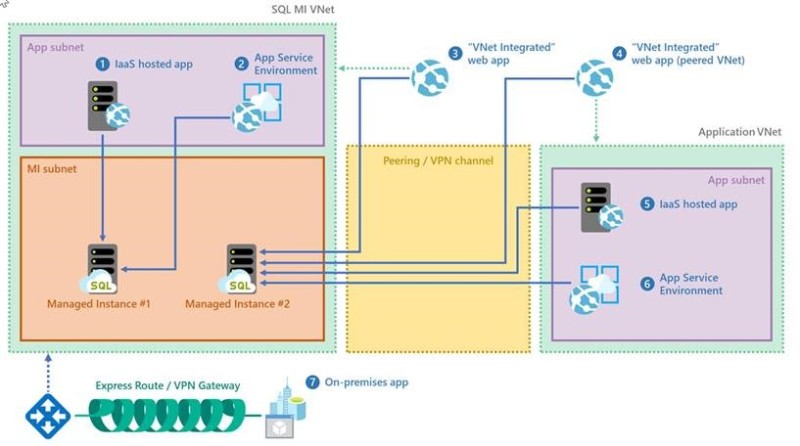
I first came across usefullness of Debezium and Kafka as change streaming platform\mechanism from SQL Server to Azure based on excellent blog posting from SQL Azure PM Davide Mauri I follow in Medium – https://medium.com/@mauridb/sql-server-change-stream-b204c0892641. At that time I was looking for a way to stream Change Data Capture Changes out of SQL Server to Azure Data Lake for number of customers and after reading Davide’s post decided to take a look deeper. Kafka integration (also can be done with Azure Event Hub Kafka message head – https://docs.microsoft.com/en-us/azure/event-hubs/event-hubs-create and https://docs.microsoft.com/en-us/azure/event-hubs/event-hubs-kafka-connect-tutorial)  allows you to also stream changes to Azure Databricks via Spark Kafka broker for further processing via Spark Streaming:

spark-streaming-datanami

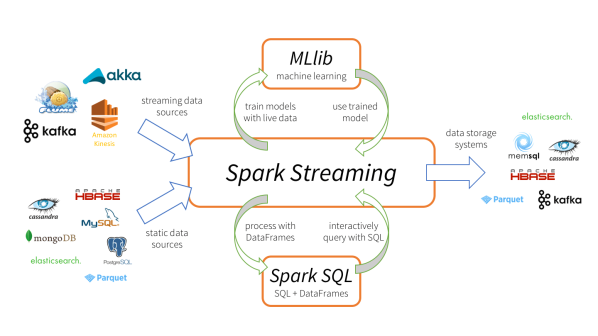
So this opens a lot of opportunities for near real-time data processing of changes from SQL Server without using transactional replication or Service Broker features.

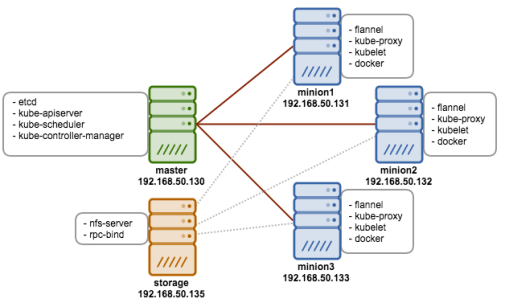
Most commonly, Debezium is deployed via Apache Kafka Connect. Kafka Connect is a framework and runtime for implementing and operating:

  1. source connectors such as Debezium, which ingest data into Kafka and
  2. sink connectors, which propagate data from Kafka topics into other systems.


debezium-architecture

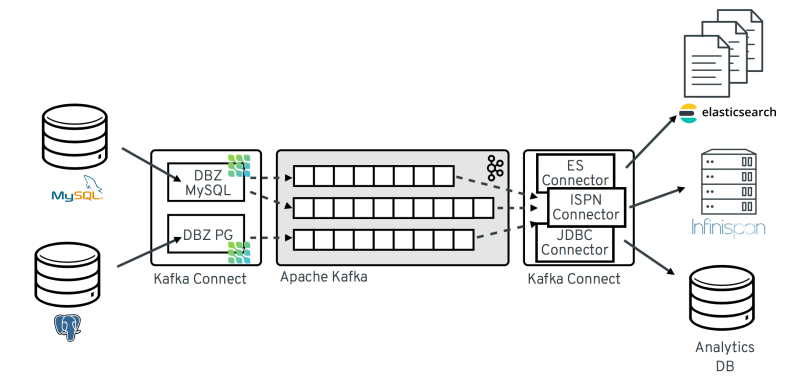
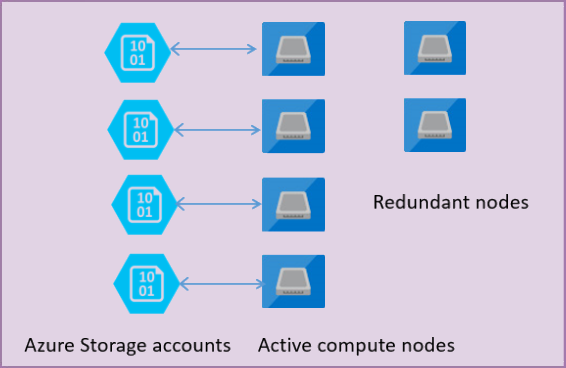
Typical Debezium CDC architecture is shown above with data landing in various sinks like Elastic, Infiniscan or another DB.

Back to Debezium\Kafka setup with SQL Server. How would we set this up based on my last post where I have setup Confluent Cloud Kafka?

Debezium will work with SQL Server Change Data Capture. SQL Server needs to be configured for CDC at a database level. Assuming we have database named demo in our source SQL Server:

USE [demo]
GO
EXEC sys.sp_cdc_enable_db
GO 

Now lets do it on table level. Assuming we have a table in demo database called orders in that database:

USE [demo]

EXEC sys.sp_cdc_enable_table
@source_schema = N'dbo',
@source_name   = N'ORDERS',
@role_name     = NULL,
@supports_net_changes = 0
GO 

Verify that user has access to CDC table:

EXEC sys.sp_cdc_help_change_data_capture
GO

If results are empty, make sure that the user has privileges to access both the capture instance and CDC tables.

Once that’s done you can setup the connector. To do so you will need confluent-hub installed.  I went through following:

  1. Assuming you already setup Confluent Cloud in Azure as I already blogged about in my last post 
  2. Setup Kafka Connect as explained here – https://docs.confluent.io/current/cloud/connect/connect-cloud-config.html
  3. Download and install confluent-hub client from – https://docs.confluent.io/current/connect/managing/confluent-hub/client.html .Shocker for me personally was lack of Windows support, looks like client is only available for MacOS and Linux. Had to use my spare old Mac Book.
  4. Use client to install Debezium SQL Server connector in your Kafka Connect worker.
  5. Restart worker.
confluent-hub install --no-prompt debezium/debezium-connector-sqlserver:0.10.0

Now, check that plugin  has been loaded successfully:

$ curl -s localhost:8083/connector-plugins|jq '.[].class'|grep debezium
"io.debezium.connector.sqlserver.SqlServerConnector"

Debezium will write to a topic with all of the data from SQL Server. Debezium also needs its own topic for tracking the DDL—and we need to pre-create both these topics:

$ ccloud kafka topic create --partitions 1 dbz_dbhistory.mssql.asgard-01
$ ccloud kafka topic create mssql-01-mssql.dbo.ORDERS
$ ccloud kafka topic list

Now create the connector. It’s a bit more verbose because we’re using a secure Kafka cluster and Debezium needs the details passed directly to it:

curl -i -X PUT -H  "Content-Type:application/json" \
    http://localhost:8083/connectors/source-debezium-mssql-01/config \
    -d '{
    "connector.class": "io.debezium.connector.sqlserver.SqlServerConnector", 
    "database.hostname": "mssql",
    "database.port": "1433",
    "database.user": "sa",
    "database.password": "Admin123",
    "database.dbname": "demo",
    "database.server.name": "mssql",
    "table.whitelist":"dbo.orders",
    "database.history.kafka.bootstrap.servers": "${file:/data/credentials.properties:CCLOUD_BROKER_HOST}:9092",
    "database.history.kafka.topic": "dbz_dbhistory.mssql.asgard-01",
    "database.history.consumer.security.protocol": "SASL_SSL",
    "database.history.consumer.ssl.endpoint.identification.algorithm": "https",
    "database.history.consumer.sasl.mechanism": "PLAIN",
    "database.history.consumer.sasl.jaas.config": "org.apache.kafka.common.security.plain.PlainLoginModule required username=\"${file:/data/credentials.properties:CCLOUD_API_KEY}\" password=\"${file:/data/credentials.properties:CCLOUD_API_SECRET}\";",
    "database.history.producer.security.protocol": "SASL_SSL",
    "database.history.producer.ssl.endpoint.identification.algorithm": "https",
    "database.history.producer.sasl.mechanism": "PLAIN",
    "database.history.producer.sasl.jaas.config": "org.apache.kafka.common.security.plain.PlainLoginModule required username=\"${file:/data/credentials.properties:CCLOUD_API_KEY}\" password=\"${file:/data/credentials.properties:CCLOUD_API_SECRET}\";",
    "decimal.handling.mode":"double",
    "transforms": "unwrap,addTopicPrefix",
    "transforms.unwrap.type": "io.debezium.transforms.ExtractNewRecordState",
    "transforms.addTopicPrefix.type":"org.apache.kafka.connect.transforms.RegexRouter",
    "transforms.addTopicPrefix.regex":"(.*)",
    "transforms.addTopicPrefix.replacement":"mssql-01-$1"
    }'

Now that everything is running from SQL Server -> Debezium-> Confluent Kafka we can now consume it from Kafka as illustrated here – https://forums.databricks.com/questions/27062/how-connect-confluent-cloud-and-databricks.html

Rest is up to you, what do you want to do with data or where to land it.

More information is here:

https://debezium.io/documentation/reference/connectors/sqlserver.html

https://docs.confluent.io/current/connect/debezium-connect-sqlserver/index.html

https://docs.confluent.io/current/connect/managing/confluent-hub/client.html

https://docs.confluent.io/current/quickstart/cloud-quickstart/index.html#cloud-quickstart

Good tutorial on using Kafka endpoints in Event Hub with Debezium Docker from Davide Mauri – https://github.com/yorek/debezium-sql-change-stream 

And Apache Kafka with Spark – https://azure.microsoft.com/en-us/resources/videos/build-2018-real-time-data-streams-with-apache-kafka-and-spark/

Hope this was interesting to some of you at least.

Forecast Cloudy – Migrating SQL Server Database from AWS RDS to SQL Azure Database Managed Instance

sql-database-windows-azure

With SQL Azure Managed Instance entering General Availability some months ago – https://azure.microsoft.com/en-us/blog/azure-sql-database-managed-instance-general-purpose-tier-general-availability/  we are seeing a lot of interest in this offering.  I already blogged about this offering in post Forecast Cloudy – Set Up SQL Server Managed Instance via Azure PowerShell, so you can see basic details on that offering in that post.  But if I am running SQL Server in AWS Relational Database Service (RDS) how can I migrate database to SQL Azure MI?  This is what I would like to show you today.

For my test I have created SQL Server express instance in AWS RDS as you can see below:

aws1

Once its created you will need to enable Backup\Restore functionality to this instance from AWS S3 storage.  I will create custom option group , assign that group to my database and add special SQLSERVER_BACKUP_RESTORE option to be able to do so.

awsrdsoptiongroup

After I am done, one can see SQLSERVER_BACKUP_RESTORE in Options tab In AWS RDS

awsrdsoptiongroup2

Now, I will create S3 bucket to be able to backup my source Adventure Works database to S3. You can use directions here to create AWS S3 Storage Bucket – https://docs.aws.amazon.com/AmazonS3/latest/gsg/CreatingABucket.html 

After creation it should look something like this , note I also added folder under the backet named Backup

aws_s3

Now I can backup my  Adventure Works database to S3 bucket.  I will use built in rds_backup_database stored procedure in msdb database to backup Adventure Works

exec msdb.dbo.rds_backup_database 
@source_db_name='database_name', @s3_arn_to_backup_to='arn:aws:s3:::bucket_name/file_name_and_extension', 
@overwrite_S3_backup_file=1;

Here running backup with my example below

aws_backup

Once you start a backup or restore process, you can track their progress or cancel it:

  • rds_task_status: to track the progress of the backup or restore task
  • rds_cancel_task: to cancel a running backup or restore task

I will grab task id and use rds_task_status to query and see status of backup

exec msdb..rds_task_status @task_id= 5;

We can keep running this command to check the status of the restore task. The “lifecycle” column of the output will change to reflect the status which can be any of these:
CREATED
IN_PROGRESS
SUCCESS
CANCEL_REQUESTED
CANCELLED
ERROR

The “% complete” column will show how far the operation has completed. When finished successfully, the output will show a “% complete” value of 100 and a “lifecycle” value of “success”

Now we can see that Adventure Works is fully backed up to S3

s3backupfile

Next I will  have to move that backup into Azure Blob Storage. To do so I will use awesome utility written by Ken Faulkner called AzureCopy. Cannot believe that no one else thought of anything like it, for example AzCopy standard tool from Microsoft cannot move files from AWS S3 bucket to Azure Blob. You can get this utility here – https://kpfaulkner.wordpress.com/azurecopyrelease/ .  Once downloaded and installed I will use command line and navigate to the folder where its installed. Then I will set up all of my necessary secret keys to connect to both S3 bucket and Azure blob:

set AzureAccountKey=MyAzureStorageAccountKey 
set AWSAccessKeyID=MyS3AccessId 
set AWSSecretAccessKeyID=MyS3SecretKey 
set AWSRegion value=us-west-2

Obviously I am not listing my secret keys here, however hopefully you get an idea. Now that my huge secret keys are successfully packaged in variables I can go ahead and try listing my files in S3 bucket like:

azurecopy -list https://s3-us-west-2.amazonaws.com/gennadykbackup/Backup/ -azurekey %AzureAccountKey% -s3k %AWSAccessKeyID% -s3sk %AWSSecretAccessKeyID%

Get response like this:

azcopy-1

Next I list files in Azure Blob, that of course will be empty as I have no files there yet.

azurecopy -list https://gennadyktarget.blob.core.windows.net/backups  -azurekey %AzureAccountKey% -s3k %AWSAccessKeyID% -s3sk %AWSSecretAccessKeyID%

Response looks like this:

azcpy12

Now lets actually move the backup file:

azurecopy -i https://s3-us-west-2.amazonaws.com/gennadykbackup/Backup/ -o https://gennadyktarget.blob.core.windows.net/backups -azurekey %AzureAccountKey% -s3k %AWSAccessKeyID% -s3sk %AWSSecretAccessKeyID% -blobcopy -destblobtype block

And the result after a bit is here:

qazcpyres

Now I see backup in my Azure Blob Storage:

backupinblob

Now I need to restore it in SQL Azure Managed Instance.  I already created one, to do so one can follow tutorials here – https://docs.microsoft.com/en-us/azure/sql-database/sql-database-managed-instance-get-started , https://www.brentozar.com/archive/2018/03/how-to-deploy-your-first-azure-sql-db-managed-instance-preview/  and https://blogs.msdn.microsoft.com/sqlserverstorageengine/2018/11/14/create-azure-sql-managed-instance-using-azure-cli/.

I will log into my SQL Azure MI via SSMS and my Azure Blob storage account and SAS key to create a credential in my Managed Instance.

CREATE CREDENTIAL [https://gennadyktarget.blob.core.windows.net/backups]
WITH IDENTITY = 'SHARED ACCESS SIGNATURE'
, SECRET = 'My Secret SSAS Key'

After that to check my credential, I will run the following script, which uses a container URL to get a backup file list.

RESTORE FILELISTONLY FROM URL = 
   'https://gennadyktarget.blob.core.windows.net/backups/AdventureWorks2014.bak'

Now since I can see file list I can proceed with restore:

   RESTORE DATABASE [AdventureWorks2014] FROM URL =
  'https://gennadyktarget.blob.core.windows.net/backups/AdventureWorks2014.bak'

And finally after a bit – result is in SSMS:

finaltarget

So finally we are done.  My Adventure Works database is fully migrated from AWS RDS to Azure DB Managed Instance. Hope this helps you or you find it interesting.


Forecast Cloudy – Set Up SQL Server Managed Instance via Azure PowerShell

logoAzureSql

Managed Instance is a new managed database service that represents fully-managed SQL Server Instance in Azure cloud. It shares the same code with the latest version of SQL Server Database Engine and has the latest features, performance improvements, and security patches.

Let’s step back and look at why Azure SQL Managed Instances are being released? Currently there is a gap of functionality between the retail SQL Server and Azure SQL Database. For example: a client that has an application that uses multiple databases and lots of code using three part names. Azure SQL Database doesn’t support three part names, so if you wanted to migrate this instance to Azure, your only choice would be to deploy and manage it as a SQL Server VM on IaaS. And yes, you can enable backup and patching agents, but at the end of the day, the configuration of the VM, maintenance of the OS and all the responsibility for SQL Server is still in your hands.

This is where the Azure SQL Managed Instance comes in. It provides a fully managed, higher feature-compatible instance that is a lot more similar to the SQL Server instance concept that we all know from the retail product. You don’t have to be responsible of every bit like with IaaS, while at the same time, you can continue running as an instance, with the features that are not compatible with the Azure SQL Database single database model. This means migration is straightforward without having to worry about compatibility or features not supported. It’s also easier because you don’t have to build every single piece of IaaS.

If you have experience with Azure SQL Database you might be thinking, how does this compare to the elastic database pools? The difference is that the pools are still created from databases that are single entities and the only thing they share are the elastic resources. On the other hand, Azure SQL Managed Instance will hold the database inside the instance container so they will be able to use three part names, linked servers, and other features that we are accustomed to using on the on-premises SQL Server.

Best of all, because Azure SQL Managed Instance is built on top of the PaaS framework that powers Azure SQL Database, once it’s migrated, it is fully managed in terms of OS, built-in HA, backups, etc.

As we can see in the diagram below, Azure SQL Managed Instance sits between having a full VM running SQL Server and the fully contained individual database paradigm of Azure SQL Database. And just like Azure SQL Db, with a Managed Instance the client can enjoy the continuous improvement and release of features that come with Microsoft’s cloud-first development model.

diagram

Managed Instance is a resource in your network hosted by Azure cloud. You need to create Azure VNET and a dedicated subnet where the instance should be deployed. There are some networking constraints for the VNET/subnet that you need to review before you create a managed instance. There is no public IP address dedicated to the Managed Instance. Only applications in customer network can access Managed Instance. In addition, your network administrators have the full control and can configure access to Managed Instance using standard methods such as Network security Groups and firewalls.

Managed Instance enables you to choose how many CPU cores you want to use and how much storage you need. You can create a Managed Instance with 16 cores and 500GB storage, and then increase or decrease these numbers depending on your needs. Changing CPU or storage in instance can be done via Azure portal using simple slider:

azure-sql-db-mi-sku-slider

Architecture of Managed Instance.

Managed Instance has split compute and storage components. You have compute nodes with 8, 16, or 24 cores, that work with database files stored on Azure Premium disk storage. Every database file is placed on separate Azure premium disk, that guarantees that database files cannot be lost. Although Managed Instance relies on Azure Premium disks, it also has separate backup mechanism that ensures that even if something would happen with the files, platform would still be able to restore files from backups.

mn-arch

There are also redundant passive nodes that are used to fail-over compute instance if needed.

Managed Instance is fully Platform as a Service database offer. High availability, automated backups, point-in-time restore, automatic plan correction, threat detection, vulnerability assessment, and other intelligent features are built-in into service     without any additional charge.

OS patching and database upgrades are handled automatically and do not require any action.

In addition to built-in monitoring and maintenance features, you can use any 3rd-party tool to monitor and manage your instance, because most of the system views are exposed.

Connecting to Managed Instance

Azure SQL Managed Instance is not a service on public endpoint. Azure SQL Managed Instance is placed on private IP address in your VNET. It is just hosted and managed by Azure cloud.

mn-connect

There are several ways to connect to your Managed Instance.

  1. You can create VPN connection between your on-premises network and Azure VNET where Managed Instance is placed. Managed Instance will be seen as any other SQL Server in your network.
  2. You can connect via some Azure VM in your Azure VNET (using standard RDP or via some app that is in your Azure VM). If your VM is placed in some other AzureVNET you need to establish peering between these two networks.
  3. You can Connect your web application to Managed Instance using Azure Apps VNET Integration or by placing your Web App into App Service environment that is placed in VNET. If your Web App or App service Environment is placed in another VNET, you need to establish peering between these two networks.

For more on Connecting see https://docs.microsoft.com/en-us/azure/sql-database/sql-database-managed-instance-connect-app

I want to create Managed Instance and test it out, how do I do it?

Assuming you  have created  Site-To-Site VPN of sorts at least we will need to place Managed Instance in special subnet inside a VNET connected to that VPN so Managed Instance can be seen from on premises.  Here are official docs for network configuration – https://docs.microsoft.com/en-us/azure/sql-database/sql-database-managed-instance-vnet-configuration and https://blogs.msdn.microsoft.com/sqlserverstorageengine/2018/03/14/how-to-configure-network-for-azure-sql-managed-instance/ . Custom DNS may need to be set in Azure like this – https://docs.microsoft.com/en-us/azure/sql-database/sql-database-managed-instance-custom-dns .

I used  Azure PowerShell  below to login to Azure Subscription connected to my on-premises network via Express Route and set up VNET, Subnets and Managed Instance itself, here is example script I run to create Demo instance.  Obviously disregard my subscription, VNET, subnet names, address ranges, etc, instead substitute proper values for you:

$SubscriptionName = ‘Visual Studio Enterprise’
$resourceGroup = ‘SQLMIDemo’
$location = ‘East US’
$vNetName = ‘SQLMIDemoVNET’

#login to azure
Login-AzureRmAccount
Select-AzureRmSubscription $SubscriptionName

#create resource group
New-AzureRmResourceGroup -ResourceGroupName $resourceGroup -Location $location

#create new virtual network
$virtualNetwork = New-AzureRmVirtualNetwork -ResourceGroupName $resourceGroup -Location $location -Name $vNetName -AddressPrefix 10.0.0.0/16

#create default subnet
$subnetConfig = Add-AzureRmVirtualNetworkSubnetConfig -Name default -AddressPrefix 10.0.0.0/24 -VirtualNetwork $virtualNetwork

#set up mi subnet

$subnetConfigMi = Add-AzureRmVirtualNetworkSubnetConfig -Name mi -AddressPrefix 10.0.1.0/24 -VirtualNetwork $virtualNetwork

$virtualNetwork | Set-AzureRmVirtualNetwork

#enable access to azure management service
$routeTableMiManagementService = New-AzureRmRouteTable -Name ‘mySQLMIRouteTableMiManagementService’ -ResourceGroupName $resourceGroup -location $location

Set-AzureRmVirtualNetworkSubnetConfig -VirtualNetwork $virtualNetwork -Name ‘mi’ -AddressPrefix 10.0.1.0/24 -RouteTable $routeTableMiManagementService |
Set-AzureRmVirtualNetwork

Get-AzureRmRouteTable -ResourceGroupName $resourceGroup -Name ‘mySQLMIRouteTableMiManagementService’ |
Add-AzureRmRouteConfig -Name ‘ToManagedInstanceManagementService’ -AddressPrefix 0.0.0.0/0 -NextHopType ‘Internet’ |
Set-AzureRmRouteTable

#install managed instance

New-AzureRmSqlManagedInstance -Name “demosqlmi”
-ResourceGroupName $resourceGroup -Location $location -SubnetId $subnetConfigMi.id`
-AdministratorCredential (Get-Credential) `
-StorageSizeInGB 1024 -VCore 8 -Edition “GeneralPurpose” `
-ComputeGeneration Gen4 -LicenseType LicenseIncluded

You can install Azure PowerShell from https://docs.microsoft.com/en-us/powershell/azure/install-azurerm-ps?view=azurermps-6.8.1 or use Portal to set up everything as per – https://docs.microsoft.com/en-us/azure/sql-database/sql-database-managed-instance-vnet-configuration and https://docs.microsoft.com/en-us/azure/sql-database/sql-database-managed-instance-get-started

Once you created networking prerequisites and SQL Azure MI you can restore SQL database into MI as explained here – https://docs.microsoft.com/en-us/azure/sql-database/sql-database-managed-instance-get-started-restore

How can I be sure that my application database features are supported in SQL Azure MI? 

Majority of mainstream SQL Server features are supported in SQL Azure Managed Instance, including such as jobs,  CLR, linked servers, etc.  For feature matrix can be found here –https://docs.microsoft.com/en-us/azure/sql-database/sql-database-features

For more see – https://azure.microsoft.com/en-us/blog/new-options-to-modernize-your-application-with-azure-sql-database/https://docs.microsoft.com/en-us/azure/sql-database/sql-database-managed-instance

Steering in the Clouds – Running SQL Server on Azure Kubernetes Managed Service (AKS)

logo_kubernetes_400

In this post I would love to combine my favorite RDBMS , which is SQL Server with hottest Azure service out there – AKS. AKS is Azure hosted Kubernetes based container orchestration service. AKS reduces the complexity and operational overhead of managing Kubernetes by offloading much of that responsibility to Azure. As a hosted Kubernetes service, Azure handles critical tasks like health monitoring and maintenance for you.

Why run SQL Server in containers orchestrated by Kubernetes?

Over the past year, Kubernetes — also known as K8s — has become a dominant topic of conversation in the infrastructure world. Given its pedigree of literally working at Google-scale, it makes sense that people want to bring that kind of power to their DevOps stories; container orchestration turns many tedious and complex tasks into something as simple as a declarative config file.

The rise of orchestration is predicated on a few things, though. First, organizations have moved toward breaking up monolithic applications into microservices. However, the resulting environments have hundreds (or thousands) of these services that need to be managed. Second, infrastructure has become cheap and disposable — if a machine fails, it’s dramatically cheaper to replace it than triage the problems.

So, to solve the first issue, orchestration relies on the boon of the second; it manages services by simply letting new machines, running the exact same containers, take the place of failed ones, which keeps a service running without any manual interference.

However, up until recently K8s were only used by stateless aps and couldn’t work with stateful applications and databases. Managing state in Kubernetes is difficult because the system’s dynamism is too chaotic for most databases to handle–especially SQL databases that offer strong consistency.

Only since StateFull sets were introduced in K8s we can start thinking about running databases in K8s. By far the most common way to run a database, StatefulSets is a feature fully supported as of the Kubernetes 1.9 release. Using it, each of your pods is guaranteed the same network identity and disk across restarts, even if it’s rescheduled to a different physical machine. In AKS in order to run an RDBMS like SQL Server I will need to create persisted volume.

A Persisted Volume (PV) is a piece of storage in the cluster that has been provisioned by an administrator. It is a resource in the cluster just like a node is a cluster resource. PVs are volume plugins like Volumes, but have a lifecycle independent of any individual pod that uses the PV.   This will allow our pods to go up and down and our volume to stay available.

wkb_arch

So all you need to setup SQL Server in Azure Kubernetes PaaS service (AKS) is really an Azure account.  FIrst thing lets install Azure CLI. I am using Windows machine, but recently I was able to install and run Azure CLI on mac as well , of course.  Instructions for Windows install can be found here –https://docs.microsoft.com/en-us/cli/azure/install-azure-cli-windows?view=azure-cli-latest.

If you dont want to install Azure CLI on your machine you can simply use it with Azure Cloud Shell on the Azure Portal – https://docs.microsoft.com/en-us/azure/cloud-shell/overview . Recently I used GCP Cloud Shell and this , as well as Azure Cloud Shell are great idea if you dont want to or cannot install CLI\SDK on your machine.

Once you installed CLI, lets login to your Azure subscription.

az login

This will launch your default browser for you to login.  Once you logged in , you can list subscriptions you have via this command

az account list

Below picture shows output of above command , I erased all of the unique information

azaccount

Once the login process is complete and you are operating in the right subscription,  the resource group to hold all the objects of the Kubernetes cluster can be created:

az group create --name GennadyKSQLK8s--location eastus

You should be able to see new resource group in Azure Portal UI:

rg

Once resource group is created we can build AKS cluster in that resource group.

az aks create --resource-group GennadyKSQLK8s --name mySQLK8sCluster --node-count 2 --generate-ssh-keys

There is a lot going behslightly ind the scenes of this one command so you may have to be a bit more patient, something I am not known for:

k8run

In few minutes we are done and cluster is created.  Next lets install kubectl to manage Kubernetes cluster.

az aks install-cli

Setup PATH for kubectl:

set PATH=%PATH%;C:\Users\Gennady\.azure-kubectl

Next, lets grab credentials in order to connect and manage the cluster: –

az aks get-credentials --resource-group=GennadyKSQLK8s  --name=mySQLK8sCluster

The cluster is setup and we can connect. Lets test it by listing cluster nodes:

kubectl get nodes

The output is below:

kubectlnodes

There are the two nodes of the cluster and it is ready to host a sql instance in a pod.  Now we need to create new persisted volume and instance of SQL Server on Linux.

We will begin by creating SA password for SQL Server in Kubernetes cluster. Kubernetes can manage configuration information like passwords as secrets.

kubectl create secret generic mssql --from-literal=SA_PASSWORD="MyP@ssw0rd1"

Now we need persistent volume and persistent volume claim in Kubernetes. Here are the steps to get that created:

      • Create a manifest to define the storage class and the persistent volume claim. The manifest specifies the storage provisioner, parameters, and reclaim policy. The Kubernetes cluster uses this manifest to create the persistent storage. I will use following YAML to define my storage class and persistent volume claim:
        kind: StorageClass
        apiVersion: storage.k8s.io/v1beta1
        metadata:
             name: azure-disk
        provisioner: kubernetes.io/azure-disk
        parameters:
          storageaccounttype: Standard_LRS
          kind: Managed
        ---
        kind: PersistentVolumeClaim
        apiVersion: v1
        metadata:
          name: mssql-data
          annotations:
            volume.beta.kubernetes.io/storage-class: azure-disk
        spec:
          accessModes:
          - ReadWriteOnce
          resources:
            requests:
              storage: 8Gi
        

        I will save above YAML as disk.yaml on my computer.

      • Next , we create the persistent volume claim in Kubernetes. Lets run this command:
        kubectl apply -f C:\Users\Gennady\Downloads\disk.yaml

        Obviously, your yaml file location may be different than mine above
        Result shown below:

        kubectlpersistent
        The persistent volume is automatically created as an Azure storage account, and bound to the persistent volume claim

      • Verify the persistent volume claim.  We can run following command:
        kubectl describe pvc mssql-data

        The output can be seen below:

        pvc_describe

Now you should be able to see this volume in the portal as part of our resource group:

pvc1

Now, that the persistent volume is added we need to add the SQL Server deployment. The deployment creates a replica set. The replica set creates the pod.  The deployment described via YAML manifest like below:

apiVersion: apps/v1beta1
kind: Deployment
metadata:
  name: mssql-deployment
spec:
  replicas: 1
  template:
    metadata:
      labels:
        app: mssql
    spec:
      terminationGracePeriodSeconds: 10
      containers:
      - name: mssql
        image: microsoft/mssql-server-linux
        ports:
        - containerPort: 1433
        env:
        - name: ACCEPT_EULA
          value: "Y"
        - name: SA_PASSWORD
          valueFrom:
            secretKeyRef:
              name: mssql
              key: SA_PASSWORD 
        volumeMounts:
        - name: mssqldb
          mountPath: /var/opt/mssql
      volumes:
      - name: mssqldb
        persistentVolumeClaim:
          claimName: mssql-data
---
apiVersion: v1
kind: Service
metadata:
  name: mssql-deployment
spec:
  selector:
    app: mssql
  ports:
    - protocol: TCP
      port: 1433
      targetPort: 1433
  type: LoadBalancer

I will save above YAML to my computer as deployment.yaml file. Now I can run this to deploy:

kubectl apply -f C:\Users\Gennady\Downloads\deployment.yaml

You should see following output:

KUBECTLDEPLOY

The deployment and service are created. The SQL Server instance is in a container, connected to persistent storage. Now lets connect to the pod to verify pod was created via kubectl get pod

getpod

Now lets verify that services are running via kubectl get services.

getservices

This command returns services that are running, as well as the internal and external IP addresses for the services.

Finaly , lets connect to our SQL Server instance using sqlcmd:

lastone

Hope this helps and happy steering the cloud databases. For more see – https://kubernetes.io/docs/home/?path=browsehttps://docs.microsoft.com/en-us/sql/linux/tutorial-sql-server-containers-kubernetes?view=sql-server-2017https://joeydantoni.com/2018/03/29/getting-started-with-sql-server-and-kubernetes/https://cloudblogs.microsoft.com/sqlserver/2018/05/29/sql-server-at-the-red-hat-summit-2018/.


Forecast Cloudy – Migrating SQL Server Database from AWS EC2 to SQL Azure Database using Microsoft Data Migration Assistant Tool

sql-database-windows-azure

Amazon Web Services EC2 is a great IaaS Platform and many organizations use it to host SQL Server instances. Being IaaS platform is opens up easy migration scenarios from on-premises deployments and for many people its a great first step into cloud. However, hopefully soooner than later, many companies realize that they are ready to take next step – move their workloads and databases to PaaS cloud service. This is where Microsoft SQL Azure DB shines.

Microsoft Azure SQL Database (formerly SQL Azure, Windows Azure SQL Database) is a cloud-based database service from Microsoft offering data-storage capabilities. The aim is for users to just communicate with a T-SQL endpoint rather than managing database storage, files, and high availability. Azure SQL Database obviously has number of limitations like lack of support of cross database queries, SQL Broker, etc. meaning that not every database can be migrated to Microsoft Azure SQL DB without prerequisite work. However, for folks that are ready to migrate Microsoft Data Migration Assistant can be viable option for such migration from AWS EC2 IaaS.

For my tutorial I have SQL Server on Windows instance in EC2 running well known venerable AdventureWorks2016 database.  Here it is amongst my other servers in EC2 console:

ec2src

With AWS elastic IP assigned to that Windows machine I can easily connect to default SQL instance via my local SSMS:

ec2sqlsrc

Obviously previously I had to setup proper inbound rules for this machine both with AWS EC2 Security Groups and Windows Firewall.

Next step is to create Microsoft Azure DB target.  This is well documented topic as well, officially described here – https://docs.microsoft.com/en-us/azure/sql-database/sql-database-get-started-portal .

I created S3 tier database calling it SmallSQLTarget.

targetsqlazure

I also had to again go to security group for the server and open inbound ports for SQL Server traffic again (port 1433).  Smart way to do it is to filter by client IP of my workstation where I run my SSMS and will run Data Migration Assistant tool

Now I can make sure that I can connect to my target Microsoft Azure SQL DB from my client machine via SSMS as well:

both

Now lets proceed with migration. For that you will need to download and install Microsoft Data Migration Assistant from – https://www.microsoft.com/en-us/download/details.aspx?id=53595  . Once you installed the tool lets create new project. I will start with assesment project to make sure I dont have any critical incompatibilities that preclude my migration to PaaS platform.

dma1

Tool will check for compatibility issues in my database as well as feature parity to see what needs to be done to migrate any SQL Server instance features to PaaS if anything at all.

dma2

We can then provide credentials to our AWS EC2 based instance and pick database after connecting to the source:

dma3

Now that we added source lets start assessment.  DMA can have any version of SQL Server as assesment source up to 2016.  As assesment done you will get a nice report where you can see all of the potential issues before you migrate. It should something  look like this :

report1

Now lets migrate our database as I found no migration blockers here.

Press on + button and create new migration project

dma5

Lets connect again to instance on EC2 and select DB to migrate

dma6

Next connect to Microsoft Azure SQL DB target by specifying server address and credentials and select target db, in my case SmallSQLAzure.

dma7

After that tool will do quick assesment and present you with schema objects you can migrate , highlighting\marking any objects that may have issues

dma8

After you pick objects you wish to migrate , tool will generate SQL DML script for these objects.  You can then save that script for analysis and changes , as well as apply that script via SSMS on your own. Or you can go ahead and apply the script via tool as I done for this example by pressing Deploy Schema button.

dma9

After schema deployment finish we can proceed with data migration by pressing Migrate Data button.

dma10

Next, pick your tables to migrate and start data migration. Migration of data for smaller database like AdventureWorks takes few minutes.  Everything transferred other than 2 temporal tables , but those are very different from regular database table.  SQL Server 2016 introduced support for system-versioned temporal tables as a database feature that brings built-in support for providing information about data stored in the table at any point in time rather than only the data that is correct at the current moment in time.  There are other ways to migrate temporal tables to SQL Azure that I will post in my next blog posts.

dma11

Well, we are pretty much done. Next, check the data has migrated to target by doing few queries in SSMS:

result

For more on Microsoft Data Migration Assistant see – https://docs.microsoft.com/en-us/sql/dma/dma-overviewhttp://www.jamesserra.com/archive/2017/03/microsoft-database-migration-tools/https://blogs.msdn.microsoft.com/datamigration/2016/08/26/data-migration-assistant-known-issues-v1-0/https://blogs.msdn.microsoft.com/datamigration/2016/11/08/data-migration-assistant-how-to-run-from-command-line/

Hope this helps.


Data Cargo In The Clouds – Running SQL Server 2017 in Docker

sqlserver_and_docker

In my previous post I attempted to explain my new interest in Docker and running data-centric applications in container. Starting here I will show how to install SQL Server for Linux on Azure IaaS in container.

Lets start by creating Linux VM in Azure that will run Docker for us.  I dont want to spend all of the time and space going through steps in portal or PowerShell since I already went through these in this post, Good video titorial  can also be found here .

Assuming you successfully created Linux VM and can login like this:

azlinux1

Next thing we will install Docker on that VM.  We will get latest and greatest version of Docker from Docker repository.

  • First, add the GPG key for the official Docker repository to the system:

    $ curl -fsSL https://download.docker.com/linux/ubuntu/gpg | sudo apt-key add -
    
  • Add the Docker repository to APT sources:

    $ sudo add-apt-repository "deb [arch=amd64] https://download.docker.com/linux/ubuntu $(lsb_release -cs) stable"
  • Next, update the package database with the Docker packages from the newly added repo:

    $ sudo apt-get update
  • Make sure you are about to install from the Docker repo instead of the default Ubuntu 16.04 repo:
    apt-cache policy docker-ce

    You should see following output:

    docker-ce:
      Installed: (none)
      Candidate: 17.03.1~ce-0~ubuntu-xenial
      Version table:
         17.03.1~ce-0~ubuntu-xenial 500
            500 https://download.docker.com/linux/ubuntu xenial/stable amd64 Packages
         17.03.0~ce-0~ubuntu-xenial 500
            500 https://download.docker.com/linux/ubuntu xenial/stable amd64 Packages


    Notice that docker-ce is not installed, but the candidate for installation is from the Docker repository for Ubuntu 16.04. The docker-ce version number might be different.

  • Finally install Docker
    $ sudo apt-get install -y docker-ce
  • Make sure its installed and running
    $ sudo systemctl status docker

    Output should be similar to below showing that daemon is started and running

    linuxdoc

Next we need to pull latest SQL Server Docker image:

$ sudo docker pull microsoft/mssql-server-linux

Once the image is pulled and extracted you should see similar output

linuxdoc2

Now lets run container image with Docker:

$ sudo docker run -e 'ACCEPT_EULA=Y' -e 'MSSQL_SA_PASSWORD=<YourStrong!Passw0rd>' -e 'MSSQL_PID=Developer' --cap-add SYS_PTRACE -p 1401:1433 -d microsoft/mssql-server-linux

Now we are running Docker container with SQL Server 2017 in Azure. We should be able to list our containers like:

 $ sudo docker ps -a

And see output like:

linuxdoc3

Connect to SQL Server in the container.

The following steps use the SQL Server command-line tool, sqlcmd, inside the container to connect to SQL Server. First lets connect to bash inside the container using docker exec command. Note I am providing container id here as parameter fetched from previous output of ps command

$ sudo docker exec -it d95734b7f9ba  "bash"

Now lets connect via sqlcmd here

/opt/mssql-tools/bin/sqlcmd -S localhost -U SA -P '<YourStrong!Passw0rd>'

Now lets make simplest query:

SELECT @@version
     GO

You should see output like:

linuxdoc4

Now you can go ahead and start creating databases, tables, moving data, etc.

For more see – https://docs.microsoft.com/en-us/sql/linux/quickstart-install-connect-dockerhttps://docs.microsoft.com/en-us/sql/linux/sql-server-linux-configure-docker. SQL Server images on Docker Hub – https://hub.docker.com/r/microsoft/mssql-server-linux/https://mathaywardhill.com/2017/05/08/how-to-attach-a-sql-server-database-in-a-linux-docker-container/


Hope this helps.

Forecast Cloudy – The Magic of AzCopy As Database Migration Tool

Here is a quick note that can be helpful to folks. Recently I had to migrate database to Azure via taking a backup from on-premises SQL Server and restoring this backup on SQL Server on Azure VM.  Now, there is a better , more structured method available for the same using Database Migration Assistant (DMA) from Microsoft – https://www.microsoft.com/en-us/download/details.aspx?id=53595 , however I went old fashioned way purely through backups.

But how do I move 800 GB backup quickly to the cloud? What about network issues and need to restart on network hiccup? All of these issues and more can be solved via AzCopy tool.

AzCopy is a command-line utility designed for copying data to and from Microsoft Azure Blob, File, and Table storage using simple commands with optimal performance. You can copy data from one object to another within your storage account, or between storage accounts.

There are two versions of AzCopy that you can download. AzCopy on Windows is built with .NET Framework, and offers Windows style command-line options. AzCopy on Linux is built with .NET Core Framework which targets Linux platforms offering POSIX style command-line options. I will showcase Windows version here for now.

So what I did first is created a File Share on Azure Blob Storage. Azure File storage is a service that offers file shares in the cloud using the standard Server Message Block (SMB) Protocol. Both SMB 2.1 and SMB 3.0 are supported. You can follow this tutorial to do so – https://www.petri.com/configure-a-file-share-using-azure-files . Next, I needed to upload my backup to this file share via AzCopy:

The basic syntax to use AzCopy from command line as follows

AzCopy /Source: /Dest: [Options]

I can upload a single file, called test.bak , from C:\Temp to the demo container in the storage account (blob service) using the following command:

AzCopy /Source:C:\Temp /Dest:https://pazcopy.blob.core.windows.net/demo /DestKey:QB/asdasHJGHJGHJGHJ+QOoPu1fC/Asdjkfh48975845Mh/KlMc/Ur7Dm3485745348gbsUWGz/v0e== /Pattern:"test.bak"

Some notes:

  • Note how the URL of the destination storage account specifies the blob service.
  • I have specified the storage account access key with the /DestKey option. This key is unique to the storage account (source or destination).
  • The /Pattern option specifies the file being copied

Once file copied ypu should see stats in command line as well:

azcopy

Once file is uploaded from my destination Azure VM all I have to is map to the File Share (example here – https://blogs.msdn.microsoft.com/windowsazurestorage/2014/05/12/introducing-microsoft-azure-file-service/)  and restore backup.

Hope this helps.  More on AzCopy – https://docs.microsoft.com/en-us/azure/storage/common/storage-use-azcopyhttps://blogs.technet.microsoft.com/canitpro/2015/12/28/step-by-step-using-azcopy-to-transfer-files-to-azure/


Capre Noctem – Using SQL Server Diagnostics (Preview) to analyze SQL Server minidump

Microsoft just released the SQL Server Diagnostics (Preview) extension within SQL Server Management Studio and Developer APIs to empower SQL Server customers to achieve more through a variety of offerings to self-resolve SQL Server issues.

diagnostic

So what can it do:

    • Analyze SQL Server dump.

Customers should be able to debug and self-resolve memory dump issues from their SQL Server instances and receive recommended Knowledge Base (KB) article(s) from Microsoft, which may be applicable for the fix.

  • Review recommendations to keep SQL Server instances up to date.


Customers will be able to keep their SQL Server instances up-to-date by easily reviewing the recommendations for their SQL Server instances. Customers can filter by product version or by feature area (e.g. Always On, Backup/Restore, Column Store, etc.) and view the latest Cumulative Updates (CU) and the underlying hotfixes addressed in the CU.

  • Developers who want to discover and learn about Microsoft APIs can view developer portal and then use APIs in their custom applications. Developers can log and discuss issues and even submit their applications to the application gallery.


So I installed this extension and decided to give it a go with one of the SQL Server minidumps I have.

diagnostics2

It actually correctly identified an issue and issues suggestions. So, while this may not work on every dump, it should worth trying before you start up WinDbg.

Give it a try. Hope this helps.

Iter in ignotus–Installing SQL Server vNext on Ubuntu Linux 16.10

SQL-Loves-Linux_2_Twitter-002-640x358


Over the holidays I had a chance to install and run SQL Server vNext on my Ubuntu Linux machine. I did run into some issues during install, but was able to work around all of those and have SQL Server engine successfully running on Ubuntu 16.10 x64 .

To start out make sure that you are installing SQL Server vNext on Ubuntu Linux version 16 or higher and 64 bit. My first issue I ran into attempting to install on Ubuntu 14.x on 32 bit.

Here are steps to follow in Bash:

  1. Import the public repository GPG keys:
    curl https://packages.microsoft.com/keys/microsoft.asc | sudo apt-key add -
  2. Register the Microsoft SQL Server Ubuntu repository:
    curl https://packages.microsoft.com/config/ubuntu/16.04/mssql-server.list | sudo tee /etc/apt/sources.list.d/mssql-server.list
    
  3. Run Update thru apt-get. If you didn’t update you may run into an error later, as I did
    sudo apt-get update
    
  4. Run actual install via apt-get again
    sudo apt-get install -y mssql-server
    

    If you are on 32 bit or didnt update source you can see this error

    Unable to locate package mssql 


  5. Now if you in latest Ubuntu x 64 with updated components tou should see install occuring in your terminal window. After the package installation finishes, run the configuration script and follow the prompts.
    sudo /opt/mssql/bin/sqlservr-setup
    

    Once the configuration is done, verify that the service is running

    systemctl status mssql-server
    

Now that install is done in 5 easy steps and SQL Services are running on Ubuntu Linux you can use SSMS on Windows to connect to your SQL Server on Linux. But in order to connect from Linux to this instance on Linux I will need to install SQL Client Tools for connectivity stack.


The following steps install the command-line tools, Microsoft ODBC drivers, and their dependencies. The mssql-tools package contains:

  1. sqlcmd: Command-line query utility
  2. bcp: Bulk import-export utility.

Install on Ubuntu in 3 easy steps

  1. Import the public repository GPG keys:
    curl https://packages.microsoft.com/keys/microsoft.asc | sudo apt-key add -
    
  2. Register the Microsoft Ubuntu Repository
    curl https://packages.microsoft.com/config/ubuntu/16.04/prod.list | sudo tee /etc/apt/sources.list.d/msprod.list
    
  3. Update again via apt-get
    sudo apt-get update
    
  4. Now run actual install
    sudo apt-get install mssql-tools
    

    If you are on 32 bit or did not update source you can see this error

    Unable to locate package mssql-tools
    

Now lets connect to our instance on local SQL and run a quick query again all via Terminal

sqlcmd -S localhost -U SA -P ''
SELECT @@version;
GO

Well, that answers what I was doing over the Holidays. Happy bashing to you SQL folks

.

For more see – https://www.microsoft.com/en-us/sql-server/sql-server-vnext-including-Linux

https://blogs.microsoft.com/blog/2016/03/07/announcing-sql-server-on-linux/#sm.001on55ayi1dduo11m02qmercn8t3, https://docs.microsoft.com/en-us/sql/linux/

Semper Secura–Introduction To SQL Server Always Encrypted

With the introduction of SQL Server 2016 we now have a new way to encrypt columns called Always Encrypted. What makes it different from older encryption features in SQL Server like Column Encryption and Transparent Data Encryption is that it doesn’t just encrypt data at rest or while being transmitted on the wire, but only feature that ensures that the database never sees unencrypted values of sensitive columns, as data gets encrypted on the client tier via SQL Client\database driver. While the database only sees encrypted values, the application code works exclusively with unencrypted data. When a query is executed, the driver automatically looks up the master key in the Windows Certificate Store (or other OS-dependent location). The master key is then used to decrypt a column specific key, which in turn is used for encrypting and decrypting fields and parameters.

pic2

Microsoft advertises following use cases for Always Encrypted feature:

· Client and Data On-Premises

A customer has a client application and SQL Server both running on-premises, at their business location. The customer wants to hire an external vendor to administer SQL Server. In order to protect sensitive data stored in SQL Server, the customer uses Always Encrypted to ensure the separation of duties between database administrators and application administrators. The customer stores plaintext values of Always Encrypted keys in a trusted key store which the client application can access. SQL Server administrators have no access to the keys and, therefore, are unable to decrypt sensitive data stored in SQL Server.

· Client On-Premises with Data in Azure

A customer has an on-premises client application at their business location. The application operates on sensitive data stored in a database hosted in Azure (for example in SQL Server running in a virtual machine on Microsoft Azure). The customer uses Always Encrypted and stores Always Encrypted keys in a trusted key store hosted on-premises, to ensure Microsoft cloud administrators have no access to sensitive data.

· Client and Data in Azure

A customer has a client application, hosted in Microsoft Azure (e.g. in a worker role or a web role), which operates on sensitive data stored also stored in Microsoft Azure. The customer uses Always Encrypted to reduce security attack surface area (the data is always encrypted in the database and on the machine hosting the database).

pic1


Types of Always Encrypted encryption:

SQL Server offers two encryption modes: deterministic and random.

· Deterministic encryption ensures that a given value always has the same encrypted representation. This allows you to use the column for equality comparisons, joins, and grouping.

· For more security, you can use random encryption. This prevents guessing by ensuring that a given value’s encrypted representation is never the same twice.

You should use deterministic encryption for columns that will be used as search or grouping parameters, for example a government ID number. Use randomized encryption, for data such as confidential investigation comments, which are not grouped with other records, or used to join tables.

Limitations.

If a column is encrypted, then all range-like operations such as greater/less than, pattern matching using LIKE, etc. are disallowed. Furthermore, you can’t pass encrypted values to functions, user-defined or otherwise, because the database doesn’t have access to the unencrypted values.

Equality comparisons can only be performed on columns that use deterministic encryption.

Indexes can only be applied to deterministically encrypted columns.

If joining between two columns, both columns need to use the same column encryption key.

Constants expressions that refer to encrypted columns are not allowed. For example, you cannot write WHERE SSN = ‘111-11-1111’, but you can write WHERE SSN = @SSN. This is necessary because the driver works with the SqlParameter class to handle encryption requirements.

Unsupported data types include: xml, rowversion, image, ntext, text, sql_variant, hierarchyid, geography, geometry, and user defined-types.

Current drivers that support these feature are listed below:

pic3


Here is a quick tutorial on how to set up Always Encrypted

· Open you SQL Server Management Studio and connect to your SQL Server 2016 instance or SQL Azure. As far as on premise SQL Server you can use AlwaysEncrypted feature in Enterprise or Developer Editions

pic4

· First thing we will create is Column Master Key. You can do so either in script or via nice wizard in SSMS. Below is my script to do so , but of course based on your certificate , machine, etc. your script will be different

CREATE DATABASE AEDemo;

GO

USE [AEDemo]
/****** Object:  ColumnMasterKey [test]    Script Date: 9/15/2016 6:44:15 PM ******/
CREATE COLUMN MASTER KEY [test]
WITH
(
	KEY_STORE_PROVIDER_NAME = N'MSSQL_CERTIFICATE_STORE',
	KEY_PATH = N'LocalMachine/My/A9B9AFE1993FA0FAD052F49195FDF10DE5A953DB'
)
GO

•    Next thing is to create Column Encryption Key. Again your actual script will vary from mine below or you can use nice SSMS wizard to do so

CREATE COLUMN ENCRYPTION KEY [test]
WITH VALUES
(
	COLUMN_MASTER_KEY = [test],
	ALGORITHM = 'RSA_OAEP',
	ENCRYPTED_VALUE = 0x01700000016C006F00630061006C006D0061006300680069006E0065002F006D0079002F0061003900620039006100660065003100390039003300660061003000660061006400300035003200660034003900310039003500660064006600310030006400650035006100390035003300640062003B237BB1F1C8A7ADBB0BEA972AB6FC321B7BAB43C6EEEF20CC4BBAC52BE1582868C7E9BF92B01D7022AF9838D625ED5F1CE2D35975BFF600F96A5A5A07EDFA946DBDE08DE896A632B06BAFC5A861DC8298E36E408BE5EBAAEB94C674C04765D0138F30B6B0E676294B5D3FF5374434273B823550D3A89D6337BEEE1D93FBDAB50025ED7A91BE2F2C3C032A636D0049F5614EC248097BD0B12F79FF3A51DC242987D931A2473EAB98BCB7217CFF61B447E435F5FE19BB5DCAF1B7C8D8FA606FE5354EB9773A78C1F1EEFCC4D3D401CB3C602EBB3C197A2421637304D94BC58F129F20A5685A700C6BEDF8D5080F959B57B3F65721DDEF78BBDA035923D3A93D3380E52465663A72916CE4DCF0D904C27DB8298D6F44AACC95998EA7CC1F895BBD55553523A5558778252A5E4AE2DED30D6DE04DB24ACE18771D0B8C27F06A228F67F950C10E0DA035D12934DA5DB5D65E947789EBA86A5375C71DC386FB854FCE702D642CB5ED695B96E864C3F9CC34E52D87178B2DF75B6AAE3A996B2F6BC9EB99445F6311142E8C3F85A545EE0614AFCAB02A547664B31E546FFAA7667D86D7DF239CB4EAB66B847EBD78BDD01707C7C7DE04EE8F52F5F7D722A71BC8E5015F9EFB2A0DBDEB9B732C163D8C32F9DA00AABCDBE68067715CB1C56A385B0EA908A51EC51F8290D701689E112C646A10462636766066F703D82844CA7237F721EF
)
GO

· Now that keys are created lets create table that uses these keys to encrypt columns

CREATE TABLE dbo.EncryptedTable
(
  ID INT IDENTITY(1,1) PRIMARY KEY,
  
  LastName NVARCHAR(32) COLLATE Latin1_General_BIN2 
    ENCRYPTED WITH 
    (
       ENCRYPTION_TYPE = DETERMINISTIC, 
       ALGORITHM = 'AEAD_AES_256_CBC_HMAC_SHA_256', 
       COLUMN_ENCRYPTION_KEY = test2
    ) NOT NULL,
    
  Salary INT 
    ENCRYPTED WITH 
    (
       ENCRYPTION_TYPE = RANDOMIZED, 
       ALGORITHM = 'AEAD_AES_256_CBC_HMAC_SHA_256', 
       COLUMN_ENCRYPTION_KEY = test2
    ) NOT NULL
);
GO

So essentially we followed this workflow:

pic6

Well , we can try to insert some data into a table


DECLARE @LastName NVARCHAR(32) = N'Gennady', @Salary INT = 720000;
INSERT dbo.EncryptedTable(LastName,Salary) SELECT @LastName, @Salary;
go

This  will actually error out, but why? Since encryption and decryption is occurring on driver level this will be way you populate these encrypted columns from client side code. You don’t have to make any changes to your data access layer of your application except addition of following to your connection string:]

Column Encryption Setting=Enabled

Together with rolling out your Column Master Key to the client it should make it easy for your application to work with AlwaysEncrypte

pic8

Great details on Always Encrypted can be found here –

BOL – https://msdn.microsoft.com/en-us/library/mt163865.aspx

Channel 9 – https://channel9.msdn.com/Shows/Data-Exposed/Getting-Started-with-Always-Encrypted-with-SSMS?ocid=relatedentry

As every security and encryption feature there is performance overhead to enabling Always Encrypted, Aaron Bertrand has attempted some benchmarking that is shown here – http://sqlperformance.com/2015/08/sql-server-2016/always-encrypted-performance-follow-up