Forecast Cloudy – Azure Event Hub Introductory Tutorial

Imagine a scenario that rolling out new IoT enabled device or getting telemetry from millions of mobile apps or games. Architecting for this type of solution poses many challenges.  How do you enable ingest of messages at this scale?  More importantly, how do you enable processing of the messages in a manner which does not create a performance bottleneck?  How do you independently scale the message ingest and message processing capabilities?  How do you provide for loose coupling between message ingress and egress and ability to scale out as needed?

Enter Azure Event Hubs.

Azure Event Hubs is a highly scalable publish-subscribe ingestor that can intake millions of events per second so that you can process and analyze the massive amounts of data produced by your connected devices and applications. Once collected into Event Hubs you can transform and store data using any real-time analytics provider or with batching/storage adapters.


Azure Event Hubs is a new member to join the Azure Service bus family adding to the existing topics and queues offering. Event Hubs offer the ability to process a very high volume of messages fast. Event Hubs provides FIFO (First In First Out) messaging much like queues and topics and also supports pub-sub messaging just like topics.

Planning for Azure Event Hubs.

You must put some effort in capacity planning before you create an Event Hub. In order to make the right decisions let’s go over a couple details about Event Hubs. Event Hubs are partitioned. The minimum number of partitions is 8 and the maximum (public) number of partitions is 32. If you need more partitions you must go through a support ticket. At that time, you can request up to 1024 (and higher) partitions for your Event Hub.

A partition is an ordered sequence of events that is held in an Event Hub. As newer events arrive, they are added to the end of this sequence. A partition can be thought of as a “commit log.”

Event Hubs

Partitions retain data for a configured retention time that is set at the Event Hub level and applies across all partitions in the Event Hub. Events expire on a time basis; you cannot explicitly delete them. Each partition is independent and contains its own sequence of data. As a result, partitions often grow at different rates.

Event Hubs

Each partition has a performance target of 1 MB ingress or 1000 operations and 2 MB egress per second. By default, each Event Hub is created with 16 partitions. This corresponds to 16 MB ingress or 16,000 operations and 32 MB egress per second.

Although this is a lot, there is also need to look at message size here. If messages were 1 KB in size we could technically hit the performance target of 1000 operations per second. This could technically represent 16,000 messages per second. Calculating the number of partitions you need starts by calculating potential throughput in megabytes. Then you need to calculate the number of messages per second. This will give you the first part of the equation. The second part of the equation is found by calculating the number of processing nodes required to meet your performance targets. Since a single partition cannot be processed concurrently by multiple nodes, you must have at least as many partitions as you have backend node instances. For example, a system that must process 30 messages simultaneously, where each process requires a dedicated processing node, requires the Event Hub to have at least 30 partitions. Number of partitions = MAX (cumulative throughput required for the stream – given 1 MB per partition, number of nodes needed by the backend processing application)

Changing the number of partitions once in production can cause quite a bit of headaches because it means that we need to create a new Event Hub and reconfigure publishers to use the new Event Hub. While events are piling up let the backend nodes empty the Event Hub. Once it’s empty, you can reconfigure your backend nodes to consumer events from the new Event Hub. Switching to the backend processing nodes to the new Event Hub too early would break the order of events. From a billing perspective, the number of partitions is irrelevant because there is not charge for partitions.

Once the application is deployed you can provision throughput units to scale the Event Hub’s throughput capacity. A single throughput unit  has the capacity of 1 MB per second of ingress events (events sent into an Event Hub), but no more than 1000 ingress events, management operations or control API calls per second. It has 2 MB per second of egress events (events consumed from an Event Hub) and 84 GB of event storage (sufficient for the default 24-hour retention period).  While partitions are a data organization concept, throughput units are purely a capacity concept. Throughput units are billed per hour and are purchased ahead of time. Once purchased, throughput units are billed for a minimum of one hour. Up to 20 throughput units can be purchased for a Service Bus namespace, and there is an Azure account limit of 20 throughput units. These throughput units are shared across all Event Hubs in a given namespace. Throughput units are provisioned on a best effort basis and may not always be available for immediate purchase. If you require a specific capacity, it is recommended that you purchase those throughput units ahead of time. If you require more than 20 throughput units, you can contact Microsoft Azure Service Bus support to purchase more throughput units on a commitment basis in blocks of 20, up to the first 100 throughput units. Beyond that, you can also purchase blocks of 100 throughput units. It is recommended that you carefully balance throughput units and partitions in order to achieve optimal scale with Event Hubs. A single partition has a maximum scale of one throughput unit. The number of throughput units should be less than or equal to the number of partitions in an Event Hub.

If the total ingress throughput or the total ingress event rate across all Event Hubs in a namespace exceeds the aggregate throughput unit allowances, senders will be throttled and receive errors indicating that the ingress quota has been exceeded. If the total egress throughput or the total event egress rate across all Event Hubs in a namespace exceeds the aggregate throughput unit allowances, receivers are throttled and receive errors indicating that the egress quota has been exceeded. Ingress and egress quotas are enforced separately, so that no sender can cause event consumption to slow down, nor can a receiver prevent events from being sent into Event Hubs.

Enough Theory – Lets Create Event Hub

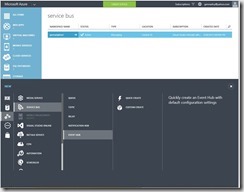
An EventHub can be created from the Azure Management Portal, under the current Service Bus area.Click on the +NEW area at the bottom of the portal and navigate to the Event Hub service

eventhub1

If you have an existing Service Bus namespace, then you can reuse it as I have done. Otherwise, you will need a new namespace before you create Event Hub. A wizard will show on screen to assist you with the creation. Enter an Event Hub name, select a Region that hosts the services that will process the events and click next. Be sure that you are creating the resource on the correct subscription and desired Azure Service Bus Namespace.

071614_0108_gettingacqu2[1]

The next panel prompts for important information. This is where you specify the number of partitions for your Event Hub. Then because this is a Standard Event Hub, you can specie the number of days that an event stays in the Event Hub. This is especially handy when you need to replay events from a week ago. The maximum number of days is set to 30, the minimum is set to 1 day.

071614_0108_gettingacqu3[1]

Security and Connectivity

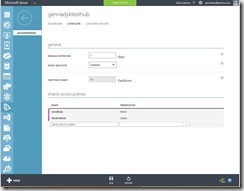
In order to publish events to an Event Hub, you must create Shared Access Policies. In order to publish an event we need a Shared Access Policy that allows us to send events. Navigate to the Service Bus namespace and click on the Event Hubs tab. From the list choose the newly created Event Hub.Then click on Configure. In this screen, you will be able to create a Send enabled Shared Access Policy.

eventhub2

Now we need to retrieve a SAS key connection strings to authenticate and interact with the Event Hub. Select the Dashboard tab and click on the View Connection String link. From the wizard copy the Connection String that is enabled for Send operations. Click the copy button to store the connection string in you clipboard. This will allow you to paste the connection string in your project’s configurations.

Create Event Sender in Code

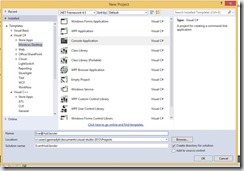
As my sample will be pretty basic I will just create a simple C# console project in Visual Studio.

eventhubvssender1

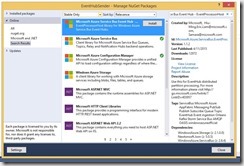
In the Solution Explorer, right-click on References and select Manage NuGet Packages…

In the Search Online box type Azure Service Bus.

eventhubvsreceiver2

Install Microsoft Azure Service Bus version 2.6.1 or later.

After that its simply a matter of code. Below sample synchronously  sends very simple messages to the hub:

using System;
using System.Collections.Generic;
using System.Linq;
using System.Text;
using System.Threading.Tasks;
using System.Threading;
using Microsoft.ServiceBus.Messaging;
using System.Diagnostics;

namespace EventHubSender
{
    class Program
    {
        static string eventHubName = "{put your hub name here}";
        static string connectionString = "Endpoint=sb:/{put your namespace here}/;SharedAccessKeyName=SendRule;SharedAccessKey={put your access key here}";
        static void Main(string[] args)
        {
            Console.WriteLine("Press Ctrl-C to stop the sender process");
            Console.WriteLine("Press Enter to start now");
            Console.ReadLine();
            SendingRandomMessages();
        }
        static void SendingRandomMessages()
        {
            var eventHubClient = EventHubClient.CreateFromConnectionString(connectionString, eventHubName);
     
            while (true)
            {
                try
                {
                    var message = Guid.NewGuid().ToString();
                    Console.WriteLine("{0} > Sending message: {1}", DateTime.Now, message);
                    
                    eventHubClient.Send(new EventData(Encoding.UTF8.GetBytes(message)));
                    

                    Console.WriteLine("Duration: " + sw.ElapsedMilliseconds.ToString());
                
                }
                catch (Exception exception)
                {
                    Console.ForegroundColor = ConsoleColor.Red;
                    Console.WriteLine("{0} > Exception: {1}", DateTime.Now, exception.Message);
                    Console.ResetColor();
                }

                Thread.Sleep(200);
            }
        }
    }
}

You will notice above that certain configuration items are marked {put your… here}. Replace {put your namespace here} with the name of the Service Bus Namespace you created in the Azure portal.  Replace your {put your hub name here} with name of the event hub you created. Finally you’ll see SharedAccessKeyName=. I want you to replace SendRule I used with the name of the data ingress shared access policy you created in your Event Hub.In order to replace {put your access key here} with the correct value, go to the Dashboard page of your Event Hub and click the Connection Information key at the bottom of the page. A dialog containing access connection information with connection strings will appear. Copy the connection string from the data ingress shared access policy you created and paste it into notepad because it contains too much information. Just copy the SharedAccessKey value at the end of the connection string into {put your access key here} and then save and close the file.

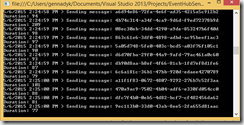
Finally running this application is really easy:

image

Output

image

Back in Azure Portal in the dashboard for our event hub I can see events being received:

image

For more and deeper information see these excellent articles and blogs :

Hope this helps.

Forecast Cloudy – Creating and Monitoring Azure Service Bus Topics Tutorial

Although in general ,unlike some of my colleagues, I have never been an integration guy vs. for example my keen interest in all things database, NoSQL, analytics and data storage, my customers currently are Azure Service Bus users, so I had to understand Service Bus, topics, queues and how to develop, troubleshoot, and tor this technology.

An Enterprise Service Bus (ESB) is a software architecture model used for designing and implementing communication between mutually interacting software applications in a service-oriented architecture (SOA). As a software architectural model for distributed computing it is a specialty variant of the more general client server model and promotes agility and flexibility with regard to communication between applications. Its primary use is in enterprise application integration (EAI) of heterogeneous and complex landscapes.

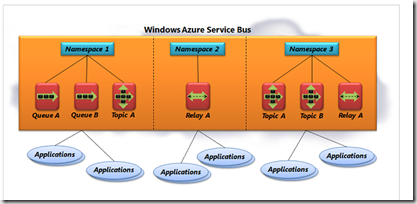
Azure Service Bus is a multi-tenant cloud service, which means that the service is shared by multiple users. Each user, such as an application developer, creates a namespace, then defines the communication mechanisms he\she needs within that namespace

image

Within a namespace, you can use one or more instances of four different communication mechanisms, each of which connects applications in a different way. The choices are:

  • Queues, which allow one-directional communication. Each queue acts as an intermediary (sometimes called a broker) that stores sent messages until they are received. Each message is received by a single recipient.
  • Topics, which provide one-directional communication using subscriptions-a single topic can have multiple subscriptions. Like a queue, a topic acts as a broker, but each subscription can optionally use a filter to receive only messages that match specific criteria.
  • Relays, which provide bi-directional communication. Unlike queues and topics, a relay doesn’t store in-flight messages-it’s not a broker. Instead, it just passes them on to the destination application.
  • Event Hubs, which provide event and telemetry ingress to the cloud at massive scale, with low latency and high reliability.

In this tutorial we will create a topic and sample subscription and will even attempt to setup some counters to monitor it.

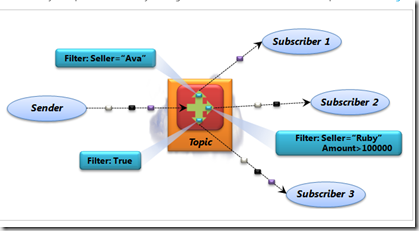
A topic is similar in many ways to a queue. Senders submit messages to a topic in the same way that they submit messages to a queue, and those messages look the same as with queues. The big difference is that topics let each receiving application create its own subscription by defining a filter. A subscriber will then see only the messages that match that filter

image

As in picture from Azure SB docs above:

  • Subscriber 1 receives only messages that contain the property Seller=”Ava”.
  • Subscriber 2 receives messages that contain the property Seller=”Ruby” and/or contain an Amount property whose value is greater than 100,000. Perhaps Ruby is the sales manager, and so she wants to see both her own sales and all big sales regardless of who makes them.
  • Subscriber 3 has set its filter to True, which means that it receives all messages. For example, this application might be responsible for maintaining an audit trail and therefore it needs to see all the messages.

For more on Service Bus and Topics see – https://msdn.microsoft.com/en-us/library/azure/hh367516.aspx, http://azure.microsoft.com/en-us/documentation/services/service-bus/, http://azure.microsoft.com/en-us/documentation/articles/service-bus-dotnet-how-to-use-topics-subscriptions/.

So lets move from theory to practice here.

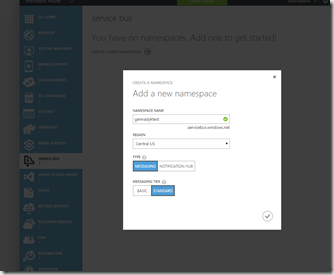
First thing I will need to do is to login to Azure Portal to define Service Bus Namespace: After I get in I will pick Service Bus in the left bar and click on Add New Namespace.  You will then pick name for your namespace , tier and region.

image


Next I need to understand and configure security to my SB namespace.

Applications can authenticate to the Service Bus using either Shared Access Signature (SAS) authentication, or by authenticating through the Access Control Service (ACS).

  • Shared Access Signature authentication enables applications to authenticate to the Service Bus using an access key configured on the namespace, or on the entity with which specific rights are associated. SAS is more applicable in scenarios in which applications do not need to manage the notion of an authorized “user”.
  • Access Control Service provides federation with various standards-based identity providers, e.g. Active Directory Federation Services (ADFS), Microsoft Account, Google, Yahoo!, and Facebook. ACS is more applicable in scenarios where applications require a rich, identity-based authentication.

In this demo I will use SAS as simplest way to authenticate.

Below, are the steps for setting up the relevant configuration:

Click the service namespace we created earlier, and then click Configure tab. Add the following policies:

  1. Name: PublisherAccessKey, Permission: Send. This key will be used by the Publisher sample to send messages to the topic. Any attempt to use this policy to listen to messages or to modify any attributes of the topic or subscriptions will result in an exception.
  2. Name: SubscriberAccessKey, Permission: Send, Listen. This key will be used by the Subscriber sample to receive and send messages from the subscriptions configured on the topic.

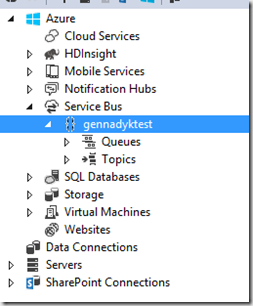
Now I can actually open my Visual Studio 2013 and see my Service Bus Namespace in Server Explorer:

image.

In this case I will create new solution in Visual Studio that will have three items:

  1. Console application called SampleTopicPublisher
  2. Console application called SampleTopicSubscriber
  3. Library application called SampleSBLibrary

Our message here will represent an order. Therefore I will define following data contract:

using System.Text;
using System.Threading.Tasks;
using System.Runtime.Serialization;
using System.Xml;

namespace SampleSBLibrary
{
    public class Order
    {
        
        public string ID { get;set;}
    
        public string Region {get;set;}

        public string Product {get;set;}

        public int Quantity {get;set;}

        public double PricePerUnit {get;set;}

    }
    
}

Now I am going to create Service Bus Topic. Topic can actually be created multiple ways:

  1. Windows Azure Management Portal: New -> App Services -> Service Bus -> Topic -> Quick Create or Custom Create.
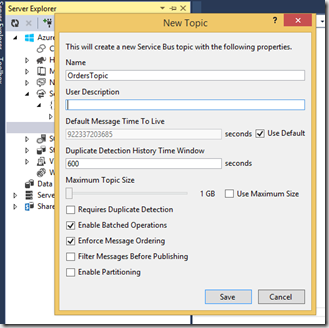
  2. Visual Studio: Server Explorer -> Windows Azure -> Service Bus -> Topics -> Create New Topic
  3. Programmatically: using the CreateTopic() method of Microsoft.ServiceBus.NamespaceManager class

As it doesn’t really matter here I will use Visual Studio.

image

Next thing we will do is setup Service Bus Connection String in in appSettings section of App.config file. The format we will use is:

image

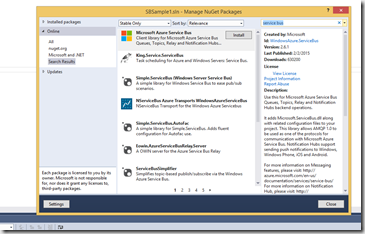
Next I will add Service Bus NuGet package to my solution via Visual Studio NuGet Package Manager searching for Service Bus online:

image

Now I pick and install Microsoft Azure Service Bus package accepting all of the legalese as necessary.

Next is my Publisher I will generate method that creates a list of sample data (Orders) to send to Service Bus:

  
 public static List GenerateSampleOrders(int NumOfOrders)
        {
            string[] products = new string[] { "Bicycle", "Motorcycle", "Kids Bycicle", "Skateboard" };
            string[] regions = new string[] {"North Central","South Central","North East","South East","South West"};
            Random r = new Random();
            List orders = new List();
            for (int i = 0; i < NumOfOrders; i++)
            {
                orders.Add(new Order
                {
                    ID = DateTime.Now.Ticks -DateTime.Parse("011\2015").Ticks +i,
                    Region = regions[r.Next(regions.Length)],
                    Product = products[r.Next(products.Length)],
                    Quantity = r.Next(10),
                    PricePerUnit = r.Next(100)

                    
                });

            }
            return orders;
        }

Inside the Program class for Publisher define a SendOrdersToTopic() method that takes the strongly-typed List of Order objects. Next, we read the service bus connection string stored in the app.config file. We will use the connection string and topic name to instantiate a TopicClient object.:

public static void SendOrdersToTopic (List orders_list)
        {
            //read connection string
            String connectionString = ConfigurationManager.AppSettings["Microsoft.ServiceBus.ConnectionString"].ToString();

            //create topic from connection string
            TopicClient myTopicClient = TopicClient.CreateFromConnectionString(connectionString,"orderstopic");

            //lets send test messages to topic
            
            foreach (Order ord in orders_list)
            {
                //create brokered message
                BrokeredMessage orderToBeSent = new BrokeredMessage(ord);
                orderToBeSent.Label =ord.ID.ToString();
                orderToBeSent.CorrelationId= ord.ID.ToString();
                orderToBeSent.MessageId = ord.ID.ToString();

                myTopicClient.Send(orderToBeSent);
                Console.WriteLine("Sent " + orderToBeSent.MessageId.ToString());
            }


        }

Finally lets put it all together in Publisher Main function\method:

 static void Main(string[] args)
        {
            while(true)
            {
                Console.Write("Enter number of Orders to Send to SB. Enter 0 to Exit");
                int input;
                if(!Int32.TryParse(Console.ReadLine(),out input) || input==0)
                {
                    break;
                }
                 List orders = GenerateSampleOrders(input);
                SendOrdersToTopic(orders); 
            }

Now we will create a Topic Subscriber.  Below is the code for that Console Application:

using System;
using System.Collections.Generic;
using System.Linq;
using System.Text;
using System.Threading.Tasks;
using Microsoft.ServiceBus;
using Microsoft.ServiceBus.Messaging;
using SampleSBLibrary;
using System.Configuration;


namespace SampleTopicSubscriber
{
    class Program
    {
        private static NamespaceManager _nsManager;
        private static MessagingFactory _factory;
        static void Initialize()
        {
            // create uri
            Uri uri = ServiceBusEnvironment.CreateServiceUri("sb", "gennadyktest", String.Empty);

            //create manager level permissions using SAS token
            string KeyName = "RootManageSharedAccessKey";
            string KeyValue = "";

            TokenProvider creds = TokenProvider.CreateSharedAccessSignatureTokenProvider(KeyName,KeyValue);

            //create namespace client

            _nsManager = new NamespaceManager(uri, creds);
            KeyName = "PublisherAccessKey";
            KeyValue = "";

            creds = TokenProvider.CreateSharedAccessSignatureTokenProvider(KeyName, KeyValue);

            //create messaging factory
            _factory = MessagingFactory.Create(uri, creds);
        }
        static void CleanUp()
        {
            if(!(_factory.IsClosed))
            {
                _factory.Close();
            }
        }
        private static void CreateTopicSubscriptions(string topic)
        {
            //add subscriptions for all orders
            if(!(_nsManager.SubscriptionExists(topic,"AllOrders")))
            {
                _nsManager.CreateSubscription(topic,"AllOrders");
            }
        }

        static void ReceiveOrdersFromSubscription(string topic, string subscription)
        {
            List orders = new List();
          
            Console.WriteLine("Receiving Messages for '{0}", subscription);
            //Create Subscription Client
            SubscriptionClient mySubClient = _factory.CreateSubscriptionClient(topic, subscription, ReceiveMode.PeekLock);
            Console.WriteLine("Receiving Messages");
            BrokeredMessage msg;
            while ((msg = mySubClient.Receive(new TimeSpan(0,0,1)))!=null)
            {
                var Order = msg.GetBody();
                Console.WriteLine("Received Message {0}", msg.MessageId.ToString());
                msg.Complete();
            }
            mySubClient.Close();
        }
        static void Main(string[] args)
        {
            
            string TopicPath ="orderstopic";
            Initialize();
            CreateTopicSubscriptions(TopicPath);
            while(true)
            {
                ReceiveOrdersFromSubscription(TopicPath,"AllOrders"); 
                Console.Write("All Done. Press Y/y to check again....");
                string input =Console.ReadLine();
                if(!input.Equals("Y",StringComparison.InvariantCultureIgnoreCase))
                {
                    break;
                }
            }

            CleanUp();

            }
        }
    }

The recommended way to receive messages from a subscription is to use a SubscriptionClient object. SubscriptionClient objects can work in two different modes: ReceiveAndDelete and PeekLock.

When using the ReceiveAndDelete mode, receive is a single-shot operation – that is, when Service Bus receives a read request for a message in a subscription, it marks the message as being consumed and returns it to the application. ReceiveAndDelete mode is the simplest model and works best for scenarios in which an application can tolerate not processing a message in the event of a failure. To understand this, consider a scenario in which the consumer issues the receive request and then crashes before processing it. Because Service Bus will have marked the message as consumed, when the application restarts and begins consuming messages again, it will have missed the message that was consumed prior to the crash.

In PeekLock mode (which is the default mode), the receive process becomes a two-stage operation which makes it possible to support applications that cannot tolerate missing messages. When Service Bus receives a request, it finds the next message to be consumed, locks it to prevent other consumers receiving it, and then returns it to the application. After the application finishes processing the message (or stores it reliably for future processing), it completes the second stage of the receive process by calling Complete on the received message. When the Service Bus sees the Complete call, it marks the message as being consumed and removes it from the subscription.

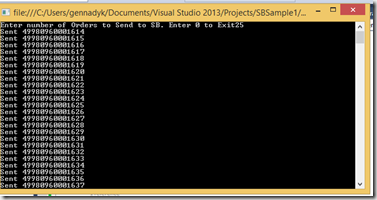
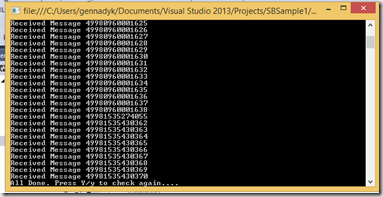
So here are two console apps in action – one sending Orders to Service Bus and another one receiving them.

image

image

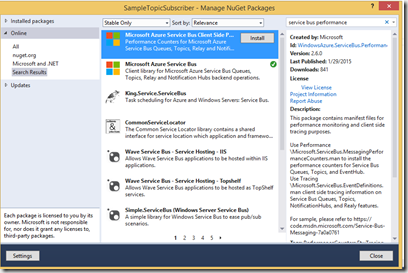
So that’s all folks? Well, I built all this for a different purpose – I need to monitor it.  Some time ago looking for monitoring solutions for Service Bus I came across long deleted page  still indexed by Google and cached. it told me that there is a NuGet package for Client performance counters for Service Bus. And sure thing I see it in Package Manager in VS:

image

Installing this package will add the following files to your project.

  1. Performance\Microsoft.ServiceBus.MessagingPerformanceCounters.man – Manifest file defining performance counters for the Azure Service Bus Queues, Topics and Event Hubs
  2. Tracing\Microsoft.ServiceBus.EventDefinitions.man – Adds event log tracing for Service Bus Queues and Topics
  3. RegisterMessagingPerfCounter.cmd – Command script to install the counters

As you probably will not be using Console application as Service Bus Client, but most likely a Windows Azure Worker Role, you can add following to that role Wad.config to collect these counters:

image

Then Then the final piece of the puzzle is to add the “RegisterMessagingPerfCounter.cmd” as a Start Up task within the Service definition file. This command will automatically install the performance counters on deployment. The Start Up task needs to be run with elevated privileges

image

Now you’re all done. Once your app is deployed, start putting some messages through and you’re see the counters capturing this information. This little package makes it incredibly simply to add performance monitoring to the Azure Service Bus. In addition the package provides support for a lot of tracing information which can be surfaced from the event log.