Forecast Cloudy – SQL Server on Amazon Web Services RDS Limitations, Backups, HA and DR

aws_logo

Continuing on SQL Server on Amazon Web Services RDS journey that I started on previous post. In that post I covered basics of RDS, creating SQL Server instance in RDS and connecting to it. In this post I would like to cover additional topics that are near and dear to any RDBMS DBA, including backups\restores, HADR and talk about limitations of SQL Server on RDS.

Limitations for SQL Server in Amazon Web Services RDS. When you are setting up SQL Server in RDS you need to be aware of following:

  • You only get SQL Server basic RDBMS Engine Services. SQL Server comes in with large number of components in addition to basic database services, These include Analysis, Reporting and Integration Services, Master Data Services, Distributed Relay, etc.  As you setup SQL Server on premises you pick components that you need. With RDS all you can host is DB Engine Service,   So if your application architecture involves running SQL Server instances with SSAS or SSRS, those components will have to be hosted elsewhere: this can be either an on-premise server within your network or an EC2 instance in the Amazon cloud. As an architectural best practice, it would make sense to host them in EC2.
  • Although you can login from SQL Management Studio (SSMS) there is no Remote Desktop option available that I could find.
  • Very limited file access.
  • Size limitations. AFAIK the minimum size of a SQL Server RDS instance for Standard or Enterprise Edition is 200 GB.and max is 4 TB. Beyond 4 TB you would have create another instance and probably implement some sort of sharding methodology.
  • Another limitation to be aware of is the number of SQL Server databases an RDS instance can host. It’s only 30 per instance.
  • There are no high availability options available. So no replication, no log shipping, no AlwaysOn and no manual configuration of database mirroring. Mirroring is enabled for all databases if you are opting for a Multi-AZ rollout. The secondary replica hosts the mirrored databases.
  • No distributed transaction support with MSDTC
  • No FileStream, CDC, SQL Audit , Policy Based Management, etc.

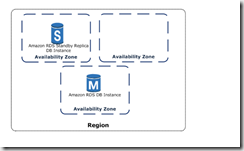
So if I have no AlwaysOn  Availability Groups or cluster how would HADR work?

image

Amazon RDS provides high availability and failover support for DB instances using Multi-AZ deployments. Multi-AZ deployments for Oracle, PostgreSQL, MySQL, and MariaDB DB instances use Amazon technology, while SQL Server DB instances use SQL Server Mirroring. In a Multi-AZ deployment, Amazon RDS automatically provisions and maintains a synchronous standby replica in a different Availability Zone. The primary DB instance is synchronously replicated across Availability Zones to a standby replica to provide data redundancy, eliminate I/O freezes, and minimize latency spikes during system backups.

The RDS console shows the Availability Zone of the standby replica (called the secondary AZ), or you can use the command rds-describe-db-instances or the API action DescribeDBInstances to find the secondary AZ. When using the BYOL licensing model, you must have a license for both the primary instance and the standby replica.

In the event of a planned or unplanned outage of your DB instance, Amazon RDS automatically switches to a standby replica in another Availability Zone if you have enabled Multi-AZ. The time it takes for the failover to complete depends on the database activity and other conditions at the time the primary DB instance became unavailable. Failover times are typically 60-120 seconds. However, large transactions or a lengthy recovery process can increase failover time. The failover mechanism automatically changes the DNS record of the DB instance to point to the standby DB instance.

Backups and Restores. Backup and restore has always been the easiest way of migrating SQL Server databases. Unfortunately this option is not available for RDS so DBAs have to fall back on the manual process of creating database schemas and importing data. You can also use the Database Import Export Wizard in SQL Server to move your data. In general Amazon defines has more on that procedure here – http://docs.aws.amazon.com/AmazonRDS/latest/UserGuide/SQLServer.Procedural.Importing.html

Interestingly you can also use SQLAzureMW tool http://sqlazuremw.codeplex.com/ to move schema and data from SQL Server to RDS.

mssql-to-rds-1[1]

That allows you to pick source objects to migrate:

mssql-to-rds-5[1]

Then you connect to destination and transfer schema and data: To me that’s much easier than scripting and transferring schema and using bcp separately on data.

For more info see – http://docs.aws.amazon.com/AmazonRDS/latest/UserGuide/Appendix.SQLServer.CommonDBATasks.htmlhttps://youtu.be/7t2-95NDfBU, http://www.nimbo.com/blog/microsoft-sql-server-high-availability-ha-cloud/

Dancing With Elephants and Flying With The Bees–Apache Hive Scaling Out with Partitions and Buckets

hive

In my previous post some time ago I introduced Apache Hive technology on Hadoop. Coming from SQL and RDBMS this was bound to be my favorite Hadoop technology.  Apache Hive is an open-source data warehouse system for querying and analyzing large datasets stored in HDFS files.

Today, unlike previous basics post, I will concentrate on Hive Partitions and Buckets. A simple query in Hive reads the entire dataset even if we have where clause filter. This becomes a bottleneck for running MapReduce jobs over a large table. We can overcome this issue by implementing partitions in Hive. Hive makes it very easy to implement partitions by using the automatic partition scheme when the table is created.

image

Partitions,  Just like in RDBMS, in Hive data within a table is split across multiple partitions. Each partition corresponds to a particular value(s) of partition column(s) and is stored as a sub-directory within the table’s directory on HDFS. When the table is queried, where applicable, only the required partitions of the table are queried, thereby reducing the I/O and time required by the query.  Example of creating partitioned table in Hive is below, note you can do this with both internal and external tables:

CREATE TABLE CUSTOMER   (

    userid             BIGINT,

    First_Name        STRING,

    Last_Name         STRING,

    address1           STRING,

    address2           STRING,

    city               STRING,

    zip_code           STRING,

    state              STRING


)

PARTITION BY  (


    COUNTRY            STRING

) 

As you can see I am using Country as partition column, The partition statement lets Hive alter the way it manages the underlying structures of the table’s data directory. If you browse the location of the data directory for a non-partitioned table, it will look like this: .db/. All the data files are directly written to this directory. In case of partitioned tables, subdirectories are created under the table’s data directory for each unique value of a partition column. In case the table is partitioned on multiple columns, then Hive creates nested subdirectories based on the order of partition columns in the table definition. Example with table above:

/gennadyk.db/customer/country=US

/gennadyk.db/customer/country=UK

When a partitioned table is queried with one or both partition columns in criteria or in the WHERE clause, what Hive effectively does is partition elimination by scanning only those data directories that are needed. If no partitioned columns are used, then all the directories are scanned (full table scan) and partitioning will not have any effect.

With a few quick changes it’s easy to configure Hive to support dynamic partition creation. Just as SQL Server has a SET command to change database options, Hive lets us change settings for a session using the SET command. Changing these settings permanently would require opening a text file and restarting the Hive cluster

SET hive.exec.dynamic.partition = true;
SET hive.exec.dynamic.partition.mode = nonstrict;

Important notes on best practices

  • Be careful using dynamic partitions. Hive has some built-in limits on the number of partitions that can be dynamically created as well as limits on the total number of files that can exist within Hive. Creating many partitions at once will create a lot of files and creating a lot of files will use up memory in Hadoop Name Node
  • If your partitions are relatively small then the expense of recursing directories becomes more expensive than simply scanning the data. Likewise, partitions should be roughly similar in size to prevent a single long running thread from holding things up

Buckets. Much like partitioning, bucketing is a technique that allows you to cluster or segment large sets of data to optimize query performance. As you create HIVE table you can use CLUSTERED keyword to define buckets.

CREATE TABLE CUSTOMER   (

    userid             BIGINT,

    First_Name        STRING,

    Last_Name         STRING,

    address1           STRING,

    address2           STRING,

    city               STRING,

    zip_code           STRING,

    state              STRING


)

PARTITION BY  (


    COUNTRY            STRING

) 
(
   CLUSTERED BY (userid) INTO 10 BUCKETS;
(

In general, the bucket number is determined by the expression hash_function(bucketing_column) mod num_buckets. The hash_function depends on the type of the bucketing column. For an int, as in our example  it’s easy, hash_int(i) == i.. In our example we can expect  all useid’s that end in 0 to be in bucket 1, all userid’s that end in a 1 to be in bucket 2 and so on. For other datatypes it gets a lot more tricky unfortunately. To note hash of a string or a complex datatype will be some number that’s derived from the value, but not anything humanly-recognizable.In general, distributing rows based on the hash will give you a even distribution in the buckets.  That’s your goal here. Bucketing is entirely dependent on data correctly being loaded to the table.Loading table properly is critical in case of bucketing,

For more see – http://www.bidn.com/blogs/cprice1979/ssas/4646/partitions-amp-buckets-in-hive, https://www.qubole.com/blog/big-data/5-tips-for-efficient-hive-queries/, http://www.brentozar.com/archive/2013/03/introduction-to-hive-partitioning/, http://blog.cloudera.com/blog/2014/08/improving-query-performance-using-partitioning-in-apache-hive/, http://archive.cloudera.com/cdh/3/hive/language_manual/working_with_bucketed_tables.html

Forecast Cloudy – SQL Server on Amazon Web Services RDS

aws_logo

Amazon Relational Database Service (Amazon RDS) is a web service that makes it easier to set up, operate, and scale a relational database in the cloud. It provides cost-efficient, resizeable capacity for an industry-standard relational database and manages common database administration tasks.

The basic building block of Amazon RDS is the DB instance. A DB instance is an isolated database environment in the cloud.  A DB instance can contain multiple user-created databases, and you can access it by using the same tools and applications that you use with a stand-alone database instance. You can create and modify a DB instance by using the Amazon RDS command line interface, the Amazon RDS API, or the AWS Management Console.

Each DB instance runs a DB engine. Amazon RDS currently supports the MySQL, PostgreSQL, Oracle, and Microsoft SQL Server DB engines. As per my background I will illustrate running DB instance of SQL Server in RDS here, but in the future I may venture further touching MySQL and especially its specialized Amazon cousin known as Aurora. The computation and memory capacity of a DB instance is determined by its DB instance class. You can select the DB instance that best meets your needs. If your needs change over time, you can change DB instances. For each DB instance, you can select from 5 GB to 3 TB of associated storage capacity, instance storage comes in three types: Magnetic, General Purpose (SSD), and Provisioned IOPS (SSD). They differ in performance characteristics and price, allowing you to tailor your storage performance and cost to the needs of your database.

Amazon cloud computing resources are housed in highly available data center facilities in different areas of the world (for example, North America, Europe, or Asia). Each data center location is called a region.Each region contains multiple distinct locations called Availability Zones, or AZs. Each Availability Zone is engineered to be isolated from failures in other Availability Zones, and to provide inexpensive, low-latency network connectivity to other Availability Zones in the same region. By launching instances in separate Availability Zones, you can protect your applications from the failure of a single location. You can run your DB instance in several Availability Zones, an option called a Multi-AZ deployment. When you select this option, Amazon automatically provisions and maintains a synchronous standby replica of your DB instance in a different Availability Zone. The primary DB instance is synchronously replicated across Availability Zones to the standby replica to provide data redundancy, failover support, eliminate I/O freezes, and minimize latency spikes during system backups.

Amazon RDS supports DB instances running several editions of Microsoft SQL Server 2008 R2 and SQL Server 2012.  Amazon RDS currently supports Multi-AZ deployments for SQL Server using SQL Server Mirroring as a high-availability, failover solution. Amazon also supports TDE  (Transparent Database Encryption) feature in SQL Server , as well as allows SSL connections to your SQL Server instance as necessary. In order to deliver a managed service experience, Amazon RDS does not provide shell access to DB instances, and it restricts access to certain system procedures and tables that require advanced privileges. Amazon RDS supports access to databases on a DB instance using any standard SQL client application such as Microsoft SQL Server Management Studio. Amazon RDS does not allow direct host access to a DB instance via Telnet, Secure Shell (SSH), or Windows Remote Desktop Connection. When you create a DB instance, you are assigned to the db_owner role for all databases on that instance, and you will have all database-level permissions except for those that are used for backups (Amazon RDS manages backups for you).

Obviously before you proceed you need to sign up for AWS account. You can do so here – https://aws.amazon.com/. Next you should create IAM (Identity and Access Management) user.

image

Once you log into AWS Console and go to IAM, as above.

  • In the navigation pane, choose Groups, and then choose Create New Group
  • For Group Name, type a name for your group, such as RDS_Admios, and then choose Next Step.
  • In the list of policies, select the check box next to the AdministratorAccess policy. You can use the Filter menu and the Search box to filter the list of policies.
  • Choose Next Step, and then choose Create Group.

Your new group is listed under Group Name after you are done. Next create a user and add user to the group. I covered creating IAM users in my previous blogs, but here it is again:

  • In the navigation pane, choose Users, and then choose Create New Users
  • In box 1, type a user name. Clear the check box next to Generate an access key for each user. Then choose Create.
  • In the Groups section, choose Add User to Groups
  • Select the check box next to your newly created admins group. Then choose Add to Groups.
  • Scroll down to the Security Credentials section. Under Sign-In Credentials, choose Manage Password. Select Assign a custom password. Then type a password in the Password and Confirm Password boxes. When you are finished, choose Apply.

Next in AWS Console I will select RDS from Data Section

image

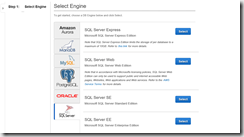
I will pick SQL Server from available DB Instance types.

image

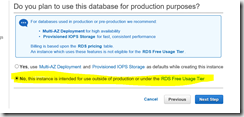
Picking SQL Server Standard for sake of example I am presented with choice of Multi-Availability Zone deployment for HADR and consistent throughput storage, For the sake of this quick post I will do what you will not do for production and decline that option: After all doing things properly does cost money:

image

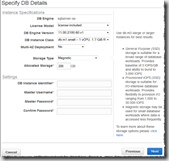
Next screen opens a more interesting Pandora’s box here – licensing. I can license my SQL Server here via “bring your own license” or use Amazon license, Customers using License Mobility through Software Assurance Plan to launch bring-your-own-license Amazon RDS for SQL Server instances must complete a license verification process with Microsoft . That option opens following checkbox

image

Here also I can pick my DB Instance Class. Instance classes are detailed in Amazon docs here – http://docs.amazonaws.cn/en_us/AmazonRDS/latest/UserGuide/Concepts.DBInstanceClass.html. I am picking a very small testing instance , what Amazon calls micro instance size – an instance sufficient for testing that should not be used for production applications.

image

After adding some more info including Availability Group, Backup preferences and retention I can hit Create Instance button.

image

Once Amazon RDS provisions your DB instance, you can use any standard SQL client application to connect to the instance. In order for you to connect, the DB instance must be associated with a security group containing the IP addresses and network configuration that you will use to access the DB instance. So lets connect to my new DB instance using SSMS:

  • On the Instances page of the AWS Management Console, select the arrow next to the DB instance to show the instance details. Note the server name and port of the DB instance, which are displayed in the Endpoint field at the top of the panel, and the master user name, which is displayed in the Username field in the Configuration Details section
  • Use that instance string and your user name to connect.

image

I did run into issue with VPC Security groups and Inbound rules. See this post for proper way to setup rules – https://msayem.wordpress.com/2014/10/23/unable-to-connect-to-aws-rds-from-sql-server-management-studio/

For more see – https://www.mssqltips.com/sqlservertip/3251/running-sql-server-databases-in-the-amazon-cloud-part-1/, http://docs.aws.amazon.com/AmazonRDS/latest/UserGuide/CHAP_SQLServer.html

Meet Redis in the Clouds – Azure PaaS Introduces Premium Public Preview with Cluster and Persistence

redis_logo

Azure Redis Cache is a distributed, managed cache that helps you build highly scalable and responsive applications by providing faster access to your data. I blogged quite a lot previously on Redis and its features here – https://gennadny.wordpress.com/category/redis/ and on Azure Redis PaaS offering here – https://gennadny.wordpress.com/2015/01/19/forecast-cloudy-using-microsoft-azure-redis-cache/.

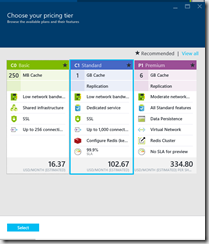
The new Premium tier includes all Standard-tier features, plus better performance, bigger workloads, disaster recovery, and enhanced security. Additional features include Redis persistence, which allows you to persist data stored in Redis; Redis Cluster, which automatically shards data across multiple Redis nodes, so you can create workloads using increased memory (more than 53 GB) for better performance; and Azure Virtual Network deployment, which provides enhanced security and isolation for your Azure Redis Cache, as well as subnets, access control policies, and other features to help you further restrict access.

To me a huge disappointment for Redis on Windows (MsOpenTech Redis) and Azure has been inability to scale out across nodes and news of Azure Redis Cluster are particularly welcome.

Redis Cluster provides a way to run a Redis installation where data is automatically sharded across multiple Redis nodes.

Redis Cluster also provides some degree of availability during partitions, that is in practical terms the ability to continue the operations when some nodes fail or are not able to communicate. However the cluster stops to operate in the event of larger failures (for example when the majority of masters are unavailable).

So in practical terms, what you get with Redis Cluster?

  • The ability to automatically split your dataset among multiple nodes
  • The ability to continue operations when a subset of the nodes are experiencing failures or are unable to communicate with the rest of the cluster.

Redis Cluster does not use consistent hashing, but a different form of sharding where every key is conceptually part of what they call an hash slot. Every node in a Redis Cluster is responsible for a subset of the hash slots, so for example you may have a cluster with 3 nodes, where:

  • Node A contains hash slots from 0 to 5500.
  • Node B contains hash slots from 5501 to 11000.
  • Node C contains hash slots from 11001 to 16384.

This allows to add and remove nodes in the cluster easily. For example if I want to add a new node D, I need to move some hash slot from nodes A, B, C to D. Similarly if I want to remove node A from the cluster I can just move the hash slots served by A to B and C. When the node A will be empty I can remove it from the cluster completely. Because moving hash slots from a node to another does not require to stop operations, adding and removing nodes, or changing the percentage of hash slots hold by nodes, does not require any downtime.

Note of caution.

Redis Cluster is not able to guarantee strong consistency. In practical terms this means that under certain conditions it is possible that Redis Cluster will lose writes that were acknowledged by the system to the client.

The first reason why Redis Cluster can lose writes is because it uses asynchronous replication. This means that during writes the following happens:

  • Your client writes to the master A.
  • The master A replies OK to your client
  • The master A propagates the write to its slaves A1, A2 and A3.

As you can see A does not wait for an acknowledge from A1, A2, A3 before replying to the client, since this would be a prohibitive latency penalty for Redis, so if your client writes something, A acknowledges the write, but crashes before being able to send the write to its slaves, one of the slaves (that did not received the write) can be promoted to master, losing the write forever.\

Still this is really exciting news for many of us in Azure NoSQL and Distributed In-Memory Cache world. So I logged into new Azure Portal and yes, creating new Redis Cache I saw a Premium option:

redispremium

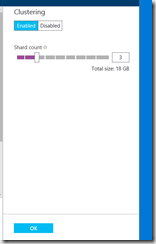
As you create your Redis Premium you can specify number of cluster nodes\shards as well, as well as persistence model for the first time!

redispremium2

Few minutes and I have myself a working 3 node cluster:

image

Now I can access this cluster just like I accessed single Redis instance previously.

My next steps are dig into Azure Redis Cluster deeper so stay tuned for updates.

Announcement from Azure Redis PG – https://azure.microsoft.com/en-us/blog/azure-redis-cache-public-preview-of-premium-tier/

Effectus Est Non Viis – Why is Storage Performance Still Important to SQL Server 2014 In Memory OLTP with Durable Tables

About half a year ago I was contacted by customer who has implemented SQL Server 2014 In Memory OLTP on VMware VM platform and was seeing some problematic behavior under load in terms of performance. Customer was seeing high CPU condition on SQL Server that cannot be completely explained by load patterns, where CPU to jump from an average of 15-20% to 90-100% . After a bit of performance log analysis for In-Memory OLTP and other counters issue was explained. Here is what, why and how:

In-Memory OLTP tables come in two flavors – durable and non-durable. 

  • Durable are default type. The schema of the durable table is stored in the system database in primary file group, just like the regular tables. The data are stored in the MEMORY OPTIMIZED DATA file group. Creating a memory optimized durable table is simple. You can use the regular table creation script with MEMORY_OPTIMIZED=ON table option to create a durable table. Once the SQL Server 2014 is restarted, the data in the durable table is loaded to the memory. the online transaction processing is done on the data loaded to the memory. So important to note that durable tables provide for data durability between restarts.
  • Non-durable tables. Just like the durable table, the schema of the non-durable table is stored in the system database in the physical disc. But, contrary to the durable table, Non-Durable table’s data are stored in the memory alone. So during a server crash or restart, all the data stored in the non-durable table will be lost. Thus the non-durable table acts like a permanent table with temporary data.

Customer was working with durable tables. What really caused an issue here is extremely slow disk IO subsystem configuration on VMware platform hosting this SQL Server instance, after all why care for disk performance when you are In-Memory? Not so fast.

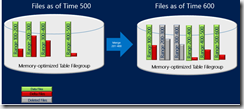
Enter Data Merge in Durable In-Memory OLTP.  The data for memory optimized tables is stored in one or more data/delta file pairs (also referred to as checkpoint file pairs or CFP) with data file(s) storing inserted rows and delta file(s) referencing deleted rows.  During the execution of an OLTP workload, as the DML operations update, insert, and delete rows, new data/delta files are created to persist the data. Also, existing delta files are updated to process delete of existing rows.  Over time, if the number of active rows, after accounting for deleted rows, in two or more consecutive CFPs falls below a threshold (usually < 50%) such that they can be merged into one CFP of 128 MB, they are merged automatically by a background merge process into a new CFP.  Once the merge operation is complete, the older CFPs go through a transition phase and are eventually removed (i.e. garbage collected) from the storage.  SQL Server 2014 supports up to 8192 CFPs within a database.

The Merge operation takes one or more closed CFPs, called MERGE SOURCE(s), based on an internally defined merge policy, described later, and produces one resultant CFP, called MERGE TARGET. The entries in each delta file of source CFP(s) are used to filter rows from the corresponding data file to remove the data rows that are not needed anymore. The remaining rows in the source CFPs are consolidated into one target CFP.  After the merge is complete, the resultant CFP (i.e. the merge-target) replaces the source CFPs (i.e. the merge sources). The merge-source CFPs go through a transition phase before they are eventually removed from the storage.

After accounting for the storage taken by CFPs in various states, the overall storage taken by durable memory-optimized tables can be much larger than 2x. The DMV sys.dm_db_xtp_checkpoint_files can be queried to list all the CFPs in memory-optimized file group including the phase they are in. Transitioning CFPs from MERGE_SOURCE state to TOMBSTONE and ultimately getting garbage collected can take up to 5 checkpoints and transaction log backup, if database is configured for full or bulk-logged recovery model, steps. You can, of course, manually force the checkpoint followed by log backup to expedite the garbage collection but then this will add 5 empty CFPs (i.e. 5 data/delta file pairs with data file of size 128MB each).

image

Sure thing looking at performance log – XTP:Storage\Merge Requests Outstanding start appearing right during the spike and trending upwards after the spike:

Untitled

So I started looking at data and correlating KPIs further, following can be seen:

Merge Requests Outstanding counter tracks  number of merge requests outstanding since the server started. Note that previous to CPU spike these were at 0 and then we started climbing. That points that perhaps our Disk IO subsystem doesn’t keep up with Hekaton MERGE activities on the disk, mainly perhaps writes to destination MERGE file.

There are also performance considerations to manage when implementing durable memory-optimized tables. The placement of data files is important for::


  • Offline checkpoint performance.
  • Performing the merge for the checkpoint file containers.
  • Recovery in the case of service failure. This will load the containers, via streaming I/O, which loads the files into memory and recreates the table.

In the steady state case of checkpoint writes, merge, and file clean-up, there will be I/O for:

  • Checkpoint writes.
  • Reads from source files participating in merge operations.
  • Writes to the destination merge file.

To prove or disprove whether you are seeing disk bottleneck on Merge you can recreate condition  with manual Merge as explained here – http://blogs.technet.com/b/dataplatforminsider/archive/2014/01/22/merge-operation-in-memory-optimized-tables.aspx 


For more information regarding the data and delta files and checkpoints, see “Durability for Memory-Optimized Tables” (http://msdn.microsoft.com/en-us/library/dn553125(v=sql.120).aspx) and “Checkpoint Operations for Memory-Optimized Tables” (http://msdn.microsoft.com/en-us/library/dn553124(v=sql.120).aspx).

SQL Server 2016 Query Store–Low Overhead Flight Recorder For Your Database

As you may be aware SQL Server 2016 is coming soon and SQL Server 2016 Community Technology Preview 2.4 is available for download here. http://www.microsoft.com/en-us/server-cloud/products/sql-server-2016/. This release is coming with plethora of new advanced features, one of which is Query Store.

Have you ever seen execution plan regressions after SQL Server upgrade? What about after release of new code? If so this feature can be of great help for you.

So what is SQL Server 2016 Query Store? The SQL Server Query Store feature provides DBAs with insight on query plan choice and performance. It simplifies performance troubleshooting by enabling you to quickly find performance differences caused by changes in query plans. The feature automatically captures a history of queries, plans, and runtime statistics, and retains these for your review. It separates data by time windows, allowing you to see database usage patterns and understand when query plan changes happened on the server

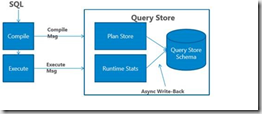
How does this work? Every time SQL Server compiles or executes a query, a message is sent to the Query Store:

image

The compile and execution information is kept in memory first and then saved to disk, depending on the Query Store configuration (the data is aggregated according to the INTERVAL_LENGTH_MINUTES parameter, which defaults to one hour, and flushed to disk according to the DATA_FLUSH_INTERVAL_SECONDS parameter). The data can also be flushed to disk if there is memory pressure on the system. In any case you will be able to access all of the data, both in memory and disk, when you run the sys.query_store_runtime_stats catalog.

The collected data is persisted on disk and stored in the user database where the Query Store is enabled (and settings are stored in sys.database_query_store_options. The Query Store catalogs are:

sys.query_store_query_text Query Text Information
sys.query_store_query Query text plus the used plan affecting SET options
sys.query_store_plan Execution Plans
sys.query_store_runtime_stats Query runtime statistics
sys.query_store_runtime_stats_interval Start and End Times for Capture Intervals
sys.query_context_settings Query context settings info

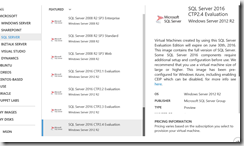
To try feature out you can either download and install CTP of SQL 2016 or do what I did and setup a SQL Server 2016 VM in Microsoft Azure straight from VM gallery:

Capture

Few minutes and you have yourself a working SQL Server 2016 VM in the cloud. You need to enable the Query Store by using the ALTER DATABASE CURRENT SET QUERY_STORE = ON; statement. It cannot be enabled for system databases such as model or tempdb. If you try to do so you will see something like:

Msg 12420, Level 16, State 1, Line 1

Cannot perform action because Query Store is not started up for this database.

Msg 5069, Level 16, State 1, Line 1

ALTER DATABASE statement failed.

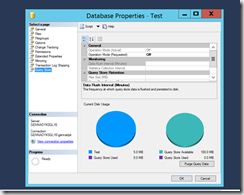
You can also see query store settings via SQL Server 2016 Management Studio GUI:

image

You may want to change defaults for the following options in order to adjust them to your requirements:

  • Max Size MB – limit for the data space that Query Store will take inside your database. The default (100 MB) may not be sufficient if your workload generates large number of different queries or plans or if you want to keep query history for a longer period of time. Keep track of current space usage and increase configuration value to prevent Query Store from switching to “Read Only” mode when disk size exceeds the limit.
  • Statistics Collection Interval: defines level of granularity for the runtime data (the default is 1 hour). Consider using lower value if you need finer granularity but keep in mind that it will directly affect the size of Query Store data.

Once the Query Store is enabled, it will start collecting the plans and query performance data and you can analyze that data by looking at the Query Store tables.

Query stores contains two stores:

  • Plan store – Stores execution plan information
  • Running Stats store – Stores execution statistics information

Next I will run a rather basic query against Adventure Works sample database on SQL Server 16 CTP:

SELECT con.*
FROM Person.Person con
JOIN HumanResources.Employee emp
        ON con.BusinessEntityID = emp.BusinessEntityID

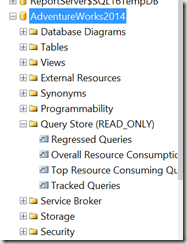
Now I can go to Query Store folder right in SSMS:

image

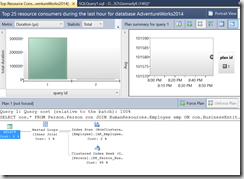
Looking at top resource consumers by duration I can see this query and its execution plan, which is most important:

image

Now this query is elemental, but assuming there was really something to tune here, outside of using wildcard ( *) , which is always a bad practice or something to index we could add an index and then rerun , comparing both plans via Query Store. In case of upgrade optimizer issue we can force a particular plan via plan guide in worst case scenario as well.

For more on Query Store see – http://www.sqlservergeeks.com/introduction-to-query-store-in-sql-server-2016-part-1/, https://seniordba.wordpress.com/2015/06/05/query-store-in-sql-server-2016/, http://sqlperformance.com/2015/02/sql-plan/the-sql-server-query-store,

MSDN Docs are already available here – https://msdn.microsoft.com/en-us/library/dn817826.aspx, awesome video from Channel 9 – https://channel9.msdn.com/Shows/Data-Exposed/Query-Store-in-SQL-Server-2016, as well as presentation by Sergio Govoni – https://docs.com/sergio-govoni/1072/sql-server-2016-query-store?containerid=C25196531-6033-6307-8750-001094967533~Mf7ebd4f1-5a55-7f4f-3c59-b77a13ff6d00

Now lets get query tuning….

Forecast Cloudy – Working with AWS DynamoDB in .NET

DynamoDB_Logo

Amazon DynamoDB is AWS primary NoSQL data storage offering. Announced on January 18, 2012, it is a fully managed NoSQL database service that provides fast and predictable performance along with excellent scalability. DynamoDB differs from other Amazon services by allowing developers to purchase a service based on throughput, rather than storage. Although the database will not scale automatically, administrators can request more throughput and DynamoDB will spread the data and traffic over a number of servers using solid-state drives, allowing predictable performance. It offers integration with Hadoop via Elastic MapReduce.
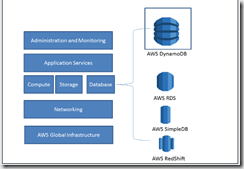
image

The above diagram shows how Amazon offers its various cloud services and where DynamoDB is exactly placed. AWS RDS is relational database as a service over Internet from Amazon while Simple DB and DynamoDB are NoSQL database as services. Both SimpleDB and DynamoDB are fully managed, non-relational services. DynamoDB is build considering fast, seamless scalability, and high performance. It runs on SSDs to provide faster responses and has no limits on request capacity and storage. It automatically partitions your data throughout the cluster to meet the expectations while in SimpleDB we have storage limit of 10 GB and can only take limited requests per second. Also in SimpleDB we have to manage our own partitions. So depending upon your need you have to choose the correct solution.

As I already went through basics of getting started with AWS .NET SDK in my previous post I will not go through it here. Instead there are following basics to consider:

  • The AWS SDK for .NET provides three programming models for communicating with DynamoDB: the low-level model, the document model, and the object persistence model
  • The low-level programming model wraps direct calls to the DynamoDB service.You access this model through the Amazon.DynamoDBv2 namespace. Of the three models, the low-level model requires you to write the most code.
  • The document programming model provides an easier way to work with data in DynamoDB. This model is specifically intended for accessing tables and items in tables.You access this model through the Amazon.DynamoDBv2.DocumentModel namespace.  Compared to the low-level programming model, the document model is easier to code against DynamoDB data. However, this model doesn’t provide access to as many features as the low-level programming model. For example, you can use this model to create, retrieve, update, and delete items in tables.
  • The object persistence programming model is specifically designed for storing, loading, and querying NET objects in DynamoDB.You access this model through the Amazon.DynamoDBv2.DataModel namespace.

We will start by navigating to AWS console and creating a table.

image

For the sake of easy tutorial I will create a table customer with couple of fields. Here I have to think about design of my table a little, in particular around hash and range keys. In DynamoDB concept of “Hash and Range Primary Key” means that a single row in DynamoDB has a unique primary key made up of both the hash and the range key.

  • Hash Primary Key – The primary key is made of one attribute, a hash attribute. For example, a ProductCatalog table can have ProductID as its primary key. DynamoDB builds an unordered hash index on this primary key attribute. This means that every row is keyed off of this value. Every row in DynamoDB will have a required, unique value for this attribute. Unordered hash index means what is says – the data is not ordered and you are not given any guarantees into how the data is stored. You won’t be able to make queries on an unordered index such as Get me all rows that have a ProductID greater than X. You write and fetch items based on the hash key. For example, Get me the row from that table that has ProductID X. You are making a query against an unordered index so your gets against it are basically key-value lookups, are very fast, and use very little throughput.
  • Hash and Range Primary Key – The primary key is made of two attributes. The first attribute is the hash attribute and the second attribute is the range attribute. For example, the forum Thread table can have ForumName and Subject as its primary key, where ForumName is the hash attribute and Subject is the range attribute. DynamoDB builds an unordered hash index on the hash attribute and a sorted range index on the range attribute.This means that every row’s primary key is the combination of the hash and range key. You can make direct gets on single rows if you have both the hash and range key, or you can make a query against the sorted range index. For example, get Get me all rows from the table with Hash key X that have range keys greater than Y, or other queries to that affect. They have better performance and less capacity usage compared to Scans and Queries against fields that are not indexed

In my case for my very simplistic example here I will use simple unique Hash Primary Key:
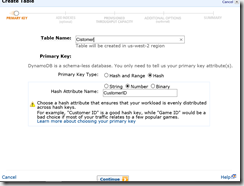
image

After finishing Create Table Wizard I can now see my table in the console.

image

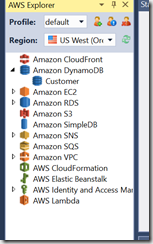
Better yet, I can  now easily see and modify my table in AWS Explorer in VS, add\remove indexes, etc.:
image

Few words on indexing. A quick question: while writing a query in any database, keeping the primary key field as part of the query (especially in the where condition) will return results much faster compared to the other way. Why? This is because of the fact that an index will be created automatically in most of the databases for the primary key field. This the case with DynamoDB also. This index is called the primary index of the table. There is no customization possible using the primary index, so the primary index is seldom discussed. DynamoDB has concept of two types of secondary indexes:

  • Local Secondary Indexes- an index that has the same hash key as the table, but a different range key. A local secondary index is “local” in the sense that every partition of a local secondary index is scoped to a table partition that has the same hash key
  • Global Secondary Indexes – an index with a hash and range key that can be different from those on the table. A global secondary index is considered “global” because queries on the index can span all of the data in a table, across all partitions

Local Secondary Indexes consume throughput from the table. When you query records via the local index, the operation consumes read capacity units from the table. When you perform a write operation (create, update, delete) in a table that has a local index, there will be two write operations, one for the table another for the index. Both operations will consume write capacity units from the table. Global Secondary Indexes have their own provisioned throughput, when you query the index the operation will consume read capacity from the table, when you perform a write operation (create, update, delete) in a table that has a global index, there will be two write operations, one for the table another for the index*.

Local Secondary Indexes can only be created when you are creating the table, there is no way to add Local Secondary Index to an existing table, also once you create the index you cannot delete it.Global Secondary Indexes can be created when you create the table and added to an existing table, deleting an existing Global Secondary Index is also allowed

Important Documentation Note: In order for a table write to succeed, the provisioned throughput settings for the table and all of its global secondary indexes must have enough write capacity to accommodate the write; otherwise, the write to the table will be throttled.

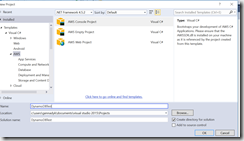
Next, I will fire up Visual Studio and create new AWS console application project:
image

In order to illustrate how easy it is to put and get data from table I created a very simple code snippet. First I created very simplistic class Customer, representation of some simple mythical company customer where we track unique id, name, city and state

using System;
using System.Collections.Generic;
using System.Linq;
using System.Text;
using System.Threading.Tasks;

namespace DynamoDBTest
{
    class Customer
    {
        private string _CustomerID;
        private string _CompanyName;
        private string _City;
        private String _State;
    public string CustomerID
        {
            get { return _CustomerID; }
            set { _CustomerID = value; }

        }
     public string CompanyName
        {
            get { return _CompanyName; }
            set { _CompanyName = value; }

        }

      public string City
        {
            get { return _City; }
            set { _City = value; }

        }
        public string State
        {
            get { return _State; }
            set { _State = value; }

        }
        public Customer(string CustomerID, string CompanyName,string City, string State)
        {
            this.CustomerID = CustomerID;
            this.CompanyName = CompanyName;
            this.City = City;
            this.State = State;
        }
        public Customer()
        {

        }
    }
}

Once that is done, I can add and get this data from DynamoDB. In my sample I used both low level and document programming models for interest:

using System;
using System.Collections.Generic;
using System.Configuration;
using System.IO;
using System.Linq;
using System.Text;

using Amazon;
using Amazon.EC2;
using Amazon.EC2.Model;
using Amazon.SimpleDB;
using Amazon.SimpleDB.Model;
using Amazon.S3;
using Amazon.S3.Model;
using Amazon.DynamoDBv2;
using Amazon.DynamoDBv2.Model;
using Amazon.DynamoDBv2.DocumentModel;

namespace DynamoDBTest
{
    class Program
    {
        public static void Main(string[] args)
        {
            //lets add some sample data
            AddCustomer("1","SampleCo1", "Seattle", "WA");
            AddCustomer("2","SampleCo2", "Reston", "VA");
            AddCustomer("3","SampleCo3", "Minneapolis", "MN");
            Console.WriteLine("Added sample data");
            Customer myCustomer = new Customer();
            myCustomer = GetCustomerByID("1");
            Console.WriteLine("Retrieved Sample Data..." + myCustomer.CustomerID + " " + myCustomer.CompanyName + " " + myCustomer.City + " " + myCustomer.State + " ");
            myCustomer = GetCustomerByID("2");
            Console.WriteLine("Retrieved Sample Data..." + myCustomer.CustomerID + " " + myCustomer.CompanyName + " " + myCustomer.City + " " + myCustomer.State + " ");
            myCustomer = GetCustomerByID("3");
            Console.WriteLine("Retrieved Sample Data..." + myCustomer.CustomerID + " " + myCustomer.CompanyName + " " + myCustomer.City + " " + myCustomer.State + " ");
            Console.Read();

      
        }

        public static void AddCustomer(string CustomerID,string CompanyName,string City, string State)
        {
        
            Customer myCustomer = new Customer(CustomerID, CompanyName, City, State);
            var client = new AmazonDynamoDBClient();
            
            var myrequest = new PutItemRequest();
            {
                myrequest.TableName= "Customer";


                myrequest.Item = new Dictionary
            {
                {"CustomerID",new AttributeValue {S = myCustomer.CustomerID} },
                {"CompanyName", new AttributeValue {S =myCustomer.CompanyName } },
                {"City", new AttributeValue {S= myCustomer.City } },
                {"State", new AttributeValue {S=myCustomer.State } }
            };
            }

            client.PutItem(myrequest);

        }
        public static Customer GetCustomerByID(string CustomerID)
        {
            var client =new AmazonDynamoDBClient();
            var table = Table.LoadTable(client, "Customer");
            var item = table.GetItem(CustomerID);

            Customer myCustomer = new Customer(item["CustomerID"].ToString(), item["CompanyName"].ToString(), item["City"].ToString(), item["State"].ToString());

            return myCustomer;
            
        }
    }
}

Result when I run the application are pretty simple , however you can see how easy it is to put an item and get an item, And its fast, really fast…
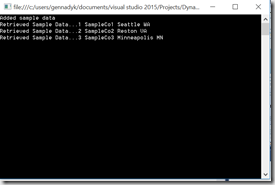
image

From VS AWS Explorer I can confirm rows in my table:
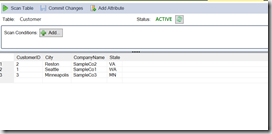
image

Hope this was useful. For more information see – http://blogs.aws.amazon.com/net/post/Tx17SQHVEMW8MXC/DynamoDB-APIs, , http://docs.aws.amazon.com/amazondynamodb/latest/developerguide/GuidelinesForLSI.html, http://yourstory.com/2012/02/step-by-step-guide-to-amazon-dynamodb-for-net-developers/,http://blog.grio.com/2012/03/getting-started-with-amazon-dynamodb.html

Forecast Cloudy – Getting Started with AWS using Microsoft.NET

aws_logo

Switching off my usual Azure and Google Cloud hang outs I decided to check out AWS. Moreover as AWS offers a nice ,NET SDK and toolkit for Visual Studio,  I decided to start with .NET as technology for AWS.

First thing you need to do if you decided to develop with .NET for AWS is to create AWS account. To sign up for AWS account:

  • Go to http://aws.amazon.com/  and click Sign Up.
  • Follow the on-screen instructions
  • As part of sign up they will call you and you will enter PIN using phone keypad

AWS sends you a confirmation email after the sign-up process is complete. At any time, you can view your current account activity and manage your account by going to http://aws.amazon.com and clicking My Account/Console. To use the AWS SDK for .NET, you must have a set of valid AWS credentials, which consist of an access key and a secret key. These keys are used to sign programmatic web service requests and enable AWS to verify the request comes from an authorized source. You can obtain a set of account credentials when you create your account.However, AWS docs recommend that you do not use these credentials with AWS SDK for .NET. Instead, they want you to create one or more IAM users, and use those credentials. For applications that run on EC2 instances, you can use IAM roles to provide temporary credentials.

To use the AWS SDK for .NET, you must have the following installed:

  • Microsoft .NET Framework 3.5 or later
  • Visual Studio 2010 or later
  • AWS SDK for .NET
  • AWS Toolkit for Visual Studio, plugin that provides a user interface for managing your AWS resources from Visual Studio, and includes the AWS SDK for .NET

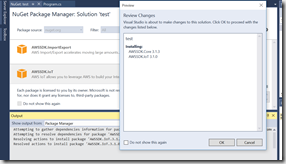
You can install AWS SDK for .NET from NuGet. NuGet always has the most recent versions of the AWSSDK assemblies, and also enables you to install previous versions. NuGet is aware of dependencies between assemblies and installs all required assemblies automatically. Assemblies installed with NuGet are stored with your solution rather than in a central location, such as Program Files. This enables you to install assembly versions specific to a given application without creating compatibility issues for other applications.

To use NuGet from Visual Studio Solution Explorer, right-click on your project and choose Manage NuGet Packages from the context menu.

image

From the Package Manager Console, you can install the desired AWSSDK assemblies using the Install-Package command. For example, to install the AWSSDK.AutoScaling assembly, use the following command:

PM> Install-Package AWSSDK.AutoScaling -Version 3.0.0.1

NuGet will also install any dependencies like AWSCore.

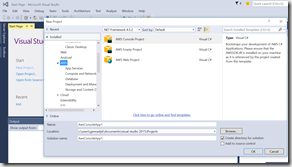
Now lets start a new project in Visual Studio. Since I have installed AWS VS Toolkit things are really simple here:

image

Toolkit provides some basic templates:

  • AWS Console Project –A  console application that makes basic requests to Amazon S3, Amazon SimpleDB, and Amazon EC2. Great for my learning.
  • AWS Empty Project – A console application that does not include any code.
  • AWS Web Project – An ASP.NET application that makes basic requests to Amazon S3, Amazon SimpleDB, and Amazon EC2.

Actually I can also use basic VS built in templates and just add AWSSDK via NuGet as I show above as well. But the toolkit is really nice and polished.

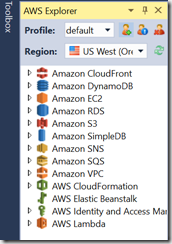
Before I start on anything in VS I really would like to see my AWS items in VS AWS Explorer. To do so do following:

  • In Visual Studio, open AWS Explorer by clicking the View menu and choosing AWS Explorer. You can also open AWS Explorer by typing Ctrl+K, and then pressing the A key.
  • Click the New Account Profile icon to the right of the Profile list.
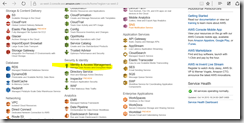
  • Enter your profile name and access keys into the dialog. As stated previously I actually went to AWS IAM (Identity and Access Management) and setup special user so I don’t use root keys:

image

      Now I can see my items in VS AWS Explorer:

      image

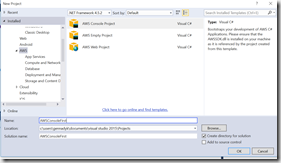
For the sake of simplicity I will pick a AWS Console Application here.

image

Once I pick my console application I am presented with dialog like this one:

Credentials Dialog Box

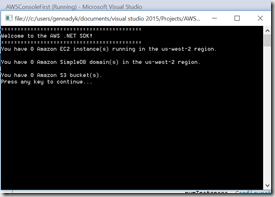
All it really does is allows me to choose profile and writes keys into App.config appsettings section.The sample SDK Code AWS provides just lists your AWS instances to the command window:

using System;
using System.Collections.Generic;
using System.Configuration;
using System.IO;
using System.Linq;
using System.Text;

using Amazon;
using Amazon.EC2;
using Amazon.EC2.Model;
using Amazon.SimpleDB;
using Amazon.SimpleDB.Model;
using Amazon.S3;
using Amazon.S3.Model;

namespace AWSConsoleFirst
{
    class Program
    {
        public static void Main(string[] args)
        {
            Console.Write(GetServiceOutput());
            Console.Read();
        }

        public static string GetServiceOutput()
        {
            StringBuilder sb = new StringBuilder(1024);
            using (StringWriter sr = new StringWriter(sb))
            {
                sr.WriteLine("===========================================");
                sr.WriteLine("Welcome to the AWS .NET SDK!");
                sr.WriteLine("===========================================");

                // Print the number of Amazon EC2 instances.
                IAmazonEC2 ec2 = new AmazonEC2Client();
                DescribeInstancesRequest ec2Request = new DescribeInstancesRequest();

                try
                {
                    DescribeInstancesResponse ec2Response = ec2.DescribeInstances(ec2Request);
                    int numInstances = 0;
                    numInstances = ec2Response.Reservations.Count;
                    sr.WriteLine(string.Format("You have {0} Amazon EC2 instance(s) running in the {1} region.",
                                               numInstances, ConfigurationManager.AppSettings["AWSRegion"]));
                }
                catch (AmazonEC2Exception ex)
                {
                    if (ex.ErrorCode != null && ex.ErrorCode.Equals("AuthFailure"))
                    {
                        sr.WriteLine("The account you are using is not signed up for Amazon EC2.");
                        sr.WriteLine("You can sign up for Amazon EC2 at http://aws.amazon.com/ec2");
                    }
                    else
                    {
                        sr.WriteLine("Caught Exception: " + ex.Message);
                        sr.WriteLine("Response Status Code: " + ex.StatusCode);
                        sr.WriteLine("Error Code: " + ex.ErrorCode);
                        sr.WriteLine("Error Type: " + ex.ErrorType);
                        sr.WriteLine("Request ID: " + ex.RequestId);
                    }
                }
                sr.WriteLine();

                // Print the number of Amazon SimpleDB domains.
                IAmazonSimpleDB sdb = new AmazonSimpleDBClient();
                ListDomainsRequest sdbRequest = new ListDomainsRequest();

                try
                {
                    ListDomainsResponse sdbResponse = sdb.ListDomains(sdbRequest);

                    int numDomains = 0;
                    numDomains = sdbResponse.DomainNames.Count;
                    sr.WriteLine(string.Format("You have {0} Amazon SimpleDB domain(s) in the {1} region.",
                                               numDomains, ConfigurationManager.AppSettings["AWSRegion"]));
                }
                catch (AmazonSimpleDBException ex)
                {
                    if (ex.ErrorCode != null && ex.ErrorCode.Equals("AuthFailure"))
                    {
                        sr.WriteLine("The account you are using is not signed up for Amazon SimpleDB.");
                        sr.WriteLine("You can sign up for Amazon SimpleDB at http://aws.amazon.com/simpledb");
                    }
                    else
                    {
                        sr.WriteLine("Caught Exception: " + ex.Message);
                        sr.WriteLine("Response Status Code: " + ex.StatusCode);
                        sr.WriteLine("Error Code: " + ex.ErrorCode);
                        sr.WriteLine("Error Type: " + ex.ErrorType);
                        sr.WriteLine("Request ID: " + ex.RequestId);
                    }
                }
                sr.WriteLine();

                // Print the number of Amazon S3 Buckets.
                IAmazonS3 s3Client = new AmazonS3Client();

                try
                {
                    ListBucketsResponse response = s3Client.ListBuckets();
                    int numBuckets = 0;
                    if (response.Buckets != null &&
                        response.Buckets.Count > 0)
                    {
                        numBuckets = response.Buckets.Count;
                    }
                    sr.WriteLine("You have " + numBuckets + " Amazon S3 bucket(s).");
                }
                catch (AmazonS3Exception ex)
                {
                    if (ex.ErrorCode != null && (ex.ErrorCode.Equals("InvalidAccessKeyId") ||
                        ex.ErrorCode.Equals("InvalidSecurity")))
                    {
                        sr.WriteLine("Please check the provided AWS Credentials.");
                        sr.WriteLine("If you haven't signed up for Amazon S3, please visit http://aws.amazon.com/s3");
                    }
                    else
                    {
                        sr.WriteLine("Caught Exception: " + ex.Message);
                        sr.WriteLine("Response Status Code: " + ex.StatusCode);
                        sr.WriteLine("Error Code: " + ex.ErrorCode);
                        sr.WriteLine("Request ID: " + ex.RequestId);
                    }
                }
                sr.WriteLine("Press any key to continue...");
            }
            return sb.ToString();
        }
    }
}

Result is quite humbling, but to me it beats usual Hello World statement:

image

My next job is to build something more useful, but now that I am setup its just a matter of finding a bit of time to spare.

For more information see – http://docs.aws.amazon.com/AWSSdkDocsNET/latest/V3/DeveloperGuide/net-dg-start-new-project.html, http://aws.amazon.com/net/, http://docs.aws.amazon.com/AWSSdkDocsNET/latest/V3/DeveloperGuide/net-dg-programming-techniques.html

Save Our Souls – Troubleshooting MSDTC

Although a lot of folks would rather forget about MSDTC existence this is one of those pesky, but vital Windows components that has been with us for a long time (since my days of heavy COM development) and will stay with us for longer time, although probably with minimal or no Microsoft investment.
MSDTC is an acronym for Microsoft Distributed Transaction Coordinator. As the name says, MSDTC is a Windows service providing transaction infrastructure for distributed systems. In this case, a transaction means a general way of structuring the interactions between autonomous agents in a distributed system. Each transaction is a state transformation with four key properties – the ACID properties: Atomic (all or nothing), Consistent (legal), Isolated (independent of concurrent transactions) and Durable (once it happens, it cannot be abrogated). There are different techniques that implement the ACID properties but the most known one is two-phase commit. So if you are like my customers using distributed transactions with SQL Server whether its from .NET, legacy code or Java most likely you are using MSDTC on Windows.  I don’t want to go deeper into DTC, but Denny Cherry has a little general snippet on it – http://itknowledgeexchange.techtarget.com/sql-server/what-exactly-is-msdtc-any-when-do-i-need-it/ , plus there is TechNet docs – https://technet.microsoft.com/en-us/library/dd337629(v=ws.10).aspx

For the most part DTC is a “black box” for DBAs and developers. But once in a while you get a situation where you start seeing issues or errors (most common are “Failure to Enlist in Transaction”) that require you to do a bit of troubleshooting.

First thing first. Basic idea should be to see if there is connectability and communication open from DTC between servers. Tool called DTCPing becomes vital here. You can download the tool from Microsoft here – http://www.microsoft.com/en-us/download/details.aspx?id=2868. Use following cadence to run the tool:

  • Download and launch tool on both servers involved in communication via DTC
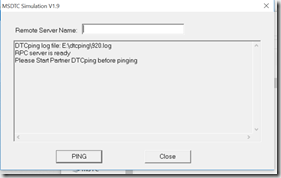
  • As you launch the tool you will see following interface

image

  • From one of the Servers, in the Remote Server Name type the host name of the client. You can get the hostname by opening a command prompt and typing the command “hostname” without the  commas. Press the Ping button.
  • Then from the other machine, in the Remote Server Name give the hostname of the first server and press the Ping button.
  • This shows the reverse bind too between the machines. Also, you can analyze the text files present in the folder of DTCPing which will contain the results of the Ping.

Typical success in a log (dtcping.log) will look like:

Platform:Windows 2003
++++++++++++ipconfig info++++++++++

++++++++++++lmhosts.sam++++++++++++

++++++++++++hosts      ++++++++++++
127.0.0.1       localhost
199.199.3.2	MachineB
199.199.2.1	firewall

++++++++++++++++++++++++++++++++++++++++++++++
     DTCping 1.8 Report for MachineA
++++++++++++++++++++++++++++++++++++++++++++++
Firewall Port Settings:
	Port:5000-5004
	Port:4343
RPC server is ready
09-11, 14:10:40.187-->RPC server:MachineA received following information:
	Network Name: MachineA
	Source  Port: 5004
	Partner LOG: MachineB528.log
	Partner CID: C2FFD8D2-F9E4-40EF-AFAA-B9A11156A578
++++++++++++Start Reverse Bind Test+++++++++++++
Received Bind call from MachineB
	Network Name: MachineA
	Source  Port: 5004
	Hosting Machine:MachineA
09-11, 14:10:40.671-->Trying to Reverse Bind to MachineB...
	Test Guid:C2FFD8D2-F9E4-40EF-AFAA-B9A11156A578
Name Resolution:
	MachineB-->199.199.3.2-->MachineB
++++++++++++Validating Remote Computer Name++++++++++++
09-11, 14:10:44.937-->Start DTC connection test
Name Resolution:
	MachineB-->199.199.3.2-->MachineB
Reverse Binding success: TOMMYROT-->PACHYDERM
++++++++++++Reverse Bind Test ENDED++++++++++
09-11, 14:10:45.046-->Start RPC test (MachineA-->MachineB)
09-11, 14:10:45.453-->Called POKE from Partner:MachineB
	Network Name: MachineA
	Source  Port: 5004
	Hosting Machine:MachineA
RPC test is successful
	Partner's CID:C2FFD8D2-F9E4-40EF-AFAA-B9A11156A578
++++++++++++RPC test completed+++++++++++++++
++++++++++++Start DTC Binding Test +++++++++++++
Trying Bind to MachineB
09-11, 14:10:47.875-->MachineA Initiating DTC Binding Test....
	Test Guid:89D254FC-B695-4331-B1C1-907B803E491C
Received reverse bind call from MachineB
	Network Name: MachineA
	Source  Port: 5004
	Hosting Machine:MachineA
Binding success: MachineA-->MachineB
++++++++++++DTC Binding Test END+++++++++++++

Whereas typical failure:

Platform:Windows 2003
++++++IP Configure Information+++++

++++++++++++lmhosts.sam++++++++++++

++++++++++++hosts      ++++++++++++
127.0.0.1       localhost
199.199.3.2	MachineB
199.199.2.1	firewall

++++++++++++++++++++++++++++++++++++++++++++++
     DTCping 1.8 Report for MachineA
++++++++++++++++++++++++++++++++++++++++++++++
Firewall Port Settings:
	Port:5000-5004
	Port:4343
RPC server is ready
++++++++++++Validating Remote Computer Name++++++++++++
09-11, 16:54:58.890-->Start DTC connection test
Name Resolution:
	MachineB-->199.199.3.2-->MachineB
09-11, 16:54:58.890-->Start RPC test (MachineA-->MachineB)
09-11, 16:55:01.687-->RPC server:MachineA received following information:
	Network Name: MachineA
	Source  Port: 5004
	Partner LOG: MachineB520.log
	Partner CID: C2FFD8D2-F9E4-40EF-AFAA-B9A11156A578
++++++++++++Start Reverse Bind Test+++++++++++++
Received Bind call from MachineB
	Network Name: MachineA
	Source  Port: 5004
	Hosting Machine:MachineA
09-11, 16:55:02.000-->Trying to Reverse Bind to MachineB...
	Test Guid:C2FFD8D2-F9E4-40EF-AFAA-B9A11156A578
Name Resolution:
	MachineB-->199.199.3.2-->MachineB
Problem:fail to invoke remote RPC method
Error(0x6BA) at dtcping.cpp @289
-->RPC pinging exception
-->1722(The RPC server is unavailable.)
RPC test failed

There is a very detailed blog from MS Distributed Systems Support on DTCPing log exception analysis with some of very common failures – http://blogs.msdn.com/b/distributedservices/archive/2008/11/12/troubleshooting-msdtc-issues-with-the-dtcping-tool.aspx

So if DTCPing tool is all about connectivity, ports and firewalls opened what are some of the other ways to trace DTC transactions? Well a fairly obscure and hidden DTC Transaction Tracing can come to the rescue. The transaction tracing becomes a powerful tool when the transactions are either taking too long to run or they are getting aborted intermittently and nothing inside your application is giving you any hint around why the transaction is getting aborted. By default, only the long-lived transactions are traced. You can turn ON tracing for all transactions or aborted transactions based on the kind of issue you are troubleshooting. You just have to select the relevant checkboxes in the trace settings and tracing will take effect (no restart of MSDTC service is required to toggle these settings)  The next important thing becomes collecting the trace in the right manner. It is always better to collect a trace which just contains information about the problem that you are troubleshooting because on a busy server the Transaction trace can contain a lot of transactions and it might become very difficult to find out which transaction outcome you are interested in

Steps to enable DTC tracing:

  • Start –> run –>dcomcnfg
  • Expand My Computer –> Distributed Transaction Coordinator –> Local DTC –>  Right Click Properties and the go to the tracing tab.
  • By Default, the Trace all transactions won’t be enabled while Trace Aborted Transactions and Trace Long Lived Transactions will be enabled as shown below

  • To collect the traces correctly, reproduce the issue under new session, therefore  we need to first click on Stop Session Button and then the New Session Button as shown below before reproducing the issue:

  • This tracing log will be found under C:\Windows\System32\MSDTC\Trace Folder. Each log can be max of 25 MB and when it exceeds it will create a new log.

You can also trace via registry as explained here – https://support.microsoft.com/en-us/kb/926099

At this point navigate to C:\Windows\System32\MSDTC\Trace folder and we will need to parse that trace file  using MSDTCVTR batch file in that folder:

The MSDTC trace can contain a lot of other events as well and I am pasting here some of the most common events that we see while parsing trace files from real time customer scenarios.

ABORT_DUE_TO_TRANSACTION_TIMER_EXPIRED
The Transaction is timing out because of the configured timeout for a transaction in DTC settings.

RECEIVED_ABORT_REQUEST_FROM_BEGINNER
The application which started the transaction issued an abort request to MSDTC to ABORT the transaction. In case of a transaction originating from a COM+ component, a call to ContextUtil.SetAbort will end up sending this event to MSDTC.

TRANSACTION_PROPOGATION_FAILED_CONNECTION_DOWN_FROM_REMOTE_TM
This error is typically due to networking issues. This happens when MSDTC on one machine loses connection with MSDTC on the other machine. For more information on this event, refer this article.

TRANSACTION_PROPAGATION_FAILED_TRANSACTION_NOT_FOUND
This event happens when you try to commit or abort a transaction that has been already committed or aborted.

RM_ENLIST_FAILED_TOO_MANY_ENLISTS
DTC already has the maximum number of resources enlisted in the transaction. The maximum number of resources that can be enlisted in a transaction is 32

Hope this helps. For more on MSDTC Troubleshooting and setup see – http://www.sqlwebpedia.com/content/msdtc-troubleshooting, https://support.microsoft.com/en-us/kb/926099, https://msdn.microsoft.com/en-us/library/ms678891(v=vs.85).aspx, https://msdn.microsoft.com/en-us/library/ms678917(v=vs.85).aspx