In my previous post I introduced you to Memcached, in-memory key-value store for small chunks of arbitrary data (strings, objects) from results of database calls, API calls, or page rendering. This continued my interest in in-memory NoSQL cache systems like AppFabric Cache and Redis.
Both Redis and Memcached are offered by AWS as a cloud PaaS service called ElastiCace. With ElastiCache, you can quickly deploy your cache environment, without having to provision hardware or install software.You can choose from Memcached or Redis protocol-compliant cache engine software, and let ElastiCache perform software upgrades and patch management for you automatically. For enhanced security, ElastiCache runs in the Amazon Virtual Private Cloud (Amazon VPC) environment, giving you complete control over network access to your cache cluster.With just a few clicks in the AWS Management Console, you can add resources to your ElastiCache environment, such as additional nodes or read replicas, to meet your business needs and application requirements.
Existing applications that use Memcached or Redis can use ElastiCache with almost no modification; your applications simply need to know the host names and port numbers of the ElastiCache nodes that you have deployed.The ElastiCache Auto Discovery feature lets your applications identify all of the nodes in a cache cluster and connect to them, rather than having to maintain a list of available host names and port numbers; in this way, your applications are effectively insulated from changes to cache node membership.
Before I show you how to setup AWS ElastiCache cluster lets go through basics:
Data Model
The Amazon ElastiCache data model concepts include cache nodes, cache clusters, security configuration, and replication groups. The ElastiCache data model also includes resources for event notification and performance monitoring; these resources complement the core concepts.
Cache Nodes and Cluster
A cache node is the smallest building block of an ElastiCache deployment. Each node has its own memory, storage and processor resources, and runs a dedicated instance of cache engine software — either Memcached or Redis. ElastiCache provides a number of different cache node configurations for you to choose from, depending on your needs.You can use these cache nodes on an on-demand basis, or take advantage of reserved cache nodes at significant cost savings.
A cache cluster is a collection of one or more cache nodes, each of which runs its own instance of supported cache engine software.You can launch a new cache cluster with a single ElastiCache operation (CreateCacheCluster), specifying the number of cache nodes you want and the runtime parameters for the cache engine software on all of the nodes. Each node in a cache cluster has the same compute, storage and memory specifications, and they all run the same cache engine software (Memcached or Redis).The ElastiCache API lets you control cluster-wide attributes, such as the number of cache nodes, security settings, version upgrades, and system maintenance windows.
Cache parameter groups are an easy way to manage runtime settings for supported cache engine software. Memcached has many parameters to control memory usage, cache eviction policies, item sizes, and more; a cache parameter group is a named collection of Memcached specific parameters that you can apply to a cache cluster
. Memcached clusters contain from 1 to 20 nodes across which you can horizontally partition your data
To create cluster via ElastiCache console follow these steps:
1. Open the Amazon ElastiCache console at https://console.aws.amazon.com/elasticache/.
2. Pick Memcached from Dashboard on the left
3. Choose Create
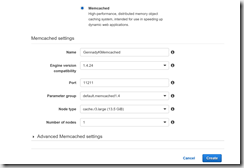
4. Complete Settings Section
As you enter setting please note following:
1. In the Name enter desired cluster name. Remember, it must begin with the letter and can contain 1 to 20 alphanumeric characters, however cannot have two consecutive hyphens nor end with the hyphen
2. In Port you can accept default at 11211. If you have a reason to use a different port, type the port number.
3. For Parameter group, choose the default parameter group, choose the parameter group you want to use with this cluster, or choose Create new to create a new parameter group to use with this cluster.
4. For Number of nodes, choose the number of nodes you want for this cluster. You will partition your data across the cluster’s nodes.If you need to change the number of nodes later, scaling horizontally is quite easy with Memcached
5. Choose how you want the Availability zone(s) selected for this cluster. You have two options
- No Preference. ElastiCache selects availability zone for each node in your cluster
- Specify availability zones. Specify availability zone for each node in your cluster.
6. For Security groups, choose the security groups you want to apply to this cluster.
7. The Maintenance window is the time, generally an hour in length, each week when ElastiCache schedules system maintenance for your cluster. You can allow ElastiCache choose the day and time for your maintenance window (No preference), or you can choose the day, time, and duration yourself
8. Now check all of the settings and pick Create
More information on Memcached specific parameters you can set up on your ElastiCache cluster see here – http://docs.aws.amazon.com/AmazonElastiCache/latest/UserGuide/ParameterGroups.Memcached.html
For clusters running the Memcached engine, ElastiCache supports Auto Discovery—the ability for client programs to automatically identify all of the nodes in a cache cluster, and to initiate and maintain connections to all of these nodes.From the application’s point of view, connecting to the cluster configuration endpoint is no different from connecting directly to an individual cache node
Process of Connecting to Cache Nodes
1. The application resolves the configuration endpoint’s DNS name. Because the configuration endpoint maintains CNAME entries for all of the cache nodes, the DNS name resolves to one of the nodes; the client can then connect to that node.
2. The client requests the configuration information for all of the other nodes. Since each node maintains configuration information for all of the nodes in the cluster, any node can pass configuration information to the client upon request.
3. The client receives the current list of cache node hostnames and IP addresses. It can then connect to all of the other nodes in the cluster.
The configuration information for Auto Discovery is stored redundantly in each cache cluster node. Client applications can query any cache node and obtain the configuration information for all of the nodes in the cluster.
For more information see – http://cloudacademy.com/blog/amazon-elasticache/, http://www.allthingsdistributed.com/2011/08/amazon-elasticache.html, https://www.sitepoint.com/amazon-elasticache-cache-on-steroids/
Hope this helps.


