Meet Redis – Setting Up Redis On Ubuntu Linux

redis_thumb.jpg

I have been asked by few folks on quick tutorial setting up Redis under systemd in Ubuntu Linux version 16.04.

I have blogged quite a bit about Redis in general –https://gennadny.wordpress.com/category/redis/ , however just a quick line on Redis in general. Redis is an in-memory key-value store known for its flexibility, performance, and wide language support. That makes Redis one of the most popular key value data stores in existence today. Below are steps to install and configure it to run under systemd in Ubuntu 16.04 and above.

Here are the prerequisites:

Next steps are:

  • Login into your Ubuntu server with this user account
  • Update and install prerequisites via apt-get
             $ sudo apt-get update
             $ sudo apt-get install build-essential tcl
    
  • Now we can download and exgract Redis to tmp directory
              $ cd /tmp
              $ curl -O http://download.redis.io/redis-stable.tar.gz
              $ tar xzvf redis-stable.tar.gz
              $ cd redis-stable
    
  • Next we can build Redis
        $ make
    
  • After the binaries are compiled, run the test suite to make sure everything was built correctly. You can do this by typing:
       $ make test
    
  • This will typically take a few minutes to run. Once it is complete, you can install the binaries onto the system by typing:
    $ sudo make install
    

Now we need to configure Redis to run under systemd. Systemd is an init system used in Linux distributions to bootstrap the user space and manage all processes subsequently, instead of the UNIX System V or Berkeley Software Distribution (BSD) init systems. As of 2016, most Linux distributions have adopted systemd as their default init system.

  • To start off, we need to create a configuration directory. We will use the conventional /etc/redis directory, which can be created by typing
    $ sudo mkdir /etc/redi
    
  • Now, copy over the sample Redis configuration file included in the Redis source archive:
         $ sudo cp /tmp/redis-stable/redis.conf /etc/redis
    
  • Next, we can open the file to adjust a few items in the configuration:
    $ sudo nano /etc/redis/redis.conf
    
  • In the file, find the supervised directive. Currently, this is set to no. Since we are running an operating system that uses the systemd init system, we can change this to systemd:
    . . .
    
    # If you run Redis from upstart or systemd, Redis can interact with your
    # supervision tree. Options:
    #   supervised no      - no supervision interaction
    #   supervised upstart - signal upstart by putting Redis into SIGSTOP mode
    #   supervised systemd - signal systemd by writing READY=1 to $NOTIFY_SOCKET
    #   supervised auto    - detect upstart or systemd method based on
    #                        UPSTART_JOB or NOTIFY_SOCKET environment variables
    # Note: these supervision methods only signal "process is ready."
    #       They do not enable continuous liveness pings back to your supervisor.
    supervised systemd
    
    . . .
    
  • Next, find the dir directory. This option specifies the directory that Redis will use to dump persistent data. We need to pick a location that Redis will have write permission and that isn’t viewable by normal users.
    We will use the /var/lib/redis directory for this, which we will create

    . . .
    
    
    # The working directory.
    #
    # The DB will be written inside this directory, with the filename specified
    # above using the 'dbfilename' configuration directive.
    #
    # The Append Only File will also be created inside this directory.
    #
    # Note that you must specify a directory here, not a file name.
    dir /var/lib/redis
    
    . . .
    

    Save and close the file when you are finished

  • Next, we can create a systemd unit file so that the init system can manage the Redis process.
    Create and open the /etc/systemd/system/redis.service file to get started:

    $ sudo nano /etc/systemd/system/redis.service
    
  • The file will should like this, create sections below
    [Unit]
    Description=Redis In-Memory Data Store
    After=network.target
    
    [Service]
    User=redis
    Group=redis
    ExecStart=/usr/local/bin/redis-server /etc/redis/redis.conf
    ExecStop=/usr/local/bin/redis-cli shutdown
    Restart=always
    
    [Install]
    WantedBy=multi-user.target
    
  • Save and close file when you are finished

Now, we just have to create the user, group, and directory that we referenced in the previous two files.
Begin by creating the redis user and group. This can be done in a single command by typing:

$ sudo chown redis:redis /var/lib/redis

Now we can start Redis:

  $ sudo systemctl start redis

Check that the service had no errors by running:

$ sudo systemctl status redis

And Eureka – here is the response

redis.service - Redis Server
   Loaded: loaded (/etc/systemd/system/redis.service; enabled; vendor preset: enabled)
   Active: active (running) since Wed 2016-05-11 14:38:08 EDT; 1min 43s ago
  Process: 3115 ExecStop=/usr/local/bin/redis-cli shutdown (code=exited, status=0/SUCCESS)
 Main PID: 3124 (redis-server)
    Tasks: 3 (limit: 512)
   Memory: 864.0K
      CPU: 179ms
   CGroup: /system.slice/redis.service
           └─3124 /usr/local/bin/redis-server 127.0.0.1:6379    

Congrats ! You can now start learning Redis. Connect to Redis CLI by typing

$ redis-cli

Now you can follow these Redis tutorials

Hope this was helpful
My Great Guardian – Watching Redis With Sentinel


redis


Redis Sentinel provides high availability for Redis. If you ever ran SQL Server mirroring or Oracle Golden Gate the concept should be somewhat familiar to you. To start you need to have Redis replication configured with master and N number slaves. From there, you have Sentinel daemons running, be it on your application servers or on the servers Redis is running on. These keep track of the master’s health.

Redis Sentinel provides high availability for Redis. If you ever ran SQL Server mirroring or Oracle Golden Gate the concept should be somewhat familiar to you. To start you need to have Redis replication configured with master and N number slaves. From there, you have Sentinel daemons running, be it on your application servers or on the servers Redis is running on. These keep track of the master’s health.

redis_sent


How does the failover work? Sentinel actually failover by rewriting configuration (conf) files for Redis instances that are running, I already mentioned SLAVEOF command before – https://gennadny.wordpress.com/2015/01/06/meet-redis-masters-slaves-and-scaling-out/, so by rewriting this command failover is achieved

Say we have a master “A” replicating to slaves “B” and “C”. We have three Sentinels (s1, s2, s3) running on our application servers, which write to Redis. At this point “A”, our current master, goes offline. Our sentinels all see “A” as offline, and send SDOWN messages to each other. Then they all agree that “A” is down, so “A” is set to be in ODOWN status. From here, an election happens to see who is most ahead, and in this case “B” is chosen as the new master.

The config file for “B” is set so that it is no longer the slave of anyone. Meanwhile, the config file for “C” is rewritten so that it is no longer the slave of “A” but rather “B.” From here, everything continues on as normal. Should “A” come back online, the Sentinels will recognize this, and rewrite the configuration file for “A” to be the slave of “B,” since “B” is the current master.

The current version of Sentinel is called Sentinel 2. It is a rewrite of the initial Sentinel implementation using stronger and simpler to predict algorithms (that are explained in this documentation).

A stable release of Redis Sentinel is shipped since Redis 2.8. Redis Sentinel version 1, shipped with Redis 2.6, is deprecated and should not be used.

When configuring Sentinel you need to take time and decide where you want to run Sentinel processes. Many folks recommend running those on your application servers. Presumably if you’re setting this up, you’re concerned about write availability to your master. As such, Sentinels provide insight to whether or not your application server can talk to the master. However a lot of folks decide to run Sentinel processes in their Redis instance servers amd that makes sense as well.

If you are using the redis-sentinel executable (or if you have a symbolic link with that name to the redis-server executable) you can run Sentinel with the following command line:

redis-sentinel /path/to/sentinel.conf

Otherwise you can use directly the redis-server executable starting it in Sentinel mode:

redis-server /path/to/sentinel.conf --sentinel

You have to use configuration file when running Sentinel (sentinel.conf) which is separate from Redis configuration file (redis.conf) and this file this file will be used by the system in order to save the current state that will be reloaded in case of restarts. Sentinel will simply refuse to start if no configuration file is given or if the configuration file path is not writable.

By default , Sentinel listens on TCP port 26379, so for Sentinels to work, port 26379 of your servers must be open to receive connections from the IP addresses of the other Sentinel instances. Otherwise Sentinels can’t talk and can’t agree about what to do, so failover will never be performed.

Redis-Sentinel


Some important items to remember on Sentinel

1. You need at least three Sentinel instances for a robust deployment.

2. As per Redis docs, three Sentinel instances should be placed into computers or virtual machines that are believed to fail in an independent way. So for example different physical servers or Virtual Machines executed on different availability zones or application fault domains

3. Sentinel + Redis distributed system does not guarantee that acknowledged writes are retained during failures, since Redis uses asynchronous replication. However there are ways to deploy Sentinel that make the window to lose writes limited to certain moments, while there are other less secure ways to deploy it.

4. You need Sentinel support in your clients. Popular client libraries have Sentinel support, but not all.

5. Test your setup so you know it works. Otherwise you cannot be sure in its performance

Basically. Initial setup expects all nodes running as a master with replication on, with manual set slaveof ip port in redis-cli on futire redis slaves. Then run sentinel and it does the rest.

Minimal redis.conf configuration file looks like this

daemonize yes
pidfile /usr/local/var/run/redis-master.pid
port 6379
bind 10.0.0.1
timeout 0
loglevel notice
logfile /opt/redis/redis.log
databases 1
save 900 1
save 300 10
save 60 10000
stop-writes-on-bgsave-error yes
rdbcompression yes
rdbchecksum yes
dbfilename master.rdb
 
dir /usr/local/var/db/redis/
slave-serve-stale-data yes
slave-read-only no
slave-priority 100
maxclients 2048
maxmemory 256mb
 
# act as binary log with transactions
appendonly yes
 
appendfsync everysec
no-appendfsync-on-rewrite no
auto-aof-rewrite-percentage 100
auto-aof-rewrite-min-size 64mb
lua-time-limit 5000
slowlog-log-slower-than 10000
slowlog-max-len 128
hash-max-ziplist-entries 512
hash-max-ziplist-value 64
list-max-ziplist-entries 512
list-max-ziplist-value 64
set-max-intset-entries 512
zset-max-ziplist-entries 128
zset-max-ziplist-value 64
activerehashing yes
 
client-output-buffer-limit normal 0 0 0
client-output-buffer-limit slave 256mb 64mb 60
client-output-buffer-limit pubsub 32mb 8mb 60

Minimal sentinel.conf configuration file looks like this

port 17700
daemonize yes
logfile "/opt/redis/sentinel.log"
 
sentinel monitor master 10.0.0.1 6379 2
sentinel down-after-milliseconds master 4000
sentinel failover-timeout master 180000
sentinel parallel-syncs master 4

Start all of your redis nodes with redis config and choose master. Then run redis console and set all other nodes as a slave of given master, using command slaveof <ip address 6379>

Start all of your redis nodes with redis config and choose master. Then run redis console and set all other nodes as a slave of given master, using command slaveof <ip address 6379>. Then you can connect to your master and verify, if there are all of your slave nodes, connected and syncing – run info command in your master redis console. Output should show you something like this

role:master
connected_slaves:3
slave0:ip=10.0.0.2,port=6379,state=online,offset=17367254333,lag=1
slave1:ip=10.0.0.3,port=6379,state=online,offset=17367242971,lag=1
slave2:ip=10.0.0.4,port=6379,state=online,offset=17367222381,lag=1

To test, if your sentinel works, just shutdown your redis master and watch sentinel log. You should see something like this

[17240] 04 Dec 07:56:16.289 # +sdown master master 10.24.37.144 6379
[17240] 04 Dec 07:56:16.551 # +new-epoch 1386165365
[17240] 04 Dec 07:56:16.551 # +vote-for-leader 185301a20bdfdf1d5316f95bae0fe1eb544edc58 1386165365
[17240] 04 Dec 07:56:17.442 # +odown master master 10.0.0.1 6379 #quorum 4/2
[17240] 04 Dec 07:56:18.489 # +switch-master master 10.0.0.1 6379 10.0.0.2 6379
[17240] 04 Dec 07:56:18.489 * +slave slave 10.0.0.3:6379 10.0.0.3 6379 @ master 10.0.0.2 6379
[17240] 04 Dec 07:56:18.490 * +slave slave 10.0.0.4:6379 10.0.0.4 6379 @ master 10.0.0.2 6379
[17240] 04 Dec 07:56:28.680 * +convert-to-slave slave 10.0.0.1:6379 10.0.0.1 6379 @ master 10.0.0.2 6379

What is also important to note that latest builds on MSOpenStack Redis for Windows have implemented Sentinel as well. As per http://grokbase.com/t/gg/redis-db/147ezmad89/installing-redis-sentinel-as-windows-service , You could use the following command line to install a sentinel
instance as a service:

redis-server --service-install --service-name Sentinel1
sentinel.1.conf --sentinel*

In this case the arguments passed to the service instance will be “*sentinel.1.conf
–sentinel*”.

Make sure of following

1. The configuration file must be the last parameter of the command line. If another parameter was last, such as –service-name, it would run fine when invoked the command line but would consistently fail went started as a service.

2. Since the service installs a Network Service by default, ensure that it has access to the directory where the log file will be written.

For more on Sentinel see official Redis docs – http://redis.io/topics/sentinel, https://discuss.pivotal.io/hc/en-us/articles/205309388-How-to-setup-HAProxy-and-Redis-Sentinel-for-automatic-failover-between-Redis-Master-and-Slave-servers, http://opentodo.net/2014/05/setup-redis-failover-with-redis-sentinel/, http://tech.3scale.net/2014/06/18/redis-sentinel-failover-no-downtime-the-hard-way/ ,https://seanmcgary.com/posts/how-to-build-a-fault-tolerant-redis-cluster-with-sentinel

Meet Redis in the Clouds – Azure PaaS Introduces Premium Public Preview with Cluster and Persistence

redis_logo

Azure Redis Cache is a distributed, managed cache that helps you build highly scalable and responsive applications by providing faster access to your data. I blogged quite a lot previously on Redis and its features here – https://gennadny.wordpress.com/category/redis/ and on Azure Redis PaaS offering here – https://gennadny.wordpress.com/2015/01/19/forecast-cloudy-using-microsoft-azure-redis-cache/.

The new Premium tier includes all Standard-tier features, plus better performance, bigger workloads, disaster recovery, and enhanced security. Additional features include Redis persistence, which allows you to persist data stored in Redis; Redis Cluster, which automatically shards data across multiple Redis nodes, so you can create workloads using increased memory (more than 53 GB) for better performance; and Azure Virtual Network deployment, which provides enhanced security and isolation for your Azure Redis Cache, as well as subnets, access control policies, and other features to help you further restrict access.

To me a huge disappointment for Redis on Windows (MsOpenTech Redis) and Azure has been inability to scale out across nodes and news of Azure Redis Cluster are particularly welcome.

Redis Cluster provides a way to run a Redis installation where data is automatically sharded across multiple Redis nodes.

Redis Cluster also provides some degree of availability during partitions, that is in practical terms the ability to continue the operations when some nodes fail or are not able to communicate. However the cluster stops to operate in the event of larger failures (for example when the majority of masters are unavailable).

So in practical terms, what you get with Redis Cluster?

  • The ability to automatically split your dataset among multiple nodes
  • The ability to continue operations when a subset of the nodes are experiencing failures or are unable to communicate with the rest of the cluster.

Redis Cluster does not use consistent hashing, but a different form of sharding where every key is conceptually part of what they call an hash slot. Every node in a Redis Cluster is responsible for a subset of the hash slots, so for example you may have a cluster with 3 nodes, where:

  • Node A contains hash slots from 0 to 5500.
  • Node B contains hash slots from 5501 to 11000.
  • Node C contains hash slots from 11001 to 16384.

This allows to add and remove nodes in the cluster easily. For example if I want to add a new node D, I need to move some hash slot from nodes A, B, C to D. Similarly if I want to remove node A from the cluster I can just move the hash slots served by A to B and C. When the node A will be empty I can remove it from the cluster completely. Because moving hash slots from a node to another does not require to stop operations, adding and removing nodes, or changing the percentage of hash slots hold by nodes, does not require any downtime.

Note of caution.

Redis Cluster is not able to guarantee strong consistency. In practical terms this means that under certain conditions it is possible that Redis Cluster will lose writes that were acknowledged by the system to the client.

The first reason why Redis Cluster can lose writes is because it uses asynchronous replication. This means that during writes the following happens:

  • Your client writes to the master A.
  • The master A replies OK to your client
  • The master A propagates the write to its slaves A1, A2 and A3.

As you can see A does not wait for an acknowledge from A1, A2, A3 before replying to the client, since this would be a prohibitive latency penalty for Redis, so if your client writes something, A acknowledges the write, but crashes before being able to send the write to its slaves, one of the slaves (that did not received the write) can be promoted to master, losing the write forever.\

Still this is really exciting news for many of us in Azure NoSQL and Distributed In-Memory Cache world. So I logged into new Azure Portal and yes, creating new Redis Cache I saw a Premium option:

redispremium

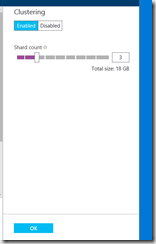
As you create your Redis Premium you can specify number of cluster nodes\shards as well, as well as persistence model for the first time!

redispremium2

Few minutes and I have myself a working 3 node cluster:

image

Now I can access this cluster just like I accessed single Redis instance previously.

My next steps are dig into Azure Redis Cluster deeper so stay tuned for updates.

Announcement from Azure Redis PG – https://azure.microsoft.com/en-us/blog/azure-redis-cache-public-preview-of-premium-tier/

Meet Redis- Connection Limits, Benchmarking And Partitioning

redis

In my previous posts on Redis  I went through basic tutorial for MSOpenTech Redis fork, master\slave setup, configuration, Azure PaaS version and finally monitoring with INFO command. In this post I want to touch on some questions that I ran into while working with Redis at some scale.

Redis 10000 concurrent client limit.

In Redis 2.6 and above and so is in MSOpenTech Redis fork there is a default 10000 client limit set in configuration file (.conf) .Here is my setting on MSOpenTech redis.windows.conf:

# Set the max number of connected clients at the same time. By default
# this limit is set to 10000 clients, however if the Redis server is not
# able to configure the process file limit to allow for the specified limit
# the max number of allowed clients is set to the current file limit
# minus 32 (as Redis reserves a few file descriptors for internal uses).
#
# Once the limit is reached Redis will close all the new connections sending
# an error 'max number of clients reached'.
#
 maxclients 10000

However Redis checks with the kernel what is the maximum number of file descriptors that we are able to open (the soft limit is checked), if the limit is smaller than the maximum number of clients we want to handle, plus 32 (that is the number of file descriptors Redis reserves for internal uses), then the number of maximum clients is modified by Redis to match the amount of clients we are really able to handle under the current operating system limit.

Can I edit that limit higher? Yes, but as above both max number of file descriptors and maxmemory configuration setting then become throttling factors.

Interesting that looking at Redis Azure PaaS , which is based I believe on MSOpenStack fork, I see that 10000 default is present there as well – https://msdn.microsoft.com/en-us/library/azure/dn793612.aspx. Moreover appears that it cannot be changed as per statement on that page – “

The settings in this section cannot be changed using the StackExchange.Redis.IServer.ConfigSet method. If this method is called with one of the commands in this section, an exception similar to the following is thrown:StackExchange.Redis.RedisServerException: ERR unknown command 'CONFIG'.

Any values that are configurable, such as max-memory-policy, are configurable through the portal.”

The Redis client command allows to inspect the state of every connected client, to kill a specific client, to set names to connections. It is a very powerful debugging tool if you use Redis at scale.. Example:

Client List

image

Please timeout your clients for typical activity. By default recent versions of Redis don’t close the connection with the client if the client is idle for many seconds: the connection will remain open forever.
However if you don’t like this behavior, you can configure a timeout, so that if the client is idle for more than the specified number of seconds, the client connection will be closed.
You can configure this limit via configuration in redis.conf or simply using CONFIG SET timeout .

For more see – http://grokbase.com/t/gg/redis-db/127cd55pgv/redis-connection-limit and docs at – http://redis.io/topics/clients

Benchmarking Redis with redis-benchmark utility.

Redis includes the redis-benchmark utility that simulates running commands done by N clients at the same time sending M total queries (it is similar to the Apache’s ab utility). MsOpenTech retains utility and here I will launch it against my local Redis on Windows using n parameter for 100,000 requests.

image

I piped the output into log and here is what I get, I guess I am doing great with huge majority of test requests running under or at 1 ms:

PING_INLINE: -1.#J
PING_INLINE: 132516.80
PING_INLINE: 136782.78
PING_INLINE: 135029.77
====== PING_INLINE ======
  100000 requests completed in 0.74 seconds
  50 parallel clients
  3 bytes payload
  keep alive: 1

99.39% <= 1 milliseconds
100.00% <= 1 milliseconds
135135.14 requests per second

PING_BULK: 142731.48
PING_BULK: 143487.34
====== PING_BULK ======
  100000 requests completed in 0.71 seconds
  50 parallel clients
  3 bytes payload
  keep alive: 1

99.57% <= 1 milliseconds
100.00% <= 1 milliseconds
140056.03 requests per second

SET: -1.#J
SET: 130784.55
SET: 128515.09
SET: 129911.53
====== SET ======
  100000 requests completed in 0.77 seconds
  50 parallel clients
  3 bytes payload
  keep alive: 1

99.46% <= 1 milliseconds
100.00% <= 1 milliseconds
129870.13 requests per second

GET: 130646.16
GET: 133253.94
GET: 124021.30
====== GET ======
  100000 requests completed in 0.81 seconds
  50 parallel clients
  3 bytes payload
  keep alive: 1

99.43% <= 1 milliseconds
100.00% <= 1 milliseconds
123152.71 requests per second

INCR: 127509.44
INCR: 130615.16
INCR: 129090.76
====== INCR ======
  100000 requests completed in 0.77 seconds
  50 parallel clients
  3 bytes payload
  keep alive: 1

99.47% <= 1 milliseconds
100.00% <= 1 milliseconds
129533.68 requests per second

LPUSH: 118755.10
LPUSH: 126949.84
LPUSH: 129224.04
====== LPUSH ======
  100000 requests completed in 0.77 seconds
  50 parallel clients
  3 bytes payload
  keep alive: 1

99.40% <= 1 milliseconds
100.00% <= 1 milliseconds
129701.68 requests per second

LPOP: -1.#J
LPOP: 115243.90
LPOP: 123830.65
LPOP: 123105.90
====== LPOP ======
  100000 requests completed in 0.81 seconds
  50 parallel clients
  3 bytes payload
  keep alive: 1

99.37% <= 1 milliseconds
100.00% <= 1 milliseconds
123762.38 requests per second

SADD: 130807.69
SADD: 127049.38
SADD: 127387.79
====== SADD ======
  100000 requests completed in 0.78 seconds
  50 parallel clients
  3 bytes payload
  keep alive: 1

99.52% <= 1 milliseconds
100.00% <= 1 milliseconds
128205.13 requests per second

SPOP: 140923.91
SPOP: 127520.47
SPOP: 129139.97
====== SPOP ======
  100000 requests completed in 0.81 seconds
  50 parallel clients
  3 bytes payload
  keep alive: 1

99.42% <= 1 milliseconds
100.00% <= 1 milliseconds
123915.74 requests per second

LPUSH (needed to benchmark LRANGE): 94333.34
LPUSH (needed to benchmark LRANGE): 126600.80
LPUSH (needed to benchmark LRANGE): 126906.74
LPUSH (needed to benchmark LRANGE): 120746.34
====== LPUSH (needed to benchmark LRANGE) ======
  100000 requests completed in 0.82 seconds
  50 parallel clients
  3 bytes payload
  keep alive: 1

99.30% <= 1 milliseconds
99.95% <= 2 milliseconds
100.00% <= 2 milliseconds
121212.13 requests per second

LRANGE_100 (first 100 elements): 41164.38
LRANGE_100 (first 100 elements): 42671.72
LRANGE_100 (first 100 elements): 38488.65
LRANGE_100 (first 100 elements): 36693.74
LRANGE_100 (first 100 elements): 37774.33
LRANGE_100 (first 100 elements): 38873.14
LRANGE_100 (first 100 elements): 39933.21
LRANGE_100 (first 100 elements): 39962.87
LRANGE_100 (first 100 elements): 40345.52
LRANGE_100 (first 100 elements): 40035.25
====== LRANGE_100 (first 100 elements) ======
  100000 requests completed in 2.50 seconds
  50 parallel clients
  3 bytes payload
  keep alive: 1

88.73% <= 1 milliseconds
99.77% <= 2 milliseconds
99.85% <= 13 milliseconds
99.90% <= 14 milliseconds
99.95% <= 103 milliseconds
99.95% <= 104 milliseconds
100.00% <= 104 milliseconds
39984.01 requests per second

LRANGE_300 (first 300 elements): 17172.13
LRANGE_300 (first 300 elements): 18250.00
LRANGE_300 (first 300 elements): 18229.90
LRANGE_300 (first 300 elements): 18384.88
LRANGE_300 (first 300 elements): 18076.72
LRANGE_300 (first 300 elements): 17673.47
LRANGE_300 (first 300 elements): 17755.71
LRANGE_300 (first 300 elements): 17886.75
LRANGE_300 (first 300 elements): 17716.30
LRANGE_300 (first 300 elements): 17873.05
LRANGE_300 (first 300 elements): 17899.70
LRANGE_300 (first 300 elements): 17905.61
LRANGE_300 (first 300 elements): 17972.45
LRANGE_300 (first 300 elements): 18034.70
LRANGE_300 (first 300 elements): 18103.56
LRANGE_300 (first 300 elements): 18112.83
LRANGE_300 (first 300 elements): 18114.05
LRANGE_300 (first 300 elements): 18169.71
LRANGE_300 (first 300 elements): 18151.45
LRANGE_300 (first 300 elements): 18005.95
LRANGE_300 (first 300 elements): 18032.99
LRANGE_300 (first 300 elements): 18086.19
====== LRANGE_300 (first 300 elements) ======
  100000 requests completed in 5.52 seconds
  50 parallel clients
  3 bytes payload
  keep alive: 1

0.27% <= 1 milliseconds
93.96% <= 2 milliseconds
99.91% <= 3 milliseconds
99.95% <= 11 milliseconds
99.97% <= 12 milliseconds
99.98% <= 13 milliseconds
100.00% <= 13 milliseconds
18115.94 requests per second

LRANGE_500 (first 450 elements): 9384.62
LRANGE_500 (first 450 elements): 12189.87
LRANGE_500 (first 450 elements): 11904.25

Docs on this utility are available here – http://redis.io/topics/benchmarks

Partitioning.,

I briefly touched on difficulties scaling Redis out in my previous post, and until promised redis cluster is available in earnest (and how soon will it be available on Windows and Azure? ), best way to scale Redis out remains partitioning aka sharding. Partitioning is the process of splitting your data into multiple Redis instances, so that every instance will only contain a subset of your keys. .

Partitioning will allow for following:

  • Much larger databases\Redis stores, using the sum of the memory of many computers. Without partitioning you are limited to the amount of memory a single instance can support.
  • It allows scaling the computational power to multiple cores and multiple computers, and the network bandwidth to multiple computers and network adapters.

Twitter, Instagram and other heavy Redis users have implemented custom partitioning which allowed these companies to scale Redis to their needs. As I started thinking of how to do this couple of methods came to my mind:

  • Classic Range Partitioning. This is accomplished by mapping ranges of objects into specific Redis instances. For example, I could say users from ID 0 to ID 10000 will go into instance R0, while users form ID 10001 to ID 20000 will go into instance R1 and so forth.This system works and is actually used in practice, however, it has the disadvantage of requiring a table that maps ranges to instances. This table needs to be managed and a table is needed for every kind of object, so therefore range partitioning in Redis is often undesirable because it is much more inefficient than other alternative partitioning approaches.
  • Hash Partitioning . Lets say we take the key name and use a hash function (e.g., the crc32 hash function) to turn it into a number. For example, if the key is foobar, crc32(foobar) will output something like 93024922. Then we can use a modulo operation with this number in order to turn it into a number between 0 and 3, so that this number can be mapped to one of our Redis instances.  Although there are few client in Redis that implement consistent hashing out of the box unfortunately some of the most popular do not.

As you may know many features of Redis, such as operations and transactions involving multiple or intersecting keys will not work and adding or removing capacity from Redis will be tricky to say the least. hen partitioning is used, data handling is more complex, for instance you have to handle multiple RDB / AOF files, and to make a backup of your data you need to aggregate the persistence files from multiple instances and hosts.  Moreover what is upsetting with C# StackExchange client connecting to MSOpenTech Redis on Windows or Azure there isn’t anything already built in for you, so you will have to build your own.   Also partitioning may be ok for Redis that is used as a cache store, but for data store may be an issue.  For more see – http://redis.io/topics/partitioning. Some interesting examples are here – http://petrohi.me/post/6323289515/scaling-redis, Twitter proxy implementation – http://antirez.com/news/44

Hope this helps

Meet Redis-Monitoring Redis Performance Metrics

redis

In my previous series on Redis I showed basic Redis tutorial,its abilities to work with complex data types, persist and scale out.  In this post idea is to show basic Redis monitoring facilities through Redis CLI. To analyze the Redis metrics you will need to access the actual data.Redis metrics are accessible through the Redis command line interface(redis-cli). So first I will start my MSOpenTech Redis on Windows Server. As I ran into an issue with default memory mapped file being to large for disk space on my laptop , I will feed it on start up configuration file (conf) which has maxmemory parameter cut to 256 MB. Otherwise I would get an error like:

The Windows version of Redis allocates a large memory mapped file for sharing
he heap with the forked process used in persistence operations. This file
ill be created in the current working directory or the directory specified by
he ‘heapdir’ directive in the .conf file. Windows is reporting that there is
insufficient disk space available for this file (Windows error 0x70).

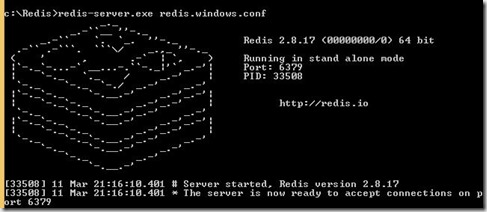
Since I changed maxmemory parameter, but not maxheap parameter which stayed at default 1.5 times maxmemory , my maxheap will be 384 MB (256*1.5).  I do have that much disk space on my laptop for memory mapped file.  As Redis starts I see now familiar screen:

redis_start

Now I can navigate to CLI.

redis_cli

We will use info command to print important information and metrics on our Redis Server. You can use info command to get information on following:

  • server
  • clients
  • memory
  • persistence
  • stats
  • replication
  • cpu
  • commandstats
  • cluster
  • keyspace

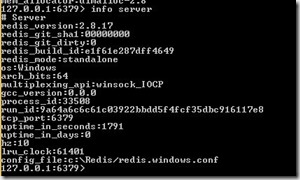
So lets start by getting general information by running info server

redis_info_server

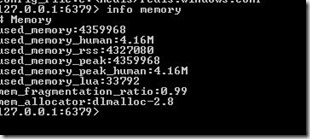
With Redis info memory will probably be one of most useful commands.  Here is me running it:

redis_info_memory

The used_memory metric reports the total number of bytes allocated by Redis. The used_memory_human metric gives the same value in a more readable format.

These metrics reflect the amount of memory that Redis has requested to store your data and the supporting metadata it needs to run. Due to the way memory allocators interact with underlying OS metrics don’t account for memory “lost” due to memory fragmentation and amount of memory reported by this metric may always differ from what is reported by OS.

Memory is critical to Redis performance. If amount of memory used exceeds available memory (used_memory metric>total available memory) the OS will begin swapping and older\unused memory pages will be written to disk to make room for newer\more used memory pages.  Writing or reading from disk is of course much slower that reading\writing to memory and this will have profound effect on Redis performance. By looking at used_memory metric together with OS metrics we can tell if instance is at risk of swapping or swapping has began.

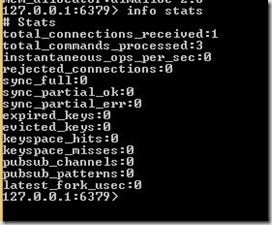
Next we can get some useful statistics by running info stats

redis_info_stats

The total_commands_processed metric gives the number of commands processed by the Redis server. These commands come from clients connected to Redis Server. Each time Redis completes one of 140 possible commands this metric (total_commands_processed)  is incremented. This can be used to do certain measurement of throughput and queuing discovery , if by repeatedly querying this metric (via automated batch or script for example) you see slowdowns and spikes in total_commands_processed this may indicated queuing.

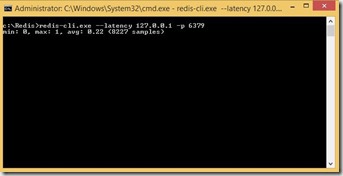
Note that none of these commands really measure latency to server. I found out that there is a way to measure it in Redis CLI. If you open separate command window, navigate to you Redis directory and run redis-cli.exe –latency –h <server>  -p <port> you can get that metric:

redis_latency

The times will depend on your actual setup, but I have read that on typical 1 Gbits/Sec network it should average well under 200 ms. Anything above probably point to an issue.

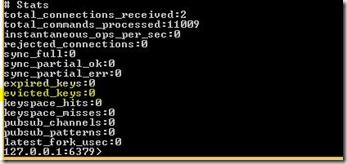
Back to stats another important metric is evicted_keys. This is similar to other alike systems such as AppFabric Cache where I profiled similar metric before. The evicted_keys metric gives the number of keys removed by Redis due to hitting the maxmemory limit. Interesting if you don’t set that limit evictions do not occur, but instead you may see something worse such as swapping and running out of memory. This of evictions therefore as protection mechanism here.  Interesting that when encountering memory pressure and electing to evict, Redis doesn’t necessarily evict oldest item. Instead it relies either on LRU (Least Recently Used) or TTL (Time to Live) cache policies.  You have the option to select between the LRU and TTL eviction policies in the config file by setting maxmemory-policy tovolatile-lru or “volatile-ttl respectively. If you are using Redis as in-memory cache server with expiring keys setting up TTL makes more sense, otherwise if you are using it with non-expiring keys you will probably choose LRU.

redis_info_stats_ek

For more information on info command see – http://www.redis.io/commands/info, http://www.lzone.de/Most%20Important%20Redis%20Commands%20for%20Sysadmins.

Forecast Cloudy – Using Microsoft Azure Redis Cache


In my previous posts I introduced Redis , in particular Microsoft port of that open source technology to Windows by MsOpenTech. In this post I want to show how you can use Azure Cache  version of Redis based on that port that went to general availability around time of Microsoft TechEd 2014 Conference in May 2014.

Creating Azure Redis Cache:

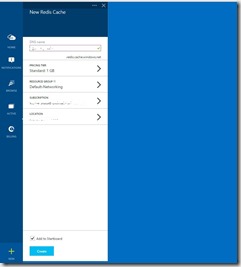
First you will login with your credentials to new Azure Portal at https://portal.azure.com. Pick Browse on home page and New button in lower left corner: Pick Redis Cache

redis_azure2


First enter DNS name, that would be subdomain name to use for the cache endpoint. The endpoint must be a string between six and twenty characters, contain only lowercase numbers and letters, and must start with a letter.

Use Pricing Tier to select the desired cache size and features. Azure Redis Cache is available in the following two tiers.

  • Basic – single node, multiple sizes up to 53 GB.
  • Standard – Two node Master/Slave, 99.9% SLA, multiple sizes up to 53 GB.

For Subscription, select the Azure subscription that you want to use for the cache. In Resource group, select or create a resource group for your cache.

Use Geolocation to specify the geographic location in which your cache is hosted. For the best performance, Microsoft strongly recommends that you create the cache in the same region as the cache client application.

redis_azure3

At this time I will hit create and my cache will be created.  After a bit here is what you see on a portal:

redis_azure4


Using Azure Redis Cache

We start by getting the connection details, this requires 2 steps:

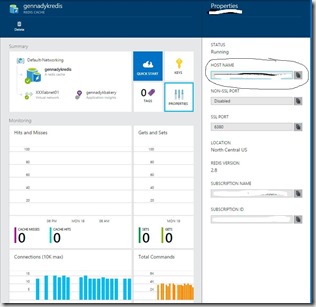
1. Get the URI, which is easy to get using the properties window, as shown below

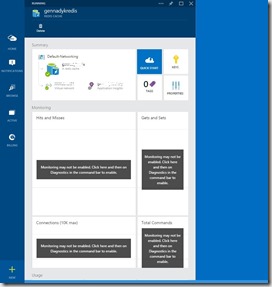
azure_redis12

2. Once you have copied the host name url, we need to copy the password, which you can grab from the keys area

Now that we have these two important bits that we need to connect, lets start using our cache service.

Just like in my on premise demo previously  I will use StackExchange.Redis package from NuGet in my client.  Below is very simple basic way to put\retrieve strings from Azure Redis:

using System;
using System.Collections.Generic;
using System.Linq;
using System.Text;
using System.Threading.Tasks;
using StackExchange.Redis; 

namespace RedisTest
{
    class Program
    {
        static void Main(string[] args)
        {
            ConnectionMultiplexer redis = ConnectionMultiplexer.Connect(",ssl=true,password=");
            IDatabase db = redis.GetDatabase();

            // Perform cache operations using the cache object...
            // Simple put of integral data types into the cache
            db.StringSet("GM", "GENERAL MOTORS");
            db.StringSet("F", "FORD");
            db.StringSet("MSFT", "MICROSOFT");

      
        // Retrieve keys\values from Redis
          
               string value = db.StringGet("GM");
               
                System.Console.Out.WriteLine("GM" + "," + value);
            
            System.Console.ReadLine();


        }
    }

And yet above demo is a bit boring as you usually will not store cache items like this in real time. Therefore a snippet below will use complex classes with properties and magic of JSON serialization to put these in Redis Cache:

using System;
using System.Collections.Generic;
using System.Linq;
using System.Text;
using System.Threading.Tasks;
using StackExchange.Redis;
using Newtonsoft.Json; 
namespace RedisTest
{
    class Program
    {
        static void Main(string[] args)
        {
            ConnectionMultiplexer redis = ConnectionMultiplexer.Connect("gennadykredis.redis.cache.windows.net,ssl=true,password=nsq/4GhGUKu8OidX15Eo6raWhC/Z5KefSnu5uwy1IRo=");
            IDatabase db = redis.GetDatabase();

            // Perform cache operations using the cache object...
            // Simple put of OBJECT data types into the cache
            Product myProd = new Product() { Price=127.99, Description = "Bycicle" };
            var serializedmyProd = JsonConvert.SerializeObject(myProd);
            db.StringSet("serializedmyProd", serializedmyProd);


            Product myProd2 = new Product() { Price = 4999.99, Description = "Motorcycle" };
            var serializedmyProd2 = JsonConvert.SerializeObject(myProd2);
            db.StringSet("serializedmyProd2", serializedmyProd2);

      
        // Retrieve keys\values from Redis

            var myProd3 = JsonConvert.DeserializeObject(db.StringGet("serializedmyProd"));
            var myProd4 = JsonConvert.DeserializeObject(db.StringGet("serializedmyProd2"));
          
            System.Console.Out.WriteLine(myProd3.Description.ToString() + " " + myProd4.Description.ToString()); 
            System.Console.ReadLine();


        }
    }

    class Product
    {
        public string Description  { get; set; }
        public double Price { get; set; }


    }

So as with previous blogs on Redis demo is pretty simple, however it shows you foundation to move deeper as necessary. For more on Redis Cache on Microsoft Azure see – http://azure.microsoft.com/en-us/documentation/services/cache/, http://msdn.microsoft.com/en-us/library/azure/dn690516.aspx, http://msdn.microsoft.com/en-us/library/azure/dn690523.aspx and https://sachabarbs.wordpress.com/2014/11/25/azure-redis-cache/ 

Hope this is helpful as it has been different and fun for myself.

Meet Redis – Masters, Slaves and Scaling Out

redis

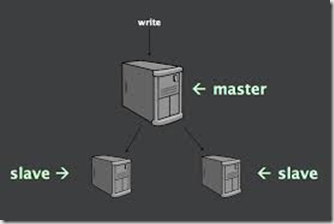
In my previous posts I introduced Redis and attempted to show how it can work with advanced data structures , as well as persistence options. Another important Redis feature is master –slave asynchronous replication. Data from any Redis server can replicate to any number of slaves. A slave may be a master to another slave. This allows Redis to implement a single-rooted replication tree. Redis slaves can be configured to accept writes, permitting intentional and unintentional inconsistency between instances. Replication is useful for read (but not write) scalability or data redundancy.
redis_master_slave

How Redis replication works. According to Redis docs this is workflow description for Redis asynchronous replication:

  • If you set up a slave, upon connection it sends a SYNC command. It doesn’t matter if it’s the first time it has connected or if it’s a reconnection.
  • The master then starts background saving, and starts to buffer all new commands received that will modify the dataset. When the background saving is complete, the master transfers the database file to the slave, which saves it on disk, and then loads it into memory. The master will then send to the slave all buffered commands. This is done as a stream of commands and is in the same format of the Redis protocol itself.
  • Slaves are able to automatically reconnect when the master <-> slave link goes down for some reason. If the master receives multiple concurrent slave synchronization requests, it performs a single background save in order to serve all of them.
  • When a master and a slave reconnects after the link went down, a full resync is always performed. However, starting with Redis 2.8, a partial resynchronization is also possible.

So Redis master-slave replication can be useful in number of scenarios here:

  • Scaling performance by using the replicas for intensive read operations.
  • Data redundancy in multiple locations
  • Offloading data persistency costs in terms of expensive Disk IO (covered in last post) from the master by delegating it to the slaves

So, if replication is pretty useful as far as read-only scale out – how do I configure it? To configure replication is trivial: just add the following line to the slave configuration file (slave instance redis.conf) :

slaveof 

Example:

slaveof 10.84.16.18 6379

More importantly you can use SLAVEOF command in Redis CLI to switch replication on the fly – http://redis.io/commands/slaveof.  If a Redis server is already acting as slave, the command SLAVEOF NO ONE will turn off the replication, turning the Redis server into a MASTER. In the proper form SLAVEOF hostname port will make the server a slave of another server listening at the specified hostname and port.

Since Redis 2.6, slaves support a read-only mode that is enabled by default. This behavior is controlled by the slave-read-only option in the redis.conf file, and can be enabled and disabled at runtime using CONFIG SET.

That’s great, but what if for HA purposes I need an automated failover here from master to slave? Enter Redis Sentinel – system designed to help managing Redis instances.  It does following:

  • Sentinel constantly checks if your master and slave instances are working as expected
  • Sentinel can notify the system administrator, or another computer program, via an API, that something is wrong with one of the monitored Redis instances.
  • If a master is not working as expected, Sentinel can start a failover process where a slave is promoted to master, the other additional slaves are reconfigured to use the new master, and the applications using the Redis server informed about the new address to use when connecting.
  • Sentinel acts as a source of authority for clients service discovery: clients connect to Sentinels in order to ask for the address of the current Redis master responsible for a given service. If a failover occurs, Sentinels will report the new address.

For more on Redis Sentinel see – http://redis.io/topics/sentinel. Unfortunately MSOpenTech port of Redis on Windows doesn’t support this feature so I couldn’t easily test it here, hope that in future blog entry testing Redis on Linux flavor I can show you Sentinel configuration and failover.

However, even through above are great features, there is one item that is missing here that for example was present in AppFabric Cache  – distributed cluster capable of linear scale out for write traffic. Yes, theoretically I can have multiple masters in Redis as well, however you would have to build some sort of sharding mechanism as multiple folks did in Silicon Valley (Instagram and Facebook I believe done so) to scale out. Fortunately, there is a new Redis Cluster Project. Redis Cluster provides a way to run a Redis installation where data is automatically sharded across multiple Redis nodes.

Commands dealing with multiple keys are not supported by the cluster, because this would require moving data between Redis nodes, making Redis Cluster not able to provide Redis-alike performances and predictable behavior under load. Redis Cluster also provides some degree of availability during partitions, that is in practical terms the ability to continue the operations when some nodes fail or are not able to communicate. So here is what you get with Redis Cluster:

  • The ability to automatically split your dataset among multiple nodes (true scale out)
  • The ability to continue operations when a subset of the nodes are experiencing failures or are unable to communicate with the rest of the cluster.

Every Redis Cluster node requires two TCP connections open. The normal Redis TCP port used to serve clients, for example 6379, plus the port obtained by adding 10000 to the data port, so 16379 in the example.This second high port is used for the Cluster bus, that is a node-to-node communication channel using a binary protocol. The Cluster bus is used by nodes for failure detection, configuration update, failover authorization and so forth. Clients should never try to communicate with the cluster bus port, but always with the normal Redis command port, however make sure you open both ports in your firewall, otherwise Redis cluster nodes will be not able to communicate.

To create a cluster, the first thing we need is to have a few empty Redis instances running in cluster mode. This basically means that clusters are not created using normal Redis instances, but a special mode needs to be configured so that the Redis instance will enable the Cluster specific features and commands. Therefore we will add following to configuration (redis.conf):

port 6379
cluster-enabled yes
cluster-config-file nodes.conf
cluster-node-timeout 5000
appendonly yes

As you can see what enables the cluster mode is simply the cluster-enabled directive. Every instance also contains the path of a file where the configuration for this node is stored, that by default is nodes.conf. This file is never touched by humans, it is simply generated at startup by the Redis Cluster instances, and updated every time it is needed.

Note that the minimal cluster that works as expected requires to contain at least three master nodes.

When instances are setup and running cluster node, next you need to create a cluster using Redis Cluster command line utility – redis-trib. The redis-trib utility is in the src directory of the Redis source code distribution. Example of use would be something like:

./redis-trib.rb create host1.domain.com:6379 host2.domain.com:6379

As Redis Cluster is still work in progress check out Redis Cluster Spec – http://redis.io/topics/cluster-spec and doc pages – http://redis.io/topics/cluster-tutorial . For internals and details on Redis Cluster also see this presentation from Redis – http://redis.io/presentation/Redis_Cluster.pdf

Hope this helps.

Meet Redis – Memory, Persistence and Advanced Data Structures


redis

In my previous post I introduced Redis and shown a very basic client application that interacts with it. So with basics covered by that post to want to touch on some more advanced, frequently misunderstood  features of Redis, mainly persistence. Unlike many other NoSQL in-memory distributed  key value stores Redis actually offers data persistence.  There are two main persistence options with Redis:

  • RDB. The RDB persistence (default mode) performs point-in-time snapshots of your dataset at specified intervals
  • AOF. The AOF (append-only file) persistence – which logs every write operation received by the server, that can later be “played” again at server startup, reconstructing the original dataset (commands are logged using the same format as the Redis protocol itself).

As mentioned RDB is default. This method is great for following:

  • RDB is a very compact single-file point-in-time representation of your Redis data. RDB files are perfect for backups
  • RDB is very good for disaster recovery, being a single compact file can be transferred to far data centers or cloud providers (Azure  Storage)
  • Most performing option. The only work the Redis parent process needs to do in order to persist is forking a child that will do all the rest.

However, RDB may not be best for:

  • Not the best HA strategy in case of power or server outage. As you understand all of the data after snapshot is gone on restore. For example if you snapshot every 10 minutes, you may lose up to  last 10 minutes of data.
  • RDB needs to fork() often in order to persist on disk using a child process. Fork() can be time consuming if the dataset is big, and may result in Redis to stop serving clients for some millisecond or even for one second if the dataset is very big and the CPU performance not great

AOF on the other hand logs every write operation and can be replayed on startup (oh how it sounds like SQL transaction logs or Oracle REDO logging) . Pluses for this approach can be:

  • Much more durable, more accepted HA
  • The AOF log is an append only log, so there are no seeks, nor corruption problems if there is a power outage. Even if the log ends with an half-written command for some reason (disk full or other reasons) the redis-check-aof tool is able to fix it easily.
  • Redis is able to automatically rewrite the AOF in background when it gets too big. The rewrite is completely safe as while Redis continues appending to the old file, a completely new one is produced with the minimal set of operations needed to create the current data set, and once this second file is ready Redis switches the two and starts appending to the new one.

Minuses for AOF are quite obvious:

  • Performance overhead and slower write operations.
  • AOF files are usually bigger than the equivalent RDB files for the same dataset.

What should I use for my application?

It depends. If you are using Redis strictly as in-memory distributed cache store backed by some RDBMS, like SQL Server or MySQL, using Cache Aside Pattern – http://msdn.microsoft.com/en-us/library/dn589799.aspx, you may not need persistence outside of occasional backup (lets say every 24 hours) provided by RDB. You will get obviously more transaction performance minimizing any kind of Disk IO. If on the other hand, you want a degree of data safety roughly comparable to database, you should use both persistence methods. If you are somewhere in the middle, care a lot about your data, but still can live with a few minutes of data lose in case of disasters, you can simply use RDB alone. Redis docs discourage use of AOF alone, since to have an RDB snapshot from time to time is a great idea for doing database backups, for faster restarts, and in the event of bugs in the AOF engine. In my opinion, although Redis is fine NoSQL in-memory cache product its no substitute for RDBMS , as it lacks HA and other features of full RDBMS product like SQL Server so don’t attempt to substitute RDBMS with Redis. It’s a different product for different purpose.  

So how do I configure persistence in Redis. Well, we are going back to redis.conf configuration file, in my case as I am running MSOpenTech Redis on Windows its redis.windows.conf

image

Lets start Redis with redis-server.exe

image


Lets configure RDB for my Redis instance to save every 60 sec for at least 1000 keys changed.  We will do it using save parameter:


save 60 1000

Actually this is what I set up in my configuration file:

################################ SNAPSHOTTING  #################################
#
# Save the DB on disk:
#
#   save  
#
#   Will save the DB if both the given number of seconds and the given
#   number of write operations against the DB occurred.
#
#   In the example below the behaviour will be to save:
#   after 900 sec (15 min) if at least 1 key changed
#   after 300 sec (5 min) if at least 10 keys changed
#   after 60 sec if at least 10000 keys changed
#
#   Note: you can disable saving at all commenting all the "save" lines.
#
#   It is also possible to remove all the previously configured save
#   points by adding a save directive with a single empty string argument
#   like in the following example:
#
#   save ""

save 60 10000

Where does RDB dump that snapshot? Well, that’s controlled via dbfilename configuration. Note I will be dumping into my Redis directory (dir configuration parameter) to file dump.rdb

# The filename where to dump the DB
dbfilename dump.rdb

# The working directory.
#
# The DB will be written inside this directory, with the filename specified
# above using the 'dbfilename' configuration directive.
# 
# The Append Only File and the QFork memory mapped file will also be created 
# inside this directory.
# 
# Note that you must specify a directory here, not a file name.
dir ./

Now I will change my application from first post to write 1000 keys to Redis and check what happens.

using System;
using System.Collections.Generic;
using System.Linq;
using System.Text;
using System.Threading.Tasks;
using StackExchange.Redis; 

namespace RedisTest
{
    class Program
    {
        static void Main(string[] args)
        {
            ConnectionMultiplexer redis = ConnectionMultiplexer.Connect("localhost");
            IDatabase db = redis.GetDatabase(0);
            int counter;
            string value;
            string key;
            //Create 5 users and put these into Redis
            for (counter = 0; counter < 999; counter++)
            {
                 value = "user" + counter.ToString();
                 key = "5676" + counter.ToString();
                 db.StringSet(key,value);
            }
      
        // Retrieve keys\values from Redis
            for (counter = 0; counter < 999; counter++)
            {
                key = "5676" + counter.ToString();
                value = db.StringGet(key);
                System.Console.Out.WriteLine(key + "," + value);
            }
            System.Console.ReadLine();


        }
    }
}

And here is my dump file 60 seconds later after execution:

image

Here is how I can restore Redis from dump.rdb:

  • Stop redis (because redis overwrites the current rdb file when it exits).
  • Copy your backup rdb file to the redis working directory (this is the dir option in your redis conf, as you can see above). Also make sure your backup filename matches the dbfilename config option.
  • Change the redis configuration appendonly flag to no (otherwise redis will ignore your rdb file when it starts).
  • Start Redis
  • Run redis-cli BGREWRITEAOF to create a new appendonly file.
  • Restore redis configuration appendonly flag to yes.

Now that we have RDB snapshots working, how do they exactly work. Here what docs state. Whenever Redis needs to dump the dataset to disk, this is what happens:

  • Redis forks. We now have a child and a parent process.
  • The child starts to write the dataset to a temporary RDB file.
  • When the child is done writing the new RDB file, it replaces the old one.

This method allows Redis to benefit from copy-on-write semantics.

What about AOF?  Well you can turn on AOP via appendonly configuration parameter setting it to yes.

appendonly yes

After you set this, every time write is issued via SET it will append to AOF. When you restart Redis it will re-play the AOF to rebuild the state.

In the previous post I showed operating with strings and Redis. But beauty of Redis is its ability to work with more complex data structures, like lists and hashes. Lets fire up Redis CLI and see.

Lists. Lists let you store and manipulate an array of values for a given key. You can add values to the list, get the first or last
value and manipulate values at a given index. Lists maintain their order and have efficient index-based operations. Here I push a new user at the front of the list (users_list) with value gennadyk .

image

Now using LRANGE command I get subset of the list. It takes the index of the first element you want to retrieve as its first parameter and the index of the last element you want to retrieve as its second parameter. A value of -1 for the second parameter means to retrieve all elements in the list.

image

Sets. Sets are used to store unique values and provide a number of set-based operations, like unions. Sets in Redis are not ordered, unless you use Sorted Sets.  Here are use SADD command to add US to set called countries

image

SMEMBERS command returns all of the set members

image

Hashes. Hashes are a good example of why calling Redis a key-value store isn’t quite accurate. You see, in a lot of ways, hashes are like strings. The important difference is that they provide an extra level of indirection: a field. For example , here I am tracking my superheroes such as superman, spiderman and mythical frogman with their power level property in relation to each other:

image

So now I can not only retrieve my superman, but his power level field as well:

image


Sorted Sets. If hashes are like strings but with fields, then sorted sets
are like sets but with a score. The score provides sorting and ranking capabilities. Perhaps my above superheroes sample can be better expressed as sorted set vs. hashes.

There is a to Redis, much more than I can cover without writing a book. Best reference to Redis commands is here – http://redis.io/commands, a very good blog on Redis data structures and CLI – http://stillimproving.net/2013/06/redis-101.

Marius covers Redis Persistence really well in this blog – http://mariuszprzydatek.com/2013/08/29/redis-persistence/, and official Redis persistence docs are here – http://redis.io/topics/persistence, as well as great deeper entry here – http://oldblog.antirez.com/post/redis-persistence-demystified.html 

Hope this helps.

Meet Redis – Running and basic tutorial for MSOpenTech Redis on Windows


redis

If you have worked on Linux and were interested in NoSQL you probably already heard of Redis. Redis is a data structure server. It is open-source, networked, in-memory, and stores keys with optional durability. The development of Redis has been sponsored by Pivotal Software since May 2013; before that, it was sponsored by VMware. According to the monthly ranking by DB-Engines.com, Redis is the most popular key-value store. The name Redis means REmote DIctionary Server. I have heard people refer to Redis as NoSQL data store, since it  provides the feature saving your data into disk. I have heard people refer to it as distributed cache, as it provides in-memory key-value data store. And someone categorized it to the distributed queue, since it supports storing your data into hash and list type and provides the enqueue, dequeue and pub/sub functionalities. So we are talking about a very powerful product here as you can see. Unfortunately while available and fully supported on Linux platform for some time, Redis itself doesn’t officially support Windows. Fortunately Microsoft Open Technologies (http://msopentech.com/) created a port of Redis that runs on Windows and can be downloaded from Git here – https://github.com/MSOpenTech/Redis. I actually installed this port on my laptop a bit ago, however just found some time to explore it now. Unfortunately looks like folks at Redis are not interested in merging any Windows based code patches into main branch, so at this time and foreseeable future MSOpenTech port will be on its own – http://oldblog.antirez.com/post/redis-win32-msft-patch.html

After you install and build Redis on Windows using Visual Studio you should see something like this in your Redis folder

image

This should create the following executables in the msvs\$(Target)\$(Configuration) folder:

  • redis-server.exe
  • redis-benchmark.exe
  • redis-cli.exe
  • redis-check-dump.exe
  • redis-check-aof.exe

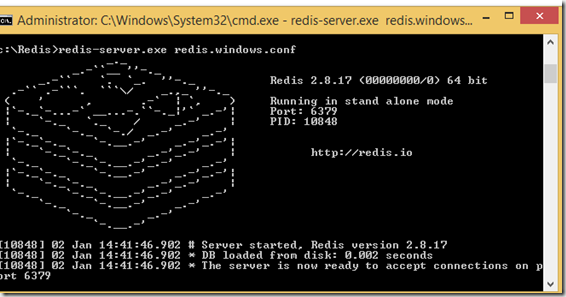
The simplest way to start a Redis server is just to open a command windows and go to this folder, execute the redis-server.exe then you can see the Redis is now running image

I actually ran into an issue during this step. As I started Redis I immediately saw an error like this:

image

So I had to find a configuration file – redis.windows.conf. There I uncommented maxmemory parameter and set it to 256 MB. Why?

The maxheap flag controls the maximum size of this memory mapped file,
as well as the total usable space for the Redis heap. Running Redis
without either maxheap or maxmemory will result in a memory mapped file
being created that is equal to the size of physical memory. During
fork() operations the total page file commit will max out at around:

    (size of physical memory) + (2 * size of maxheap)

For instance, on a machine with 8GB of physical RAM, the max page file
commit with the default maxheap size will be (8)+(2*8) GB , or 24GB. The
default page file sizing of Windows will allow for this without having
to reconfigure the system. Larger heap sizes are possible, but the maximum
page file size will have to be increased accordingly.
 
The Redis heap must be larger than the value specified by the maxmemory
flag, as the heap allocator has its own memory requirements and
fragmentation of the heap is inevitable. If only the maxmemory flag is
specified, maxheap will be set at 1.5*maxmemory. If the maxheap flag is
specified along with maxmemory, the maxheap flag will be automatically
increased if it is smaller than 1.5*maxmemory.

So here comes the curse of modern laptop with small SSD drive. I only have about 15 GB free on my hard disk and 32 GB RAM. Obviously default behavior here of creating memory mapped file size of my RAM will not work, so I cut maxmemory used here accordingly.

To do anything useful here in console mode we actually have to start Redis Console – redis-cli.exe. Redis has the same basic concept of a database that you are already familiar with. A database contains a set of data.The typical use-case for a database is to group all of an application’s data together and to keep it separate from another application’s. In Redis, databases are simply identified by a number with the default database being number 0. If you want to change to a different database you can do so via the select command.

c:\Redis>redis-cli.exe
127.0.0.1:6379> select 0
OK
127.0.0.1:6379>

While Redis is more than just a key-value store, at its core, every one of Redis’ five data structures has at least a key and a value. It’s imperative that we understand keys and values before moving on to other available pieces of information. I will not go into detail on concept of key-value store here, but lets use redis-cli to add a key-value set and retrieve it via console. To add item I will use set command:

c:\Redis>redis-cli.exe
127.0.0.1:6379> select 0
OK
127.0.0.1:6379> set users:gennadyk '("name";"GennadyK","counry","US")'
OK

So I added an item into users with gennadyk as a key. Next I will use get to retrieve my value:

127.0.0.1:6379> get users:gennadyk
"(\"name\";\"GennadyK\",\"counry\",\"US\")"
127.0.0.1:6379>

Next lets see all of my keys present:

127.0.0.1:6379> keys *
1) "users:gennadyk"
127.0.0.1:6379>

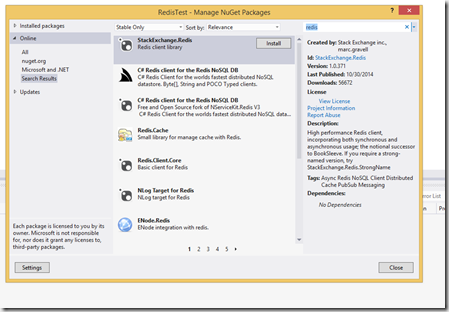
Now that’s basics are done lets create a simple C# application to work with Redis here. I fired  up my VS and started a small Windows console application project named non-surprisingly as Redis test. Next I will go to Manage NuGet packages and pick a client, in my case I will pick StackExchange Redis client library.

image

Just hit Install and you are done here. The code below is pretty simple, but illustrates setting key\value pair strings in Redis and retrieving those as well:

namespace RedisTest
{
    class Program
    {
        static void Main(string[] args)
        {
            ConnectionMultiplexer redis = ConnectionMultiplexer.Connect("localhost");
            IDatabase db = redis.GetDatabase(0);
            int counter;
            string value;
            string key;
            //Create 5 users and put these into Redis
            for (counter = 0; counter < 4; counter++)
            {
                 value = "user" + counter.ToString();
                 key = "5676" + counter.ToString();
                 db.StringSet(key,value);
            }
      
        // Retrieve keys\values from Redis
            for (counter = 0; counter < 4; counter++)
            {
                key = "5676" + counter.ToString();
                value = db.StringGet(key);
                System.Console.Out.WriteLine(key + "," + value);
            }
            System.Console.ReadLine();


        }
    }
}

And here is output

image

Looking at the code, central object in StackExchange.Redis is the  ConnectionMultiplexer  class in the  StackExchange.Redis  namespace; this is the object that hides away the details of multiple servers. Because the  ConnectionMultiplexer  does a lot, it is designed to be shared and reused between callers. You should not create a  ConnectionMultiplexer  per operation. Situation here is very similar to DataCacheFactory with Microsoft Windows AppFabricCache NoSQL client – cache and reuse that ConnectionMultiplexer.

A normal production  scenario might involve a master/slave distributed data store setup; for this usage, simply specify all the desired nodes that make up that logical redis tier (it will automatically identify the master):

ConnectionMultiplexer redis = ConnectionMultiplexer.Connect("myserver1:6379,server2:6379");

Rest is even easier. Next I connect to the database (in my case default ) via GetDatabase call. After that I set 5 key\value pair items making sure keys are unique by incrementing these and retrieve these values in the loop based on the key. 

Checking through redis-cli on my server I can see these values now:

127.0.0.1:6379> keys *
1) "56760"
2) "56761"
3) "users:gennadyk"
4) "56763"
5) "56762"
127.0.0.1:6379>

Some other interesting things that I learned, especially around configuration. I already mentioned maxheap and maxmemory parameters.

Parameter Explanation Default value
Port Listening Port 6379
Bind Bind Host IP 127.0.0.1
Timeout Timeout connection 300 sec
loglevel logging level, there are four values, debug, verbose,
notice, warning
verbose
logfile log mode stdout

Hope this helps. For more see – http://www.databaseskill.com/645056/, http://stevenmaglio.blogspot.com/2014/10/quick-redis-with-powershell.html, https://github.com/StackExchange/StackExchange.Redis